printable rosary guide

Discover a powerful tool for deepening your faith! A printable rosary guide simplifies prayer, aiding reflection on Jesus and Mary’s lives, moving you closer to God․

What is a Rosary?

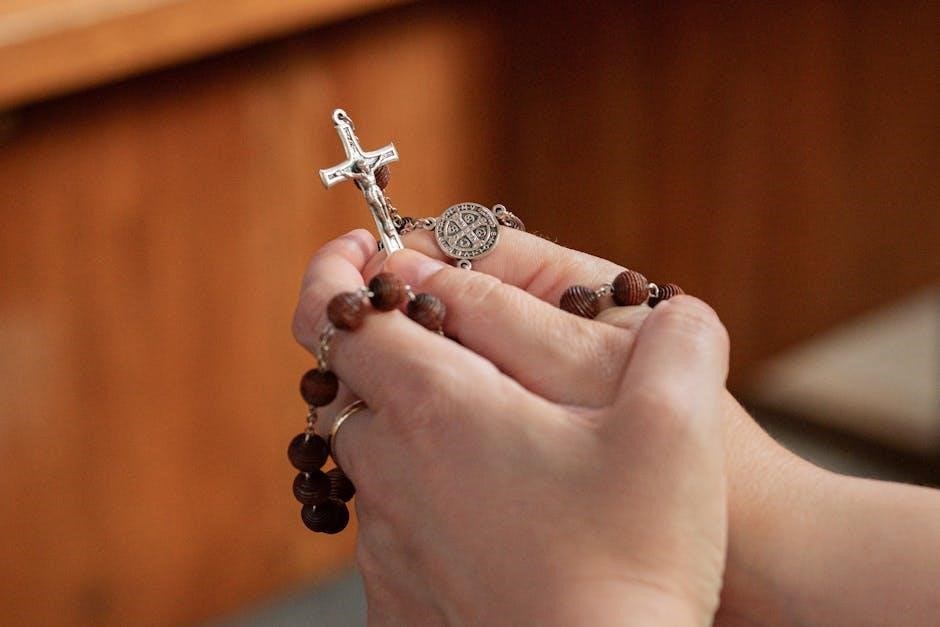
The Rosary is a deeply cherished Catholic devotion, a meditative prayer form centered on contemplating the mysteries of Jesus and Mary’s lives․ It’s more than just beads; it’s a scriptural prayer, a powerful weapon against sin, and a pathway to spiritual growth․ Traditionally, it consists of a crucifix, beads representing the Our Father and Hail Mary prayers, and often a chaplet․

Each decade – a set of ten Hail Marys – focuses on a specific event, called a mystery, encouraging profound reflection․ Utilizing a printable rosary guide enhances this practice, providing structure and focus for a richer prayer experience․

Why Use a Printable Rosary Guide?

A printable rosary guide offers numerous benefits for both seasoned practitioners and beginners․ It provides a visual aid, simplifying the prayer process and preventing confusion about which prayer to recite next․ This is especially helpful when first learning the Rosary’s structure․

Furthermore, a guide can enhance focus, minimizing distractions and deepening meditative reflection on each mystery․ It’s a portable, accessible tool, allowing you to pray the Rosary anywhere, anytime, fostering a consistent prayer life and strengthening your connection with faith․

Understanding the Rosary Components

Explore the key elements: the crucifix, beads for Our Father and Hail Mary prayers, chaplets, and decades – each vital for structured, meditative prayer․

The Crucifix

The crucifix, a central component, serves as a powerful reminder of Christ’s sacrifice and ultimate love for humanity․ Holding it initiates the Rosary prayer, focusing intention on Jesus’s passion․ A printable rosary guide often depicts a detailed crucifix, enhancing this visual connection․ It’s more than just a starting point; it’s a symbol of faith and redemption․

Consider the crucifix a tangible link to the core message of Christianity, prompting contemplation during each decade․ Its presence encourages a deeper, more meaningful prayer experience․

The Beads (Our Father & Hail Mary Beads)

Rosary beads aren’t merely counting tools; they guide meditative prayer․ Larger beads signify the “Our Father,” while smaller beads represent the “Hail Mary․” A well-designed printable rosary guide clearly distinguishes these, aiding focus during recitation․ Each bead marks a prayer, fostering a rhythm of devotion․

These tactile elements help maintain concentration, preventing wandering thoughts․ Utilizing a guide ensures correct bead sequence, enhancing the prayer’s structure and spiritual benefit․ They are essential for a complete Rosary experience․

The Chaplet & Decades

A chaplet comprises five decades, each representing a specific mystery in the lives of Jesus and Mary․ A printable rosary guide visually breaks down these sets, simplifying navigation․ Each “decade” consists of ten Hail Marys, preceded by an Our Father and concluded with a Glory Be․

Understanding this structure is key to effective Rosary prayer․ A clear guide highlights the beginning and end of each decade, preventing confusion․ This organized approach deepens meditative focus, enhancing the spiritual journey through each mystery’s contemplation․

The Four Mysteries of the Rosary

Explore the core of Rosary prayer! These events in salvation history – Joyful, Luminous, Sorrowful, and Glorious – offer profound meditative experiences․

The Joyful Mysteries

Embrace the beginnings of Christ’s life with these uplifting reflections! The Joyful Mysteries – Annunciation, Visitation, Nativity, Presentation in the Temple, and Finding in the Temple – invite contemplation of God’s loving plan․

A printable rosary guide enhances this journey, providing a structured path through each decade․ Reflect on Mary’s ‘yes’ at the Annunciation, her selfless visit to Elizabeth, and the wonder of Jesus’ birth․

Consider the dedication shown at the Presentation and the relief felt when finding Jesus in the Temple․ These mysteries inspire hope and joy within the praying heart․

The Annunciation

Reflect upon the pivotal moment when the angel Gabriel revealed God’s plan to Mary! This printable rosary guide assists in meditating on Mary’s humble acceptance – her courageous “yes” to becoming the Mother of God․

Visualize the scene: the angel’s appearance, Mary’s initial questioning, and her ultimate surrender to divine will․ Consider the immense faith required to embrace such a profound destiny․

This mystery embodies hope, obedience, and the transformative power of God’s grace, beautifully supported by a focused prayer guide․

The Visitation

Contemplate Mary’s journey to visit her cousin Elizabeth, a moment brimming with grace and anticipation! This printable rosary guide encourages reflection on the joy experienced when two mothers, carrying divine children, recognize each other’s sacred roles․

Imagine the encounter: Elizabeth’s inspired greeting, the leaping of John the Baptist in her womb, and the profound humility displayed by Mary in her Magnificat․

This mystery highlights the power of selfless service and the blessings that flow from embracing God’s will, aided by focused prayer․

The Nativity

Reflect upon the humble birth of Jesus Christ, a pivotal moment in salvation history! This printable rosary guide invites you to meditate on the scene in Bethlehem – a stable, a manger, and the loving presence of Mary and Joseph․

Consider the profound humility of God becoming man, choosing poverty and simplicity to enter our world․

Visualize the adoration of the shepherds and the angels’ glorious proclamation․ This mystery embodies God’s immense love for humanity, fostering deeper devotion through prayer․

The Presentation in the Temple

Contemplate the obedience of Mary and Joseph as they presented the infant Jesus in the Temple, fulfilling the law of Moses․ This printable rosary guide aids reflection on this significant event, where Simeon and Anna recognized Jesus as the Messiah;

Ponder Simeon’s prophetic words, foreshadowing both Jesus’ glory and Mary’s sorrow․

Visualize the offering of two doves, symbolizing the family’s poverty and devotion․ This mystery highlights Jesus’ identification with the marginalized and foreshadows his redemptive sacrifice․

The Finding in the Temple

Reflect upon the anxiety of Mary and Joseph when they realized Jesus was missing after their pilgrimage to Jerusalem․ Utilize this printable rosary guide to deeply consider their frantic search and eventual relief․

Imagine the scene in the Temple, with young Jesus engaging in profound discussions with the teachers, astonishing them with his wisdom․

This mystery reveals Jesus’ growing awareness of his divine mission and foreshadows his future role as the ultimate teacher․

The Luminous Mysteries

Embrace the illuminating moments of Christ’s public ministry with this printable rosary guide! These mysteries, added by Pope John Paul II, focus on pivotal events revealing Jesus’ divine identity․

Contemplate the significance of Jesus’ baptism by John the Baptist, marking the beginning of his public life and the descent of the Holy Spirit․

Journey through the Wedding at Cana, witnessing his first miracle and demonstrating his power over nature, strengthening faith․

The Baptism of Jesus

Utilize your printable rosary guide to reflect on this foundational event! The Baptism of Jesus, performed by John the Baptist in the Jordan River, signifies the beginning of Christ’s public ministry․

Witness the opening of the heavens and the descent of the Holy Spirit in the form of a dove, accompanied by God’s voice proclaiming, “This is my beloved Son․”

This mystery highlights Jesus’ humility and solidarity with humanity, paving the way for salvation․

The Wedding at Cana

Employ your printable rosary guide as you contemplate this miracle! At the wedding in Cana, Jesus performs His first public miracle, transforming water into wine, saving the hosts from embarrassment․

This act demonstrates His divine power and foreshadows the abundance of grace offered through Him․ Mary’s faith and intercession play a crucial role in prompting Jesus to act․

Reflect on the significance of this event as a symbol of the New Covenant and the joy of believing․

The Proclamation of the Kingdom

Utilize your printable rosary guide to focus on Jesus’s pivotal message! Following His baptism, Jesus begins to preach, proclaiming the Kingdom of God is at hand, calling for repentance and belief in the Gospel․

This proclamation signifies a radical shift in perspective, inviting people to embrace a new way of life centered on God’s love and forgiveness․

Consider how this message challenges and inspires you to live out your faith daily․

The Transfiguration

Employ your printable rosary guide during contemplation of this radiant event! Jesus ascends a high mountain with Peter, James, and John, where He is gloriously transfigured before them․

His face shines like the sun, and His clothes become dazzling white, revealing His divine glory․ Moses and Elijah appear, conversing with Jesus․

This miraculous display affirms Jesus’s identity as the Son of God, strengthening the apostles’ faith for trials ahead․

The Institution of the Eucharist

Utilize your printable rosary guide while meditating on this sacred moment! During the Last Supper, Jesus institutes the Eucharist, offering His Body and Blood under the appearance of bread and wine․

He commands His apostles to “Do this in memory of me,” establishing a perpetual sacrifice and a source of grace for all believers․

This act demonstrates Jesus’s ultimate love and foreshadows His sacrifice on the cross, nourishing our souls eternally․

The Sorrowful Mysteries

Employ your printable rosary guide to contemplate Jesus’s profound suffering! These mysteries focus on the pain and sacrifice endured during His Passion․

Reflect upon the Agony in the Garden, Scourging at the Pillar, Crowning with Thorns, Carrying of the Cross, and ultimately, the Crucifixion․

Each decade invites deeper empathy and understanding of Christ’s immense love, offering solace and strength through remembrance of His sacrifice for humanity’s salvation․

The Agony in the Garden

Utilize your printable rosary guide as you meditate on Jesus’s intense emotional and spiritual distress in Gethsemane․

He willingly accepted the weight of humanity’s sins, experiencing profound sorrow and pleading with His Father for strength․

This mystery highlights His obedience and love, even in the face of unimaginable suffering․ Contemplate His humanity and divine resolve as you pray each Hail Mary, seeking grace to endure your own trials․

The Scourging at the Pillar

Employ your printable rosary guide to focus on the brutal and unjust suffering inflicted upon Jesus during the scourging․

Visualize the immense physical pain He endured, offered willingly for our redemption․ Reflect on the cruelty of those who condemned Him and the depth of His sacrifice․

As you pray, ask for the strength to forgive those who have wronged you and to bear your own burdens with patience and humility, mirroring Christ’s example․

The Crowning with Thorns

Utilize your printable rosary guide to contemplate the profound humiliation Jesus suffered when crowned with thorns․

Imagine the piercing pain and the mockery He endured, despite being the King of Kings․ Consider the contrast between His divine majesty and the cruel treatment He received․

Pray for the grace to accept suffering with dignity and to recognize Christ’s presence in those who are marginalized and ridiculed․ Seek strength to defend the vulnerable․

The Carrying of the Cross

Employ your printable rosary guide as you reflect on Jesus’ arduous journey to Calvary, bearing the weight of our sins upon His shoulders․

Visualize the physical exhaustion, the relentless taunts, and the immense suffering He willingly endured for our salvation․ Consider the strength required to continue despite such overwhelming hardship․

Pray for the fortitude to carry your own crosses with patience and acceptance, trusting in God’s loving presence during difficult times․

The Crucifixion

Utilize your printable rosary guide to contemplate the ultimate sacrifice – Jesus’ crucifixion․ Picture the agonizing pain, the profound humiliation, and the complete selflessness of His offering․

Reflect on His final words, a plea for forgiveness for those who condemned Him, demonstrating boundless love and mercy․

This moment represents the culmination of God’s plan for our redemption․ Pray for a deeper understanding of the depth of His sacrifice and gratitude for the gift of salvation․

The Glorious Mysteries

Employ your printable rosary guide to journey through the triumphant Glorious Mysteries! These events celebrate Christ’s victory over death and Mary’s exaltation in Heaven․

Visualize the Resurrection, the Ascension, and the descent of the Holy Spirit, empowering the Apostles․

Contemplate the Assumption of Mary, body and soul, into Heaven, and her Coronation as Queen of Heaven and Earth․ These mysteries inspire hope and promise eternal life with God․

The Resurrection

Utilize your printable rosary guide as you reflect upon the glorious Resurrection of Jesus Christ! This pivotal event, the cornerstone of our faith, signifies victory over sin and death․

Imagine the empty tomb, the risen Lord appearing to Mary Magdalene and His disciples, offering proof of His triumph․

Contemplate the profound joy and hope this miracle brings, promising eternal life to all who believe․ This mystery affirms God’s boundless love and power․

The Ascension

Employ your printable rosary guide to meditate on the Ascension of Jesus into Heaven! Following His Resurrection, Christ ascended, gloriously returning to His Father’s side, marking the end of His earthly mission․

Visualize Jesus rising before His apostles’ eyes, enveloped in a cloud, promising to send the Holy Spirit․

This event signifies Christ’s reign at God’s right hand and prepares the way for the Church’s mission․ It’s a moment of both sorrowful farewell and joyful anticipation!

The Descent of the Holy Spirit

Utilize your printable rosary guide while contemplating Pentecost – the Descent of the Holy Spirit! This pivotal event, occurring fifty days after Easter, fulfilled Jesus’ promise to send the Advocate․

Imagine the apostles gathered in the Upper Room, filled with the Holy Spirit, manifesting as tongues of fire․

Empowered by this divine gift, they boldly proclaimed the Gospel, marking the birth of the Church and initiating its worldwide mission; Reflect on this transformative moment!

The Assumption of Mary

Employ your printable rosary guide as you meditate on the Assumption of Mary, a profound testament to her holiness! This dogma affirms that, upon her earthly life’s completion, Mary was taken body and soul into heavenly glory․

It’s a beautiful anticipation of our own resurrection and participation in eternal life with God․

Reflect on Mary’s complete union with her Son, Jesus Christ, and her role as Queen of Heaven․ This mystery offers hope and inspires devotion!

The Coronation of Mary

Utilize your printable rosary guide to contemplate the Coronation of Mary, the final Glorious Mystery! This beautiful event signifies Mary’s recognition as Queen of Heaven and Earth, eternally reigning with her Son, Jesus Christ․

Visualize the Holy Trinity crowning Mary with a radiant crown, acknowledging her supreme dignity and maternal role․

This mystery inspires us to seek Mary’s intercession and strive for heavenly glory, recognizing her as a powerful advocate and loving mother․

How to Pray the Rosary – A Step-by-Step Guide

Follow your printable rosary guide to learn the traditional steps: Sign of the Cross, Apostle’s Creed, Our Father, Hail Mary, and Glory Be—a pathway to prayer!

Making the Sign of the Cross

Begin your Rosary prayer with the Sign of the Cross, a foundational gesture of faith․ Your printable rosary guide will visually remind you of this essential first step․ Touch your forehead, saying, “In the name of the Father,” then your chest, “and of the Son,” followed by your left shoulder, “and of the Holy Spirit․” Finally, bring your hand to your right shoulder, concluding, “Amen․”

This simple act invokes the Holy Trinity and prepares your heart for a deeper connection with God through the Rosary’s mysteries․

Reciting the Apostle’s Creed

Following the Sign of the Cross, your printable rosary guide directs you to recite the Apostle’s Creed․ This ancient profession of faith summarizes core Christian beliefs․ Begin by declaring your belief in God the Father, then in Jesus Christ, His Son, and the Holy Spirit․

Affirm your faith in the Church, the forgiveness of sins, and the resurrection of the body․ Reciting the Creed centers your mind and heart, establishing a firm foundation for the Rosary’s meditative journey․

Praying the Our Father

Your printable rosary guide indicates that after the Apostle’s Creed, you pray the Our Father on the first bead․ This foundational prayer, taught by Jesus Himself, expresses adoration and dependence on God․ Begin with “Our Father, who art in heaven…” and continue through its beautiful petitions․

Ask for God’s kingdom to come, His will to be done, and for daily bread․ Seek forgiveness and protection from temptation, concluding with praise: “For thine is the kingdom…”

Praying the Hail Mary

Following the Our Father on your printable rosary guide, you proceed to the next three beads, reciting the Hail Mary on each․ This prayer beautifully honors the Virgin Mary, the Mother of God․ Begin with “Hail Mary, full of grace…” and reflect on her role in salvation history․

Ask Mary to pray for us sinners, now and at the hour of our death․ Repeating this prayer fosters a deeper connection with Mary and her intercession․

Praying the Glory Be

After completing the Hail Marys on a decade, as indicated on your printable rosary guide, conclude with the Glory Be prayer․ This ancient hymn praises the Holy Trinity – Father, Son, and Holy Spirit – for all eternity․ Begin with “Glory be to the Father…” and contemplate the divine nature of God․

Reciting the Glory Be acknowledges God’s greatness and offers thanks for His blessings, completing each mystery’s prayer cycle․

Using Your Printable Rosary Guide Effectively

Maximize your prayer experience! Select a printable rosary guide format that suits you, and personalize it for focused reflection during each decade’s contemplation․

Choosing a Guide Format

Selecting the right printable rosary guide format enhances your prayer journey․ Consider options like a simple bead layout, displaying each mystery alongside its corresponding beads, or a more detailed guide including prayers and reflections․

Some prefer compact, booklet-style guides for portability, while others opt for larger, visually appealing designs․ Explore different templates online – many offer variations in style and complexity․

Think about your personal preferences and prayer habits․ A minimalist guide might suit those seeking quiet contemplation, while a detailed version aids those new to the Rosary․

Personalizing Your Guide

Transform your printable rosary guide into a cherished prayer companion! Personalization deepens connection․ Add meaningful images, quotes, or artwork reflecting your devotion․ Consider using your favorite colors or fonts for a visually appealing experience․

You could also include specific intentions for each decade, focusing your prayers on loved ones or particular needs․

Handwriting notes or highlighting key passages creates a truly unique and personal guide, fostering a more intimate and focused prayer life․ Make it uniquely yours!

Resources for Further Learning

Expand your understanding of the Rosary with these valuable resources! Explore websites like St․ Thérèse of Carmel Catholic Church for comprehensive guides on how to pray․ Discover ebooks and reports offering deeper insights into the mysteries and benefits of this devotion․

Numerous online communities and webinars provide opportunities to learn from others and share experiences․

GitHub and faith-based platforms often host downloadable guides and prayer materials, enriching your Rosary practice․

symptoms of bad valve guides

Symptoms of Bad Valve Guides: A Comprehensive Overview (as of 04/28/2026)

Recognizing failing valve guides is crucial for engine health. Like a leaky heart valve, issues can remain unnoticed, straining the engine and leading to performance decline and potential damage.

Valve guides are essential components within your engine’s cylinder head, playing a critical role in maintaining precise valve control. These cylindrical components are precisely fitted into the cylinder head and serve as a low-friction surface for the valve stems to move within. Their primary function is to ensure the valves open and close at the correct time and with the proper amount of lift, maximizing engine efficiency and power.

Without properly functioning valve guides, valves can wander off-center, leading to incomplete combustion, reduced power, and increased wear on valve seats and faces. They act as a stabilizing force, preventing side loading and ensuring a tight seal between the valve and the valve seat. This seal is paramount for maintaining compression within the combustion chamber.

Typically constructed from cast iron, bronze, or specialized alloys, valve guides are designed for durability, but are still susceptible to wear over time. Understanding their function is the first step in recognizing the symptoms of their degradation, and ultimately, preventing significant engine damage. Proper valve guide operation is fundamental to overall engine health and longevity.

What Causes Valve Guide Wear and Failure?

Several factors contribute to the wear and eventual failure of valve guides. A primary culprit is normal engine operation – the constant reciprocating motion of the valve stems against the guide material gradually causes abrasion. The quality of lubrication plays a vital role; insufficient oil supply or degraded oil can accelerate wear significantly, increasing friction and heat.

Detonation and pre-ignition create excessive pressure and temperature spikes within the combustion chamber, stressing valve guides and potentially causing them to crack or distort. Contamination, such as carbon buildup or abrasive particles entering the valve train, acts like a grinding paste, rapidly wearing down the guide’s inner surface.

High mileage and aggressive driving habits naturally increase the rate of wear. Furthermore, poor manufacturing quality or improper installation of the valve guides themselves can lead to premature failure. Ignoring early warning signs, like subtle changes in engine performance, allows the problem to escalate, ultimately necessitating more extensive and costly repairs. Regular maintenance and quality components are key to prevention.

Initial, Subtle Symptoms of Worn Valve Guides

Detecting worn valve guides in their early stages can be challenging, as the initial symptoms are often subtle and easily mistaken for other engine issues. A slight decrease in engine smoothness, barely noticeable during normal driving, might be one of the first indicators. You may observe a minor reduction in fuel economy, attributable to inefficient combustion caused by imperfect valve sealing.

A barely perceptible rough idle, especially when the engine is cold, can also signal emerging problems. Some drivers report a slight hesitation during acceleration, though this is often intermittent and difficult to pinpoint. Increased engine noise, a faint ticking or tapping sound, might become audible, particularly at lower RPMs.

These early signs are often dismissed as normal engine quirks. However, ignoring them allows the wear to progress, leading to more pronounced and problematic symptoms. Regular observation and a keen awareness of your vehicle’s normal operating characteristics are crucial for early detection and preventative maintenance.

Increased Oil Consumption – A Key Indicator

A significant and unexplained increase in oil consumption is a prominent symptom of worn valve guides. As the guides wear, oil can seep past the valve seals and into the combustion chamber, where it’s burned along with the fuel-air mixture. This leads to a gradual but noticeable depletion of engine oil between scheduled changes.

Regularly monitoring your oil levels becomes critical. If you find yourself adding oil more frequently than usual, it’s a strong indication of a potential problem. The rate of consumption may initially be slow, but it will typically accelerate as the valve guide wear worsens. This isn’t simply a matter of inconvenience; burning oil creates carbon deposits, further exacerbating engine issues.

Pay attention to the color of your exhaust smoke. While not always present, increased oil consumption often correlates with blue-tinted exhaust fumes. This is a direct result of oil being burned within the cylinders. Addressing increased oil consumption promptly can prevent more serious and costly engine damage.

Blue Smoke from Exhaust – A Visual Clue

The appearance of blue smoke emanating from the exhaust pipe is a visually telling sign of potential valve guide issues. This discoloration isn’t typical and indicates that oil is entering the combustion chamber and being burned alongside the air-fuel mixture. Unlike white smoke (often steam) or black smoke (usually excessive fuel), blue smoke specifically points to oil combustion.

The smoke may be intermittent at first, appearing primarily during acceleration or when the engine is under load. As the valve guides wear further, the blue smoke will likely become more consistent and noticeable, even at idle. Observing when the smoke appears – cold start, warm engine, acceleration – can provide valuable diagnostic clues.

Don’t dismiss this symptom. While other issues can cause blue smoke, worn valve guides are a common culprit. Ignoring it can lead to increased carbon buildup, catalytic converter damage, and ultimately, significant engine problems. A thorough inspection is necessary to confirm the source of the smoke and address the underlying cause.

Engine Misfires and Rough Idling

Experiencing engine misfires and a generally rough idling sensation are frequently associated with deteriorating valve guides. When valve guides are worn, they can’t properly seal the valve stem, leading to inconsistent valve closure. This imperfect seal disrupts the precise air-fuel mixture needed for efficient combustion.

Misfires manifest as a stuttering or jerking during acceleration or a noticeable unevenness when the engine is at a standstill. The engine may shake more than usual, and the overall driving experience becomes less smooth. These symptoms often worsen as the engine warms up and the valve guides expand with heat, exacerbating the existing clearances.

A rough idle is a direct consequence of the inconsistent combustion across cylinders. The engine control unit (ECU) attempts to compensate, but it can only do so much with compromised valve sealing. Ignoring these signs can lead to further engine strain and potential damage to other components. Prompt diagnosis is crucial.

Loss of Engine Power and Performance

A noticeable decline in engine power and overall performance is a significant indicator of potential valve guide issues. As valve guides wear, the compromised valve seal results in incomplete combustion, directly impacting the engine’s ability to generate optimal horsepower and torque. Drivers may find themselves needing to press the accelerator harder to achieve the same level of acceleration.

This power loss isn’t typically sudden; it’s a gradual degradation that can be easily dismissed as normal wear and tear. However, the cumulative effect of inefficient combustion across multiple cylinders significantly reduces the engine’s output. Uphill climbs may feel more strenuous, and merging onto highways requires more planning and effort.

Reduced performance extends beyond acceleration; it also affects the engine’s responsiveness. The engine may feel sluggish and less eager to rev, impacting the overall driving experience. Addressing worn valve guides is essential to restore the engine’s original power and performance capabilities, preventing further deterioration.

Difficulty Starting the Engine

Experiencing increased difficulty starting the engine, particularly when it’s cold, can be a telltale sign of worn valve guides. The compromised valve seal allows oil to seep into the combustion chamber overnight. This excess oil fouls the spark plugs, hindering their ability to ignite the air-fuel mixture efficiently.

The engine may require multiple attempts to start, with prolonged cranking before it finally catches. Once started, it might run unevenly for a short period until the excess oil burns off. This issue is exacerbated in colder temperatures, as the oil becomes thicker and more resistant to vaporization.

While a weak battery or faulty starter can also cause starting problems, consistently struggling to start the engine, especially after it has been sitting, strongly suggests a valve guide issue. Ignoring this symptom can lead to further complications and potentially prevent the engine from starting altogether, necessitating costly repairs.

Ticking or Clicking Noises from the Engine

A noticeable ticking or clicking sound emanating from the engine, particularly at idle or during low-speed operation, can indicate worn valve guides. This noise arises from the excessive valve lash – the clearance between the valve stem and the rocker arm or camshaft follower. As the valve guide wears, the valve stem loses its precise alignment, creating a loose connection.

The ticking sound is most prominent when the engine is cold and tends to diminish, but not disappear entirely, as the engine warms up and the metal components expand. However, the sound will likely return when the engine cools down again. It’s crucial to differentiate this ticking from the normal sounds of engine operation.

Ignoring these noises can lead to more significant problems. The constant movement and impact can further damage the valve guides, valve seats, and even the valves themselves. A timely diagnosis and repair are essential to prevent costly engine damage and maintain optimal performance.

Valve Guide Wear and Compression Loss

Worn valve guides directly contribute to compression loss within the engine cylinders. When the guides are excessively worn, the valves cannot seat properly against the valve seats during the compression stroke. This imperfect seal allows combustion gases to escape past the valves, reducing the cylinder’s ability to build pressure.

The result is diminished engine power and efficiency. Compression loss is often most noticeable during acceleration or when climbing hills, as the engine struggles to maintain speed. This loss can also manifest as a rough or uneven idle, as different cylinders experience varying degrees of compression.

Furthermore, the escaping combustion gases can cause carbon buildup around the valve seats, exacerbating the sealing problem and accelerating valve guide wear. Addressing valve guide issues promptly is vital to restore compression, optimize engine performance, and prevent further damage to critical engine components.

How Worn Valve Guides Affect Fuel Efficiency

Worn valve guides significantly impact fuel efficiency by disrupting the optimal air-fuel mixture and combustion process. When valves don’t seal correctly due to guide wear, it leads to incomplete combustion within the cylinders. This means that a portion of the fuel isn’t fully burned, resulting in wasted fuel and reduced mileage.

The engine’s computer attempts to compensate for the combustion inefficiencies by injecting more fuel to maintain performance. However, this ultimately leads to a higher fuel consumption rate. Drivers may notice a gradual decline in gas mileage without any apparent changes in driving habits.

Moreover, the increased strain on the engine caused by worn valve guides forces it to work harder, further contributing to fuel wastage. Addressing valve guide issues isn’t just about restoring power; it’s also a crucial step towards improving fuel economy and reducing operating costs.

The Relationship Between Valve Guides and Cylinder Head Damage

Neglecting worn valve guides can escalate into significant cylinder head damage, creating a costly repair scenario. As valve guides deteriorate, the valves themselves can begin to wobble and move erratically. This unstable movement causes the valve head to impact the piston or the cylinder wall, leading to scoring and potential cracking.

Over time, this constant impact can warp the cylinder head, compromising its structural integrity. The valve seats, which ensure a tight seal, can also become damaged, exacerbating combustion leaks and further reducing engine efficiency. Severe cases may necessitate complete cylinder head replacement.

Furthermore, metal fragments from the damaged valve guides and valves can circulate within the engine, causing abrasive wear to other critical components. Addressing valve guide issues promptly prevents a cascade of damage, safeguarding the cylinder head and minimizing overall repair expenses.

Diagnosing Bad Valve Guides: Visual Inspection

A thorough visual inspection is the first step in diagnosing potential valve guide issues. This involves removing the valve cover(s) to directly observe the valve stems and guides. Look for excessive oil accumulation around the valve seals – a common sign of guide wear allowing oil to seep past.

Inspect the valve stems themselves for scoring or unusual wear patterns. A worn guide will often cause the valve stem to exhibit a polished or uneven surface due to constant friction. Gently attempt to move each valve stem; excessive play or wobble indicates a loose guide.

Carefully examine the valve guide bores for signs of ovalization or damage. A flashlight and mirror can be helpful for inspecting hard-to-reach areas. While a visual inspection provides initial clues, it’s often insufficient for a definitive diagnosis and should be combined with other tests for accurate assessment.

Diagnosing Bad Valve Guides: Leak-Down Test

The leak-down test is a more precise method for identifying valve guide issues than a simple visual inspection. This test involves pressurizing each cylinder with compressed air while the piston is at Top Dead Center (TDC) on the compression stroke.

Listen carefully for air escaping from several locations: the exhaust pipe, the intake manifold, and the oil filler cap. Air escaping through the exhaust valve strongly suggests a leaking exhaust valve or, critically, a worn valve guide preventing a proper seal. Similarly, air escaping into the intake indicates an intake valve issue.

Significant air leakage past the piston rings will be evident through the oil filler cap. However, a consistent, noticeable leak specifically at the valve(s) points directly to valve guide wear. This test helps pinpoint the source of compression loss, differentiating between valve guide problems and other engine issues, offering a more definitive diagnosis.

Diagnosing Bad Valve Guides: Cylinder Compression Test

A cylinder compression test is a fundamental diagnostic step when suspecting valve guide wear. This test measures the peak compression pressure within each cylinder, revealing potential sealing issues. Lower-than-expected compression in one or more cylinders can indicate a problem, but doesn’t pinpoint the exact cause.

Performing the test involves removing all spark plugs and then screwing a compression gauge into each cylinder, one at a time. The engine is then cranked over several times while the gauge records the maximum pressure achieved. A significant difference in compression between cylinders – typically exceeding 10-15% – is a red flag.

While a low reading suggests a problem, it could stem from worn piston rings, a damaged cylinder head gasket, or, importantly, leaky valves due to worn guides. To further isolate the issue, a “wet” compression test can be performed by adding a small amount of oil into the cylinder; if compression increases, rings are likely the culprit. If it remains low, focus shifts to valves and guides.

Repair Options: Valve Guide Replacement

Valve guide replacement is a common and often effective repair for addressing worn or damaged guides. This procedure involves removing the cylinder head and pressing out the old guides, then installing new ones. It’s a precision job, requiring specialized tools and expertise to ensure proper alignment and fit.

The process typically includes careful measurement of the valve stem-to-guide clearance to select the correct size replacement guides. The new guides are often installed using a hydraulic press or specialized driver tools, followed by reaming to achieve the precise interference fit. Ensuring the guides are perfectly straight and properly seated is critical for optimal valve control.

Following guide replacement, the valve seats are typically inspected and resurfaced to ensure a proper seal. The entire cylinder head is then reassembled with new valve stem seals, and the head is reinstalled onto the engine. This repair restores proper valve function, reducing oil consumption and improving engine performance. It’s a cost-effective alternative to full cylinder head replacement.

Repair Options: Cylinder Head Replacement

When valve guide wear is extensive, or if the cylinder head itself exhibits significant damage – such as cracks or severe corrosion – complete cylinder head replacement may be the most practical solution. This involves removing the damaged head and installing a new or remanufactured unit. While more expensive than valve guide replacement alone, it offers a comprehensive fix.

A replacement head typically comes fully assembled with new valves, valve springs, and valve stem seals, eliminating the need to transfer components from the old head. This ensures all critical parts are in optimal condition. Installation involves carefully torquing the head bolts to the manufacturer’s specifications and adjusting valve lash.

Choosing a remanufactured cylinder head can provide a cost-effective alternative to a brand-new unit. Remanufactured heads are thoroughly inspected, cleaned, and repaired, with worn components replaced. This option offers a reliable solution while minimizing expense. Cylinder head replacement effectively restores engine performance and addresses underlying issues, providing long-term reliability.

Preventing Premature Valve Guide Wear

Proactive maintenance is key to extending valve guide life and avoiding costly repairs. Regular oil changes with high-quality oil are paramount, ensuring proper lubrication and reducing friction within the valve train. Using the correct oil viscosity, as specified by the vehicle manufacturer, is crucial for optimal protection.

Allowing the engine to warm up fully before subjecting it to high loads prevents excessive wear during cold starts. Avoiding prolonged periods of idling, which can lead to oil dilution and reduced lubrication, is also beneficial. Regularly inspecting the cooling system ensures proper temperature regulation, preventing overheating that can damage valve guides.

Addressing any engine issues promptly, such as coolant leaks or excessive oil consumption, prevents further damage. Maintaining a clean air filter prevents abrasive particles from entering the engine and accelerating wear. Consistent, careful driving habits, avoiding aggressive acceleration and high-RPM operation, contribute significantly to valve guide longevity and overall engine health.

guide pin

Guide pins‚ essential components in various industries‚ offer precise alignment and positioning. Recent discussions highlight their role‚ mirroring the precision found in automotive reliability—like Toyota’s enduring value.

What are Guide Pins?

Guide pins are cylindrical or specialized fasteners meticulously engineered to constrain or direct movement within a system. They function as locating devices‚ ensuring accurate alignment during assembly‚ operation‚ or maintenance procedures. Unlike typical fasteners‚ their primary role isn’t clamping force‚ but rather precise guidance.

Consider the meticulous construction of automobiles‚ like those highlighted for their durability – a Toyota Corolla‚ for instance‚ maintains value well. Similarly‚ guide pins provide consistent‚ reliable positioning. They are crucial in molds‚ dies‚ and fixtures where repeatable accuracy is paramount. Their design can vary‚ influencing load capacity and wear resistance‚ mirroring the diverse range of rolling pins each suited for a specific task.

Historical Development of Guide Pins

The evolution of guide pins parallels the broader advancements in precision manufacturing. Initially‚ simple dowel pins served as rudimentary guides‚ evolving alongside the need for increasingly accurate tooling. As industries like automotive manufacturing – exemplified by Toyota’s consistent reliability – demanded tighter tolerances‚ so too did guide pin technology.

Early iterations likely utilized readily available materials like brass. The mid-20th century saw the rise of hardened steel pins‚ offering superior wear resistance. Limited-edition vehicles‚ like the Le Collection Numéro 271‚ demonstrate a focus on detail; similarly‚ guide pin development prioritized precision. Today‚ materials like stainless steel and specialized plastics cater to diverse applications‚ reflecting ongoing innovation and refinement.

Types of Guide Pins

Diverse guide pin types – straight‚ tapered‚ stepped‚ and ball nose – cater to specific application needs‚ mirroring the variety in automotive choices and cabin configurations.

Straight Guide Pins

Straight guide pins represent the most fundamental and widely utilized type‚ characterized by their consistent diameter along their entire length. These pins excel in applications demanding simple‚ direct alignment‚ offering reliable performance in scenarios where angular guidance isn’t a primary concern. Their straightforward design contributes to cost-effectiveness and ease of manufacturing‚ making them a staple in numerous industries.

Similar to the consistent reliability of brands like Toyota‚ straight guide pins provide a dependable solution for basic positioning needs. They are frequently employed in mold and die work‚ assembly fixtures‚ and various machine tooling applications where precise linear movement is crucial. The simplicity of their form doesn’t diminish their importance; they are foundational elements in many precision engineering processes.

Tapered Guide Pins

Tapered guide pins introduce a unique advantage through their conical shape‚ facilitating easier insertion and removal‚ particularly in tight-fitting applications. This design minimizes the risk of damage to mating components during assembly and disassembly‚ a crucial benefit in sensitive tooling environments. The taper also allows for self-alignment‚ compensating for minor misalignments during the joining process.

Much like the careful engineering found in automotive design – ensuring components fit seamlessly – tapered pins offer a refined solution for precision alignment. They are often preferred in mold applications where frequent changes are required‚ and in fixtures demanding quick and reliable component exchange. Their design promotes smooth operation and reduces potential for binding‚ enhancing overall efficiency.

Stepped Guide Pins

Stepped guide pins‚ characterized by multiple diameters along their length‚ provide versatile functionality in applications requiring varying degrees of clearance or interference fits. This design allows for a secure hold in one section while permitting free movement in another‚ ideal for complex assembly sequences. The stepped configuration can also accommodate different material thicknesses or component geometries.

Similar to the tiered seating arrangements in aircraft cabins (V‚ H‚ W‚ P‚ L)‚ stepped pins offer a structured approach to alignment. They excel in situations where a single pin needs to fulfill multiple roles‚ offering a cost-effective and space-saving solution. Their adaptability mirrors the diverse needs of modern manufacturing‚ ensuring precise positioning across a range of applications and tolerances.

Ball Nose Guide Pins

Ball nose guide pins feature a hemispherical end‚ offering a self-aligning capability crucial for applications where precise centering is paramount‚ even with slight misalignments. This design minimizes stress concentration and reduces the risk of damage to mating components during assembly. The rounded tip allows for smooth entry and exit‚ enhancing the overall efficiency of the process.

Much like the diverse collection of rolling pins – each shape and material serving a specific purpose – ball nose pins are specialized tools. They excel in scenarios demanding gentle guidance‚ akin to carefully navigating a limited-edition vehicle like the Le Collection Numéro 271. Their forgiving nature makes them ideal for delicate assemblies and high-precision tooling.

Materials Used in Guide Pin Manufacturing

Guide pins utilize diverse materials—steel‚ stainless steel‚ brass‚ and plastics—selected for strength‚ durability‚ and resistance to wear‚ mirroring automotive material choices.

Steel Guide Pins (Various Grades)

Steel guide pins represent the most common type‚ prized for their exceptional strength and cost-effectiveness. Numerous steel grades are employed‚ each tailored to specific application demands. High-carbon steel offers superior hardness and wear resistance‚ ideal for high-volume production molds. Alloy steels‚ incorporating elements like chromium or molybdenum‚ enhance toughness and resistance to deformation under load.

The selection hinges on factors like anticipated loads‚ operating temperatures‚ and the corrosive environment. Heat treatment processes—hardening‚ tempering‚ and case hardening—further refine steel properties. Proper heat treatment is crucial for achieving optimal performance and longevity. Considering the automotive industry’s focus on durability‚ similar principles apply to steel guide pin selection‚ ensuring reliable performance over extended periods.

Stainless Steel Guide Pins

Stainless steel guide pins are favored when corrosion resistance is paramount‚ offering superior performance in harsh environments. Various grades‚ such as 303‚ 304‚ and 420 stainless steel‚ cater to diverse needs. 303 provides excellent machinability‚ while 304 excels in general corrosion resistance. 420 stainless steel offers increased hardness and wear resistance‚ approaching that of some carbon steels.

These pins are frequently chosen in applications involving exposure to moisture‚ chemicals‚ or extreme temperatures. Like the long-term reliability valued in automobiles—such as a Toyota Corolla retaining its value—stainless steel guide pins ensure consistent performance and minimize maintenance. While generally more expensive than carbon steel‚ their longevity often justifies the initial investment.

Brass Guide Pins

Brass guide pins‚ known for their excellent machinability and inherent corrosion resistance‚ are a popular choice in specific applications. Their softer nature compared to steel makes them ideal where minimizing damage to mating components is crucial – preventing wear on delicate molds or fixtures. Different brass alloys offer varying properties; some prioritize machinability‚ while others enhance strength.

Similar to appreciating the craftsmanship in automotive manufacturing‚ brass guide pins represent a balance of functionality and material properties. While not as strong as steel‚ their resistance to corrosion and ease of fabrication make them suitable for less demanding‚ yet precise‚ alignment tasks. They are often found in applications where spark resistance is also a requirement.

Plastic Guide Pins

Plastic guide pins represent a cost-effective and lightweight solution for non-critical alignment applications. Offering excellent damping properties‚ they reduce noise and vibration during operation‚ a benefit akin to the smooth ride quality sought in modern vehicles. Various polymers‚ like nylon and acetal‚ are employed‚ each providing a unique balance of strength‚ wear resistance‚ and chemical compatibility.

While lacking the strength of metal counterparts‚ plastic guide pins excel in environments where corrosion is a major concern or where electrical insulation is required. They are frequently used in assembly fixtures and low-load applications‚ mirroring the focus on durability and value seen in models like the Toyota Corolla. Their lower cost allows for frequent replacement if needed.

Applications of Guide Pins

Guide pins are vital in mold and die work‚ assembly fixtures‚ machine tooling‚ and robotics—ensuring precision‚ much like the reliability of automotive manufacturing.

Mold and Die Applications

Guide pins are absolutely critical within mold and die sets‚ functioning to precisely align die halves during the molding or stamping process. This alignment is paramount for maintaining dimensional accuracy and preventing flash or other defects in the finished parts. They withstand substantial forces and repeated cycles‚ demanding robust materials like high-grade steel or stainless steel.

Their consistent performance directly impacts production efficiency and part quality. The selection of appropriate guide pin dimensions and materials is crucial‚ considering factors like mold size‚ clamping force‚ and the type of material being processed. Proper lubrication and maintenance are also essential to extend their lifespan and ensure continued precision‚ mirroring the care needed for reliable automotive components.

Assembly Fixtures

Guide pins play a vital role in assembly fixtures‚ ensuring accurate and repeatable positioning of components during manufacturing processes. They facilitate quick and precise alignment‚ reducing assembly time and minimizing errors. These pins act as locating elements‚ guiding parts into their correct orientation before fastening or joining.

The use of guide pins in fixtures is particularly important for complex assemblies requiring tight tolerances. Similar to the precision needed in automotive manufacturing – exemplified by Toyota’s reliability – accurate alignment is key. Materials are selected based on load requirements and wear resistance‚ often utilizing hardened steel for durability and longevity‚ ensuring consistent performance throughout the assembly process.

Machine Tooling

Guide pins are integral to machine tooling‚ providing crucial support and alignment for various machining operations. They function as locating devices within jigs and fixtures‚ ensuring consistent workpiece positioning relative to the cutting tool. This precision is paramount for achieving accurate dimensions and surface finishes‚ mirroring the exacting standards found in automotive production‚ like those upheld by Toyota.

In applications like drilling‚ milling‚ and tapping‚ guide pins maintain stability and prevent unwanted movement during the machining process. Materials chosen for these pins often include hardened steel or stainless steel‚ offering resistance to wear and deformation. Proper selection and maintenance of guide pins are essential for maximizing tooling lifespan and maintaining machining accuracy.

Robotics and Automation

Guide pins play a vital role in robotics and automation systems‚ enabling precise and repeatable movements of robotic arms and end-effectors. They act as alignment features within automated assembly lines‚ ensuring accurate component placement and fastening‚ much like the precise fit and finish expected in modern automobiles‚ such as those produced by Toyota.

In robotic cells‚ guide pins facilitate quick tool changes and fixture positioning‚ minimizing downtime and maximizing production efficiency. Their robust construction and dimensional stability are crucial for withstanding the high-speed‚ repetitive cycles inherent in automated processes. Selecting appropriate materials‚ like hardened steel‚ ensures longevity and reliability within these demanding environments.

Guide Pin Standards and Tolerances

Guide pin manufacturing adheres to ANSI/ASME‚ DIN‚ and ISO standards‚ ensuring interchangeability and quality—similar to cabin class codes (Y‚ F‚ C) for aircraft seating.

ANSI/ASME Standards

ANSI (American National Standards Institute) and ASME (American Society of Mechanical Engineers) collaboratively establish crucial guidelines for guide pin dimensions‚ materials‚ and performance characteristics. These standards prioritize precision and reliability‚ mirroring the meticulous attention to detail seen in automotive manufacturing‚ like Toyota’s commitment to durability.

Specifically‚ these standards define acceptable tolerances for diameter‚ straightness‚ and surface finish‚ ensuring consistent functionality across different applications. They also cover material specifications‚ often referencing steel grades and hardness requirements. Adherence to ANSI/ASME standards facilitates seamless integration within assembly fixtures‚ mold designs‚ and machine tooling‚ promoting interoperability and reducing potential errors—much like standardized cabin codes (Y‚ F‚ C) simplify air travel logistics.

DIN Standards

DIN (Deutsches Institut für Normung – German Institute for Standardization) provides a comprehensive set of standards governing guide pin manufacturing and application‚ particularly prevalent in European engineering. These standards‚ like the meticulous detail in limited-edition car collections (Le Collection Numéro 271)‚ emphasize precision and interchangeability.

DIN standards specify dimensional accuracy‚ material composition‚ and hardness levels for various guide pin types. They often detail surface finish requirements and geometric tolerances‚ ensuring consistent performance in demanding applications like mold and die work. Compliance with DIN standards guarantees compatibility within European machinery and tooling‚ fostering efficient production processes. Similar to how Kelley Blue Book assesses vehicle value‚ DIN standards provide a benchmark for quality and reliability.

ISO Standards

ISO (International Organization for Standardization) develops globally recognized standards for guide pins‚ promoting international compatibility and quality control. Much like the diverse range of rolling pins available‚ ISO standards cover a broad spectrum of guide pin specifications‚ ensuring consistent performance across different manufacturing environments.

ISO standards define dimensional tolerances‚ material properties‚ and testing procedures for guide pins. These standards facilitate seamless integration of components sourced from various global suppliers‚ mirroring the international appeal of brands like Toyota. Adherence to ISO guidelines ensures that guide pins meet stringent quality requirements‚ enhancing reliability and reducing the risk of failures in critical applications. They are vital for maintaining precision‚ similar to aircraft cabin classifications (V‚ H‚ W‚ etc.).

Selecting the Right Guide Pin

Choosing guide pins demands careful consideration of load‚ wear‚ and precision needs—much like selecting a reliable car‚ such as a Toyota Corolla‚ for long-term value.

Load Capacity Considerations

Determining the appropriate load capacity for guide pins is paramount to ensuring reliable performance and preventing premature failure. This involves a thorough understanding of the forces acting upon the pin during operation‚ including static loads‚ dynamic loads‚ and potential shock loads.

Factors such as pin diameter‚ material strength‚ and pin length all contribute to its overall load-bearing capability. Larger diameter pins generally exhibit higher load capacities‚ while stronger materials‚ like high-grade steel‚ can withstand greater stresses.

Furthermore‚ the pin’s length influences its susceptibility to bending and buckling under load. Careful calculation and consideration of these variables are crucial for selecting a guide pin that can safely and effectively handle the anticipated loads‚ mirroring the importance of vehicle durability‚ like that of a Toyota.

Wear Resistance Requirements

Assessing wear resistance is critical when selecting guide pins‚ particularly in applications involving frequent movement or abrasive environments. The longevity of a guide pin directly impacts the precision and reliability of the overall system. Materials like stainless steel and hardened tool steels offer superior wear resistance compared to softer materials like brass or plastic.

Surface treatments‚ such as coatings or nitriding‚ can further enhance wear resistance‚ extending the pin’s service life. The operating conditions‚ including lubrication‚ temperature‚ and the presence of contaminants‚ also play a significant role in determining the required level of wear resistance‚ much like maintaining a vehicle’s value over time.

Choosing a pin with adequate wear resistance minimizes downtime and reduces the need for frequent replacements.

Precision and Accuracy Needs

Defining precision and accuracy is paramount when specifying guide pins. Applications demanding tight tolerances‚ such as mold and die work or robotics‚ necessitate pins manufactured to exacting standards. Dimensional accuracy‚ including diameter and length‚ must be closely controlled to ensure proper alignment and functionality.

The required level of precision often dictates the manufacturing process and material selection. Ground pins offer superior accuracy compared to machined pins. Furthermore‚ factors like runout and straightness are crucial considerations. Similar to the meticulous construction of reliable automobiles‚ precision in guide pins translates to consistent performance.

Careful consideration of these needs minimizes errors and maximizes system efficiency.

confession orthodox guide

Orthodox Confession is a sacred sacrament where believers seek forgiveness for sins through repentance and prayer. It is a personal encounter with Christ, mediated by a priest.

This sacrament emphasizes spiritual growth, healing, and reconciliation with God and the Church. Rooted in Scripture and Tradition, it calls believers to humility, honesty, and transformation.

The Sacrament of Confession in the Orthodox Church

Confession is a sacred sacrament in the Orthodox Church, known as the Mystery of Repentance. It is a divine act where believers confess their sins to a priest, who acts as a spiritual guide and mediator of God’s forgiveness. This sacrament is rooted in Scripture and Tradition, emphasizing the importance of humility, honesty, and spiritual healing. Through confession, Orthodox Christians seek reconciliation with God and the Church, receiving grace to overcome sin and grow in holiness. The priest prays for the penitent, offering guidance and absolution, while the individual commits to amendment of life. Regular confession is encouraged for spiritual renewal.

The Role of the Priest in Confession

The priest in Orthodox confession acts as a spiritual father and mediator, facilitating reconciliation between the penitent and God. He does not forgive sins himself but serves as a vessel of God’s mercy. The priest listens with compassion, offers guidance, and provides spiritual advice. He prays for the penitent, imposing penances when necessary, such as prayer or fasting, to aid in spiritual healing. The priest also ensures confidentiality, as the seal of confession is sacred. His role is to help the believer understand their sins, renounce them, and return to a life of virtue and communion with God and the Church.

Why Confession is Important in Orthodox Life

Confession is a cornerstone of Orthodox spirituality, offering healing, reconciliation, and spiritual renewal. It allows believers to acknowledge their sins, seek forgiveness, and restore their relationship with God and the Church. Through confession, individuals confront their weaknesses, taking responsibility for their actions and committing to change. This sacrament fosters humility, fosters a deeper awareness of God’s mercy, and prepares one for Holy Communion. Regular confession strengthens faith, promotes personal growth, and nurtures a life of repentance and virtue, essential for walking the path to salvation and union with Christ.

Preparation for Holy Confession

Preparation involves self-examination, prayer, and fasting, helping believers recognize sins, repent sincerely, and seek spiritual guidance. It fosters humility, readiness to change, and openness to God’s grace.

Examining Your Conscience

Examining your conscience involves honest self-reflection, identifying sins, and acknowledging spiritual weaknesses. This process requires prayer, humility, and a willingness to confront your actions, thoughts, and omissions. Begin by reviewing your life in light of God’s commandments and the teachings of the Orthodox Church. Consider how you have loved God, others, and yourself. Reflect on specific areas, such as anger, greed, or dishonesty, and how they have impacted your relationships. This introspection helps you recognize patterns of sin and prepares you to confess sincerely, seeking forgiveness and healing. Regular self-examination strengthens your spiritual awareness and readiness for confession.

The Role of Prayer and Fasting in Preparation

Prayer and fasting are essential in preparing for Holy Confession, as they cultivate humility and repentance. Prayer helps to focus your mind and heart on God, seeking His guidance and mercy. Fasting, often recommended before confession, is a physical and spiritual act of self-denial, demonstrating your commitment to repentance. Both practices assist in quieting the soul, allowing for a deeper examination of conscience and a sincere confession. By combining prayer and fasting, you create a spiritual environment conducive to healing and reconciliation with God. These practices emphasize the seriousness of confession and your desire for spiritual renewal.

Seeking Guidance from Your Spiritual Father

Seeking guidance from your spiritual father is a vital part of preparing for confession. He offers wisdom, discernment, and encouragement, helping you understand your sins and struggles. A spiritual father provides personalized advice, prayer, and support, guiding you toward genuine repentance. Regular communication with him fosters humility and openness, essential for a meaningful confession. His role is not to judge but to help you grow spiritually. By seeking his counsel, you entrust your spiritual journey to an experienced guide, ensuring your confession is honest and fruitful. This relationship strengthens your resolve to live a life pleasing to God.

The Process of Confession

The process of confession involves acknowledging sins, expressing remorse, and receiving absolution. It is a sacramental encounter where believers seek forgiveness and spiritual healing through repentance.

The Physical Setup: Face-to-Face or Side-by-Side

In the Orthodox Church, confession typically occurs in an open area of the temple, often before an icon of Christ or the Theotokos. The penitent may stand face-to-face with the priest or side-by-side, depending on local tradition. This physical arrangement emphasizes the sacramental nature of confession, where the priest acts as a witness of repentance. Icons and the cross are present to remind the faithful of Christ’s mercy and the seriousness of the sacrament. The setup fosters a prayerful atmosphere, encouraging openness and humility. Both arrangements underscore the communal and ecclesiastical dimensions of confession.

How to Begin Your Confession

Begin your confession with prayer, asking for God’s mercy and guidance. Many start by reciting the Jesus Prayer or making the sign of the cross. Stand before the priest and humbly acknowledge your sins, saying, “Bless me, a sinner.” Be straightforward, avoiding excuses or justification. The priest may offer a brief prayer or blessing to set the tone. Confession should be approached with sincerity, focusing on specific thoughts, words, and actions that have distanced you from God. This openness fosters repentance and prepares you to receive spiritual guidance and absolution.

The Priest’s Role in Absolution

The priest acts as a witness and guide, not a judge, during absolution. After your confession, the priest offers a prayer asking for God’s forgiveness and mercy. They may provide spiritual guidance or penance to aid in your repentance. The priest pronounces absolution, declaring God’s forgiveness, which is sealed by the prayer and the laying on of hands. This sacramental act is a manifestation of Christ’s authority entrusted to the Church. The priest’s role is to mediate God’s grace, ensuring confidentiality and offering direction for spiritual growth. Their words of absolution are a source of comfort and renewal, reaffirming your reconciliation with God.

The Prayer of Absolution

The Prayer of Absolution is a sacred moment in Orthodox Confession, where the priest invokes God’s mercy and forgiveness. After the confession, the priest recites specific prayers, asking for the remission of sins. This prayer is not a magical formula but a heartfelt plea to God, rooted in the Church’s tradition. The priest prays for the penitent’s deliverance from sin and spiritual renewal. The prayer culminates in the declaration of forgiveness, emphasizing that it is God who pardons. This sacred act reaffirms the penitent’s reconciliation with God and strengthens their resolve to live a virtuous life.

What to Expect After Confession

After confessing, you can expect a profound sense of peace and renewal. The priest may offer words of encouragement, spiritual advice, or a prayer to seal your forgiveness. Many people feel a deep emotional and spiritual release, knowing their sins are forgiven. It is customary to prostrate or bow as a sign of gratitude. The priest may also assign a prayer or act of charity to strengthen your commitment to change. This moment is a renewal of your relationship with God, empowering you to live a more righteous life. The experience is deeply personal and transformative, fostering spiritual growth and humility.

Frequency and Timing of Confession

Regular confession is encouraged, with frequency varying based on spiritual needs and guidance from a spiritual father. It is customary before major feasts and Holy Communion.

How Often Should You Confess?

The frequency of confession varies depending on individual spiritual needs and guidance from a spiritual father. There is no strict rule, but many Orthodox Christians confess monthly or during major fasting periods. St; Basil the Great recommended confession for serious sins, while smaller struggles can be addressed through prayer and self-reflection. The key is to confess regularly enough to maintain spiritual health without falling into legalism. Some confess before receiving Holy Communion, especially on Sundays, while others may need more frequent confession due to specific life circumstances or struggles with sin. Ultimately, the goal is to seek spiritual growth and renewal.

Confession and Holy Communion

In the Orthodox Church, confession is closely tied to Holy Communion. Many believers confess before receiving Communion, especially on Sundays or during major feast days. This practice emphasizes the need for a clean heart and reconciliation with God before partaking of Christ’s Body and Blood. While there is no strict rule, frequent Communion often prompts regular confession to maintain spiritual preparedness. Ultimately, the frequency depends on personal spiritual guidance, ensuring that one approaches the sacraments with humility, repentance, and a desire for union with God.

What is a Life Confession?

A Life Confession is a profound and comprehensive sacramental confession in the Orthodox Church, typically undertaken at significant life junctures. It involves confessing all sins committed from childhood onward, ensuring no serious transgressions are unaddressed. Often performed before major life events, monastic tonsure, serious illness, or old age, it serves as a thorough cleansing of conscience. This practice underscores the importance of spiritual purity and prepares the individual for deeper union with God, emphasizing repentance and forgiveness. It differs from regular confessions by its scope and occasion, providing a complete accounting of one’s life before God.

Common Questions and Misconceptions

Explore frequent inquiries about Orthodox confession, such as its necessity, privacy concerns, and differences from other traditions, clarifying misunderstandings about this sacred practice.

Is Confession Mandatory for Orthodox Christians?

Confession is not legally mandatory but is highly recommended as part of Orthodox spiritual life. The Church encourages believers to confess regularly to maintain spiritual health and prepare for Holy Communion. While it is not enforced, frequent confession is seen as a vital practice for growth in humility, repentance, and closeness to God. Ultimately, the decision to confess lies with the individual, guided by their conscience and spiritual father. The Church emphasizes confession as a means of healing and reconciliation, rather than a strict obligation.

Can You Confess to a Priest You Don’t Regularly Commune With?

Yes, Orthodox Christians can confess to any priest, even if they do not regularly commune with him. The priest acts as a witness and guide in the sacrament, and confession is not dependent on familiarity. However, it is beneficial to have a regular spiritual father for consistency in spiritual growth. While any priest can hear confession, building a relationship with one priest allows for deeper guidance and accountability. Confidentiality is always maintained, ensuring comfort regardless of the priest. Ultimately, the choice depends on personal preference and circumstances, but regular confession is encouraged for spiritual well-being.

Is Confession Different from Other Christian Traditions?

Orthodox confession differs from other Christian traditions in its sacramental nature and emphasis on spiritual guidance. Unlike Protestant traditions, which often lack formal confession, Orthodoxy views it as a mystical sacrament. It also contrasts with Catholicism by not requiring prescribed penances and emphasizing the priest’s role as a spiritual father rather than a judge. The Orthodox Church’s focus on regular confession, preparation, and the sacrament’s connection to Holy Communion further distinguishes it. These unique aspects reflect the Orthodox understanding of repentance as a continuous process of healing and union with God, guided by the Church’s teachings and traditions.

Scripture and Tradition in Confession

The Orthodox Church upholds both Scripture and Tradition as inseparable sources of divine truth. Scripture provides the theological foundation, while Tradition offers practical guidelines for confession, ensuring a balanced approach to repentance and spiritual healing.

Biblical Basis for Confession

The Orthodox Church roots confession in biblical teachings. Jesus entrusted the disciples with the authority to forgive sins (John 20:21-23), establishing the sacrament’s foundation. James 5:16 encourages confessing sins to one another for healing, reflecting the communal aspect of repentance. The Bible emphasizes reconciliation with God and others, and confession serves as a means to achieve this. While Scripture doesn’t outline specific rituals, the Church developed confession as a sacrament based on these principles, ensuring a path to spiritual healing and restoration.

Patristic Teachings on Repentance

The Church Fathers emphasized repentance as a vital path to salvation. St. John Chrysostom taught that true repentance involves deep remorse, confession, and a firm resolve to amend one’s life. St. Basil the Great stressed that repentance is a divine gift, enabling believers to turn from sin to God. The Fathers also highlighted the importance of humility and tears in the repentance process, seeing them as signs of genuine contrition. Their writings underscored the priest’s role in guiding penitents and the healing power of confession, shaping the Orthodox understanding of repentance as both a personal and communal act of faith.

Liturgical Practices Surrounding Confession

In the Orthodox Church, confession is deeply intertwined with liturgical life. The rite of confession often occurs before the Divine Liturgy, emphasizing reconciliation before communion. The Prayer of Absolution, recited by the priest, is a solemn declaration of God’s forgiveness. Many parishes incorporate pre-confession prayers and hymns, creating a penitential atmosphere. Icons and crosses are venerated during confession, symbolizing the believer’s repentance and devotion. The liturgical setting underscores confession as a sacramental act, not merely a private conversation, connecting the individual’s repentance to the communal worship of the Church.

The Role of Icons and Prayer in Confession

Icons and prayer play a significant role in Orthodox confession, creating a sacred atmosphere for repentance. Icons of Christ, the Theotokos, and saints serve as reminders of God’s presence and the intercession of the holy. Prayer prepares the heart for confession, fostering humility and sincerity. Many faithful recite the Jesus Prayer or psalms before confessing, seeking spiritual clarity. The priest may also offer prayers during the confession, invoking God’s mercy. Icons and prayer help the believer focus on the spiritual dimensions of confession, emphasizing its divine character and the healing grace of God.

Personal Reflection and Growth

Confession fosters humility, self-examination, and a deeper connection with God. Through prayerful reflection, believers grow spiritually, embracing repentance and renewal, strengthening their faith journey.

How Confession Leads to Spiritual Growth

Confession nurtures spiritual growth by fostering honesty about sins and weaknesses, enabling believers to confront their failings humbly. Through this sacrament, individuals experience God’s mercy and grace, leading to healing and renewal. Absolution provides peace and strength, encouraging a commitment to change. By regularly confessing, Christians develop self-awareness and accountability, deepening their relationship with God. This process cultivates humility, repentance, and a desire to live according to God’s will, ultimately transforming the heart and guiding believers toward a more virtuous and meaningful life rooted in faith and love.

Overcoming Habitual Sins Through Confession

Confession is a powerful tool for breaking free from habitual sins, as it fosters self-awareness and accountability. By acknowledging recurring struggles, believers can confront sin patterns and seek divine grace for transformation. The sacrament provides an opportunity to repent sincerely, with the priest offering guidance and prayer for strength. Through confession, individuals receive forgiveness and the empowerment to resist sin, gradually cultivating spiritual freedom. Regular confession helps root out deep-seated weaknesses, enabling believers to grow in virtue and draw closer to God. This process of healing and renewal is essential for overcoming the cycles of sin and living a transformed life.

Cultivating Humility and Gratitude Post-Confession

After confession, believers are called to nurture humility and gratitude, recognizing the mercy of God and the gift of forgiveness. Humility grows through acknowledging one’s limitations and dependence on divine grace. Gratitude is expressed by thanking God for His compassion and the priest for their spiritual guidance. Prayer, reflection, and acts of kindness can deepen these virtues; By embracing humility, one avoids pride and self-justification, while gratitude fosters a heart of love and appreciation for God’s providence. These qualities enrich spiritual life, fostering a deeper connection with God and a life of continuous repentance and growth in holiness.

Practical Tips and Resources

Explore practical guidance for deepening your confession experience, including examining your conscience, prayer routines, and seeking advice from your spiritual father. Utilize recommended books, online guides, and community support to enhance your spiritual growth and embrace a life of repentance and humility.

Keeping a List of Sins for Confession

Keeping a list of sins is a common practice in Orthodox preparation for confession. Write down your sins as they occur to ensure honesty and thoroughness. Reflect on thoughts, words, and actions that contradict God’s commandments. This list is not for the priest but for personal accountability. Review it prayerfully before confession to identify patterns of sin. Maintain privacy and destroy the list afterward to protect confidentiality. This discipline fosters self-awareness and sincerity, helping you approach confession with a humble and repentant heart. Remember, the goal is spiritual growth, not merely a ritualistic exercise.

Prayers for Repentance and Forgiveness

Prayers for repentance and forgiveness are essential in preparing for confession. The Orthodox Church provides rich liturgical and devotional prayers to guide believers. The Jesus Prayer, “Lord Jesus Christ, have mercy on me,” is often recited to cultivate humility. Psalm 51, a penitential psalm, expresses deep sorrow for sin. Specific prayers like the “Prayer of St. Ephrem” and the “Canon of Repentance” are also used. These prayers help focus the mind, soften the heart, and express genuine remorse. Reciting them regularly fosters a spirit of repentance and readies the soul for confession. They remind us of God’s infinite mercy and our need for His grace.

Recommended Reading on Orthodox Confession

For a deeper understanding of Orthodox confession, several books are highly recommended. The Orthodox Church by Metropolitan Kallistos Ware provides an excellent overview of the sacrament. The Way of a Pilgrim offers practical insights into prayer and repentance. Preparation for Confession by Fr. John Mack is a helpful guide for laypeople. Additionally, Confession: A Series of Lectures by Fr. Thomas Hopko explores the theological and practical aspects of confession. Reading these works enriches one’s understanding of the sacrament and its role in spiritual life, offering both theological depth and practical advice for believers seeking to grow in faith and humility.

Online Resources and Guides

Several online resources provide invaluable guidance for Orthodox confession. The Orthodox Church in America (OCA) website offers detailed articles and preparation guides. The Greek Orthodox Archdiocese of America shares insightful resources on the sacrament. Websites like Ancient Faith Ministries and OrthodoxWiki provide accessible explanations and prayerful reflections. Additionally, many Orthodox parishes publish confession guides tailored for their communities. These online tools, including podcasts and YouTube channels, help believers deepen their understanding of confession and prepare meaningfully for the sacrament. Utilizing these resources fosters a more informed and prayerful approach to repentance and spiritual growth.

Cultural and Historical Perspectives

Orthodox confession reflects rich cultural and historical traditions. Practices vary across ethnic churches, blending local customs with universal teachings. Historically, confession evolved from early Church practices, emphasizing continuity and adaptation across centuries.

Confession in Different Orthodox Cultures

Orthodox confession practices vary subtly across cultures, reflecting local traditions while maintaining theological unity. In Greek Orthodox traditions, confession often occurs face-to-face, emphasizing a personal encounter. Russian Orthodox practices frequently use a screen or icon separating the penitent and priest, symbolizing Christ’s mediation. Slavic traditions may incorporate veneration of icons during confession, while Middle Eastern Orthodox churches blend Arab hospitality with sacramental solemnity. These cultural expressions enrich the sacrament, highlighting the universal call to repentance within diverse communal contexts, yet always preserving the essence of spiritual healing and reconciliation.

Historical Development of Confession in the Orthodox Church

The sacrament of confession in the Orthodox Church traces its roots to the early Christian Church, where public confession was common. Over time, confession evolved into a private practice between the believer and the priest, formalized by the 7th to 10th centuries. The priest’s role as a spiritual guide became central, emphasizing repentance and healing. By the 10th century, confession was fully established as a sacrament, with the priest acting as a mediator of God’s forgiveness. This development reflected the Church’s understanding of confession as a means of spiritual renewal and restoration, deeply intertwined with the sacramental life of the Orthodox faith.

Notable Historical Documents on Confession

Key historical documents shaping the Orthodox understanding of confession include the works of early Church Fathers like St. John Chrysostom and St. Basil the Great, who emphasized repentance and the priest’s role. The Canons of the Holy Apostles and the Rudder (a collection of ecclesiastical decrees) provide foundational guidelines. The Confession of Dositheus (1672) from the Synod of Jerusalem reaffirmed Orthodox teachings on confession. These documents highlight the sacrament’s role in spiritual life, balancing public and private confession, and guiding both clergy and laity in the pursuit of repentance and divine forgiveness.

Confession is a transformative sacrament fostering spiritual growth, healing, and reconciliation with God. Regular participation leads to deeper humility, self-awareness, and a life of repentance. Embrace it with honesty and humility to draw closer to Christ and experience divine forgiveness.

Final Thoughts on the Importance of Confession

Confession is a profound expression of faith, offering believers a sacred opportunity to seek healing, forgiveness, and spiritual renewal. By acknowledging our weaknesses and sins, we open ourselves to God’s grace and mercy. This sacrament strengthens our relationship with Christ, fostering humility, self-reflection, and personal growth. Regular confession cultivates a deeper awareness of our actions and their impact on our spiritual journey. It is a powerful tool for overcoming sin and drawing closer to God. Embrace confession as a lifeline to spiritual health, and approach it with sincerity, trusting in God’s boundless love and forgiveness.

Encouragement to Engage in Regular Confession

Embracing regular confession is a transformative practice that nurtures spiritual health and deepens your faith. By confessing regularly, you cultivate self-awareness, accountability, and a humble heart. It becomes a powerful rhythm of repentance and renewal, allowing you to grow closer to God and live a life aligned with His will. Don’t wait until major sins accumulate—consistent confession helps address smaller struggles before they become overwhelming. Make it a priority to seek this sacrament often, trusting in its power to heal and transform your life. Let regular confession be a cornerstone of your spiritual journey, guiding you toward eternal salvation.

biofinity multifocal toric fitting guide

Biofinity Multifocal Toric contact lenses are designed for individuals with astigmatism and presbyopia‚ offering clear vision at all distances with AquaForm Technology for enhanced comfort and hydration.

1.1 Overview of Biofinity Multifocal Toric Lenses

Biofinity Multifocal Toric lenses are premium contact lenses designed for individuals with both astigmatism and presbyopia. These lenses combine the benefits of toric and multifocal technologies to address blurry vision at all distances. Featuring AquaForm Technology‚ they lock in moisture for exceptional comfort and hydration throughout the day. The unique design includes multiple optical zones to cater to near‚ intermediate‚ and far vision needs‚ ensuring sharp and stable vision. Additionally‚ the Optimized Toric Lens Geometry enhances lens stability and orientation‚ reducing movement during eye movements. This makes Biofinity Multifocal Toric an excellent choice for patients seeking clear‚ comfortable‚ and consistent vision correction in a monthly replacement lens.

1.2 Importance of Proper Fitting Guide

Proper fitting of Biofinity Multifocal Toric lenses is crucial for ensuring optimal vision‚ comfort‚ and lens performance. Unlike spherical lenses‚ toric lenses require precise alignment with the eye’s axis to correct astigmatism effectively. Misalignment can lead to blurry vision‚ eye strain‚ or discomfort. A well-executed fitting guide ensures the lens stabilizes correctly‚ providing consistent visual acuity across all distances.

Additionally‚ proper fitting minimizes the risk of complications such as dryness or irritation‚ which can arise from poor lens placement or improper movement. By adhering to a structured fitting guide‚ eye care professionals can tailor the lenses to the patient’s unique needs‚ ensuring a seamless transition to multifocal toric correction and maximizing overall satisfaction.

Understanding the Optical Design

Biofinity Multifocal Toric lenses feature a sophisticated optical design with multiple zones for near‚ intermediate‚ and far vision‚ combined with aspheric optics for sharp‚ clear imagery at all distances.

2.1 Optical Zones and Their Functions

Biofinity Multifocal Toric lenses incorporate multiple optical zones designed to address presbyopia and astigmatism simultaneously. These zones are strategically arranged to provide clear vision at near‚ intermediate‚ and far distances. The aspheric design minimizes distortions‚ ensuring sharp imagery across all zones; The multifocal structure allows seamless transitions between tasks‚ reducing visual disturbances. Each zone is optimized to correct specific refractive errors‚ with the toric component stabilizing the lens to address astigmatism. This advanced design ensures consistent visual acuity and comfort‚ making it ideal for patients with both conditions. The optical zones work harmoniously to deliver a natural viewing experience‚ adapting to the wearer’s lifestyle and visual demands.

2.2 Aspheric Design for Enhanced Vision

The Biofinity Multifocal Toric lenses feature an aspheric design‚ which minimizes spherical aberrations and enhances optical clarity. This design ensures sharper vision across all distances‚ particularly in low-light conditions‚ by reducing distortions. The aspheric profile contributes to a more natural viewing experience‚ allowing smooth transitions between near‚ intermediate‚ and far focal points. This advanced optical structure is particularly beneficial for individuals with presbyopia and astigmatism‚ as it maintains consistent visual acuity. The design also supports better contrast sensitivity‚ making it easier for wearers to adapt to varying lighting environments. Overall‚ the aspheric design plays a critical role in delivering crisp‚ clear vision while maintaining comfort and optical performance.

2.3 Correcting Astigmatism and Presbyopia

Biofinity Multifocal Toric lenses are specifically designed to address both astigmatism and presbyopia‚ providing clear vision at all distances. The toric design corrects astigmatism by stabilizing the lens on the eye‚ ensuring proper orientation to minimize blur. For presbyopia‚ the multifocal zones allow seamless transitions between near‚ intermediate‚ and far vision. The lens incorporates Optimized Toric Lens Geometry‚ which enhances stability and predictable orientation‚ reducing vision distortions. Additionally‚ Aquaform Technology ensures long-lasting hydration‚ promoting comfort for patients with dry eyes. This combination makes Biofinity Multifocal Toric lenses an excellent choice for individuals seeking to correct multiple vision problems while maintaining clarity and comfort throughout the day.

Assessing Patient Needs

Assessing patient needs involves identifying candidates for multifocal toric lenses‚ evaluating corneal health‚ tear quality‚ and discussing lifestyle expectations to ensure optimal lens performance and comfort.

3.1 Identifying Candidates for Multifocal Toric Lenses

Identifying suitable candidates for Biofinity Multifocal Toric lenses involves assessing individuals with both astigmatism and presbyopia. These lenses are ideal for patients seeking clear vision at all distances without relying on glasses. Candidates should have a high motivation to correct both conditions and adapt to multifocal lenses. An eye exam is essential to evaluate corneal health‚ tear quality‚ and optical requirements. Patients with active eye conditions or severe dry eye may not be suitable. Lifestyle factors‚ such as reading habits or outdoor activities‚ also influence candidacy. The eye care professional plays a crucial role in determining if Biofinity Multifocal Toric lenses align with the patient’s needs and expectations for optimal vision correction and comfort;

3.2 Evaluating Corneal Health and Tear Quality

Evaluating corneal health and tear quality is critical before fitting Biofinity Multifocal Toric lenses. A thorough slit-lamp examination is essential to assess the cornea for irregularities‚ such as keratoconus or scars‚ which may affect lens stability. Tear quality is equally important‚ as insufficient or poor-quality tears can lead to discomfort and blurry vision. Tear osmolarity testing and corneal staining can help identify dry eye issues. Patients with severe dry eye or blepharitis may require additional treatment before lens fitting. The lens’s silicone hydrogel material ensures oxygen permeability‚ but proper tear film integrity is still necessary for optimal comfort and vision. This step ensures the lenses align with the patient’s ocular health for a successful fitting experience.

3.3 Discussing Patient Expectations and Lifestyle

Understanding patient expectations and lifestyle is crucial for a successful fitting of Biofinity Multifocal Toric lenses. Patients should have realistic expectations about vision clarity at all distances‚ as multifocal lenses may require an adaptation period. Discussing their daily activities‚ such as reading‚ driving‚ or computer use‚ helps tailor the lens selection to their needs. Lifestyle factors‚ including work environment and hobbies‚ influence lens comfort and wearability. Open communication about their willingness to handle and care for contact lenses is also essential. By aligning lens features with patient priorities‚ practitioners can enhance satisfaction and ensure the lenses meet their unique demands.

Fitting the Biofinity Multifocal Toric Lenses

Fitting Biofinity Multifocal Toric lenses involves selecting the correct orientation using a ballast prism‚ ensuring proper stabilization‚ and evaluating vision and comfort for optimal results.

4.1 Initial Lens Selection and Power Calculation

The initial selection and power calculation for Biofinity Multifocal Toric lenses require careful consideration of the patient’s refractive error‚ astigmatism‚ and presbyopia needs. The lenses are designed to address both conditions simultaneously‚ but precise calculations are essential to ensure proper fit and vision. The power calculation involves determining the correct sphere‚ cylinder‚ and axis to correct astigmatism‚ while also accounting for the multifocal design to address presbyopia. The use of trial lenses is often recommended to verify the fit and vision quality before finalizing the prescription. Proper orientation‚ achieved through the lens’s prism ballast‚ ensures stability and consistent vision. Accurate calculations and initial selection are critical to achieving optimal results for the patient.

4.2 Proper Orientation and Stabilization

Proper orientation and stabilization of Biofinity Multifocal Toric lenses are crucial for optimal vision and comfort. The lenses feature a prism ballast design‚ which helps maintain correct orientation on the eye. This weighted bottom ensures the lens stabilizes quickly‚ reducing movement and rotation. The toric design includes stabilization zones that guide the lens into the correct position‚ preventing drift and misalignment. Proper orientation is achieved by aligning the lens’s axis with the patient’s astigmatism axis. Ensuring the lens remains stable is key to delivering consistent vision at all distances. Misorientation can lead to blurred vision and discomfort‚ making accurate fitting and stabilization essential for patient satisfaction and successful wear.

4.3 Assessing Vision and Comfort

Assessing vision and comfort is a critical step in fitting Biofinity Multifocal Toric lenses. The lenses’ aspheric design and multiple optical zones ensure sharp vision at all distances‚ while the toric geometry corrects astigmatism. Patients should be evaluated for clarity at near‚ intermediate‚ and far distances to confirm proper lens performance. Comfort is assessed by monitoring hydration levels‚ lens movement‚ and patient feedback. The AquaForm Technology enhances water retention‚ promoting all-day comfort. Any signs of distortion‚ blurriness‚ or dryness should be addressed promptly. Patient-specific adjustments may be necessary to optimize vision and comfort‚ ensuring a successful wearing experience. Regular follow-ups are recommended to monitor lens performance and patient satisfaction.

Troubleshooting Common Fitting Issues

Troubleshooting Biofinity Multifocal Toric fitting issues involves addressing blurry vision‚ distortion‚ and discomfort. Adjustments may include refining lens orientation‚ power‚ or replacement to ensure optimal vision and comfort.

5.1 Addressing Blurry Vision and Distortion

Blurry vision and distortion with Biofinity Multifocal Toric lenses can stem from improper fitting‚ lens orientation‚ or power mismatches. Ensure the lens is correctly oriented‚ as misalignment can cause vision issues. Verify the prescription accuracy and consider rechecking the refractive error. Prism ballast and stabilization zones in the lens design help guide proper positioning. If vision remains unclear‚ assess the optical zones and tear quality‚ as dryness can exacerbate blur. Troubleshooting may involve refitting with a different lens power or design parameter. Patient adaptation time should also be considered‚ with follow-up appointments to monitor progress and adjust as needed for optimal clarity and comfort.

5.2 Managing Discomfort and Dryness

Discomfort and dryness with Biofinity Multifocal Toric lenses can often be resolved by addressing lens fit and tear quality. Ensure proper hydration by recommending artificial tears and discussing lifestyle factors‚ such as screen time or environmental conditions. Evaluate the lens fit to avoid excessive movement‚ which can irritate the eyes. AquaForm Technology in Biofinity lenses helps retain moisture‚ but additional care‚ like cleaning and proper storage‚ is essential. Patients with persistent dryness may benefit from lubricating drops or adjusting their wearing schedule. Proper lens hygiene and follow-up appointments can help maintain comfort and address any ongoing issues effectively.

5.3 Correcting Lens Stabilization Problems

Stabilization issues with Biofinity Multifocal Toric lenses can lead to inconsistent vision. To address this‚ ensure the lens is properly oriented‚ as misalignment can cause blurry vision. Check for excessive lens movement during blinking and verify the stability of the ballast prism. If the lens rotates incorrectly‚ consider reevaluating the fit or adjusting the axis of the toric component. Stabilization zones in the lens design help maintain proper orientation‚ but environmental factors like dry eyes or irregular corneal surfaces can disrupt this. In such cases‚ improving tear quality and ensuring a smooth corneal surface can enhance lens stability. Follow-up appointments are crucial to monitor adjustments and ensure optimal fit and performance.

Aftercare and Maintenance

Proper aftercare is essential for maintaining the health of your eyes and extending the life of your Biofinity Multifocal Toric lenses. Always clean and store lenses with a prescribed solution‚ avoiding tap water. Replace lenses as recommended to prevent deposits and irritation. Attend follow-up appointments to monitor lens performance and eye health. Proper hygiene‚ such as washing hands before handling lenses‚ is critical to prevent infections. Regularly cleaning the lens case and replacing it every 3 months can reduce contamination risks. Consistent aftercare ensures comfort‚ clear vision‚ and prevents complications‚ making it a key part of successful lens wear.

6.1 Importance of Proper Lens Hygiene

Proper lens hygiene is crucial for maintaining eye health and ensuring the longevity of Biofinity Multifocal Toric lenses. Always wash hands thoroughly before handling lenses to prevent the transfer of bacteria or other contaminants. Use only the prescribed cleaning solution to rinse and disinfect lenses‚ as tap water can contain harmful microorganisms. Avoid touching the lens surface to minimize the risk of contamination. Regularly clean and replace the lens case‚ as it can harbor bacteria and other pathogens. Proper hygiene practices reduce the risk of eye infections‚ such as microbial keratitis‚ and ensure consistent comfort and clear vision. Neglecting hygiene can lead to discomfort‚ blurred vision‚ and potential eye damage‚ making it a critical aspect of lens care.

6.2 Recommended Cleaning and Storage Practices

Regular cleaning and proper storage are essential to maintain the quality and performance of Biofinity Multifocal Toric lenses. Always use the prescribed cleaning solution to rinse and disinfect the lenses‚ as tap water can contain harmful microorganisms. Gently rub the lenses with the solution to remove any deposits or protein buildup. After cleaning‚ store the lenses in a clean‚ dry case filled with fresh solution. Replace the lens case every 3 months to prevent bacterial growth. Avoid sharing cases or solutions to reduce contamination risks. Proper storage ensures the lenses remain hydrated and maintain their shape‚ providing consistent comfort and vision clarity. Neglecting these steps can lead to lens degradation or eye discomfort.

6.3 Follow-Up Appointments and Adjustments

Regular follow-up appointments are crucial to ensure optimal performance and comfort of Biofinity Multifocal Toric lenses. Schedule follow-ups within the first week of lens wear to assess adaptation and address any initial discomfort or vision issues. Subsequent appointments should be made every 3-6 months to monitor eye health and lens fit. During these visits‚ the eye care professional will evaluate corneal health‚ tear quality‚ and lens orientation. Adjustments may include modifying the lens power‚ axis‚ or cylinder to refine vision clarity and comfort. Open communication about lifestyle needs and vision expectations is key to making precise adjustments. Consistent follow-ups ensure long-term satisfaction and prevent potential complications‚ ensuring the lenses continue to meet the patient’s visual and comfort requirements effectively.

Biofinity Multifocal Toric lenses offer a reliable solution for astigmatism and presbyopia‚ combining clear vision with comfort. Proper fitting‚ care‚ and follow-ups ensure optimal performance and patient satisfaction.

7.1 Summary of Key Fitting Principles

Proper fitting of Biofinity Multifocal Toric lenses requires careful consideration of the patient’s unique needs‚ including astigmatism and presbyopia. Initial lens selection should align with the patient’s refractive error and lifestyle‚ ensuring optimal orientation and stabilization. Assessing vision at all distances and comfort levels is crucial to confirm the lens’s performance. Follow-up appointments are essential to monitor adaptation and address any issues. Proper hygiene and care practices must be emphasized to maintain lens health. By adhering to these principles‚ eyecare professionals can ensure a successful fitting experience‚ providing clear vision and long-lasting comfort for patients with complex vision needs.

7.2 Final Tips for Optimal Patient Satisfaction

To ensure optimal patient satisfaction with Biofinity Multifocal Toric lenses‚ prioritize clear communication and personalized recommendations. Discuss lifestyle needs and expectations upfront to set realistic goals. Emphasize proper lens hygiene and handling to maintain comfort and vision clarity. Schedule follow-up appointments to monitor adaptation and address any concerns. Provide detailed care instructions and encourage patients to report discomfort or vision issues promptly. By addressing individual needs and ensuring a smooth transition to multifocal toric lenses‚ eyecare professionals can enhance patient confidence and satisfaction‚ leading to a positive overall experience with Biofinity Multifocal Toric contact lenses.

jewelry gift guide

Welcome to our jewelry gift guide‚ your ultimate resource for finding the perfect piece‚ whether for birthdays‚ anniversaries‚ or other special occasions. Discover thoughtful ideas‚ styles‚ and tips to make your gift truly meaningful and personalized.

1.1. Importance of Choosing the Right Jewelry Gift

Choosing the right jewelry gift is more than just selecting a piece of metal or stone; it carries emotional weight and personal significance. Jewelry often symbolizes love‚ milestones‚ or memories‚ making it a deeply meaningful present. A well-chosen piece reflects the recipient’s style‚ preferences‚ and personality‚ ensuring it will be cherished. Consider the occasion‚ their lifestyle‚ and personal taste to avoid generic choices. The right jewelry gift can boost confidence‚ create lasting impressions‚ and strengthen relationships. It’s not just about the price tag but the thoughtfulness behind it‚ making the effort to select the perfect piece truly worthwhile.

1.2. Understanding the Recipient’s Style and Preferences

Understanding the recipient’s style and preferences is crucial for selecting a jewelry gift they’ll treasure. Pay attention to the jewelry they already wear‚ noting metal preferences‚ gemstone colors‚ and design aesthetics. Consider their wardrobe to ensure the piece complements their clothing. For instance‚ delicate necklaces suit minimalist styles‚ while bold earrings enhance vibrant outfits. Lifestyle factors‚ such as whether they prefer understated elegance or statement pieces‚ also matter. Personalizing the gift to align with their tastes shows thoughtfulness and effort. This attention to detail ensures the jewelry becomes a cherished possession‚ reflecting their individuality and your consideration.

Popular Types of Jewelry for Gifting

Explore top jewelry gifts: earrings‚ necklaces‚ bracelets‚ rings‚ and anklets. Each offers unique styles‚ ensuring a perfect match for every recipient’s taste and occasion.

2.1. Earrings: Studs‚ Hoops‚ and Dangles

Earrings are a versatile and popular choice for gifting‚ offering timeless appeal. Studs are classic and subtle‚ ideal for everyday wear‚ while hoops come in various sizes to suit different styles. Dangle earrings add a touch of personality‚ with options ranging from elegant drops to playful charms. Personalization‚ such as birthstone studs or engraved hoops‚ can make the gift even more meaningful. Consider the recipient’s lifestyle when choosing—delicate designs for sensitive skin or durable options for active individuals. Earrings are perfect for any occasion‚ from casual to formal events‚ making them a thoughtful and stylish gift for loved ones.

2.2. Necklaces: Pendants‚ Chains‚ and Birthstone Jewelry

Necklaces are a timeless and elegant gift option‚ offering versatility for any style. Pendants add a personal touch‚ whether minimalistic or elaborate‚ while chains provide a classic foundation; Birthstone necklaces are particularly meaningful‚ featuring a stone associated with the recipient’s birth month. Consider pairing a delicate chain with a personalized pendant or a bold statement piece for a striking look. Chains come in various lengths and materials‚ ensuring a perfect fit. Birthstone jewelry not only adds sentimental value but also creates a personalized gift. Necklaces are ideal for both casual and formal occasions‚ making them a thoughtful and enduring present for loved ones.

2.3. Bracelets and Bangles: Cuff‚ Charm‚ and Beaded Styles

Bracelets and bangles are versatile and stylish gift options‚ perfect for adding a personal touch to any outfit. Cuff bracelets offer a bold‚ modern look‚ while charm bracelets allow for customization‚ making them deeply meaningful. Beaded styles add a bohemian flair‚ ideal for those who appreciate unique‚ handmade pieces. Consider the recipient’s lifestyle when choosing materials and designs‚ ensuring comfort and durability. Personalized charms or engravable cuffs can make the gift even more special. Whether it’s a delicate chain‚ a vibrant beadwork piece‚ or a sleek bangle‚ bracelets are a thoughtful way to celebrate individuality and personal style‚ ensuring a lasting impression.

2.4. Rings: Engagement‚ Wedding‚ and Fashion Rings

Rings are timeless jewelry gifts‚ perfect for celebrating milestones or adding a touch of elegance to everyday looks. Engagement rings‚ often featuring diamonds‚ symbolize commitment and love‚ while wedding rings‚ typically simple bands‚ represent eternal unity. Fashion rings‚ with bold designs or vibrant gemstones‚ make statement pieces for any occasion. Consider the recipient’s style and preferences when choosing between classic solitaires‚ modern halo settings‚ or trendy stackable options. Personalized engravings or birthstones can add sentimental value. Whether for a romantic gesture or a fashion-forward gift‚ rings offer endless possibilities to express thoughtfulness and personal taste‚ making them a cherished choice for any celebration.

2.5. Anklets: Delicate Chains and Charms

Anklets are a beautiful and elegant accessory that can elevate any outfit. Delicate chains‚ often paired with charming pendants or gemstones‚ make them a thoughtful gift. Available in various styles‚ from minimalist designs to elaborate charm anklets‚ they cater to different tastes and preferences. Anklets are perfect for celebrating milestones or adding a personal touch to everyday looks. Consider materials like gold‚ silver‚ or platinum for durability and style. Personalized options‚ such as engravings or birthstones‚ add sentimental value. Whether for a birthday‚ anniversary‚ or graduation‚ anklets offer a graceful and meaningful way to show care and attention to detail.

Jewelry for Special Occasions

Jewelry is a timeless way to commemorate life’s milestones‚ offering elegant pieces for weddings‚ anniversaries‚ birthdays‚ and holidays. It adds a personal‚ meaningful touch to celebrations.

3.1. Birthday Jewelry Gift Ideas

Birthday jewelry is a meaningful way to celebrate a loved one’s special day. Consider birthstone jewelry‚ as each month has a unique gemstone symbolizing traits and qualities. For example‚ January’s garnet or April’s diamond. Personalized pieces‚ like engraved necklaces or bracelets‚ add a heartfelt touch. Zodiac-inspired designs or charm jewelry with significant dates also make thoughtful gifts. Earrings‚ pendants‚ or rings in their favorite style ensure a perfect fit. Pair the gift with a beautifully designed box or card for an extra-special presentation. Jewelry is a lasting reminder of your care and celebration of their life’s milestones.

3.2. Anniversary Jewelry: Timeless and Romantic Choices

Anniversary jewelry is a beautiful way to celebrate love and milestones. Opt for timeless designs like gold or pearl pieces‚ symbolizing enduring commitment. Engraved jewelry with names‚ dates‚ or special messages adds a personal‚ romantic touch. Consider custom-designed pieces that reflect shared memories or personal styles. Eternity bands‚ classic pendants‚ or elegant bracelets are popular choices. Pair the gift with a heartfelt note or luxurious packaging to make it extra special. Anniversary jewelry is not just a gift—it’s a lasting symbol of your journey together‚ crafted to be cherished for years to come.

3.3. Wedding Jewelry: Bridal and Groom Accessories

Wedding jewelry is a vital part of the big day‚ symbolizing love and commitment. For brides‚ classic choices include delicate necklaces‚ elegant earrings‚ and intricately designed veils. Tiaras or hairpieces add a touch of royalty. Grooms can opt for cufflinks‚ tie pins‚ or simple yet sophisticated watches. Engraved pieces‚ such as wedding bands with meaningful dates or initials‚ make the jewelry even more special. Accessories should complement the wedding attire while reflecting personal style. Timeless designs ensure the jewelry remains cherished for years. Whether traditional or modern‚ wedding jewelry plays a significant role in making the occasion unforgettable and deeply personal.

3.4. Holiday Jewelry: Christmas‚ Valentine’s‚ and More

Holiday jewelry is a thoughtful way to celebrate loved ones during festive seasons. For Christmas‚ consider ornate pendants‚ snowflake-inspired designs‚ or red and green gemstones. Valentine’s Day calls for heart-shaped pendants‚ birthstone jewelry‚ or elegant diamond pieces. Personalized jewelry‚ like engraved names or special dates‚ adds a sentimental touch. Holiday-themed accessories‚ such as Easter-themed charms or New Year’s sparkle‚ also make memorable gifts. These pieces are designed to capture the spirit of the occasion‚ making them both festive and meaningful. Whether classic or trendy‚ holiday jewelry is a beautiful way to commemorate celebrations and create lasting memories.

3.5. Graduation Jewelry: Celebrating Milestones

Graduation jewelry is a meaningful way to commemorate academic achievements and milestones. Popular choices include pendants shaped like graduation caps‚ diploma-inspired designs‚ and necklaces with engraved dates or initials. Birthstone jewelry‚ such as a pendant featuring the graduate’s birthstone‚ adds a personal touch. Consider elegant bracelets or rings with motivational engravings like “Class of [Year]” or “Follow Your Dreams.” These pieces serve as lasting reminders of hard work and success. Whether gold‚ silver‚ or gemstone-adorned‚ graduation jewelry is a thoughtful gift that celebrates this significant life event and inspires future endeavors.

Personalized and Custom Jewelry

Personalized jewelry offers a unique way to express individuality. From engraved necklaces with names or dates to custom-designed pieces‚ it adds a personal touch‚ making each gift truly special and meaningful.

4.1. Engraved Jewelry: Names‚ Dates‚ and Messages

Engraved jewelry is a timeless way to add personal significance to a gift. Whether it’s a name‚ date‚ or heartfelt message‚ engraved pieces create a unique and lasting keepsake. This option allows you to tailor the jewelry to the recipient’s identity or a special memory‚ making it deeply meaningful. From romantic anniversary dates to birth names‚ the possibilities are endless. Engraved jewelry is perfect for celebrating milestones or expressing love and appreciation. It combines elegance with sentiment‚ ensuring the gift is not only beautiful but also carries a personal story. This thoughtful touch makes engraved jewelry a cherished possession for years to come.

4.2. Birthstone Jewelry: Meaning and Significance

Birthstone jewelry holds profound emotional and symbolic value‚ as each month is associated with a unique gemstone. These stones are believed to carry special meanings‚ often tied to traits‚ luck‚ or celestial connections. For instance‚ January’s garnet symbolizes loyalty‚ while April’s diamond represents strength. Birthstone jewelry allows for a personalized gift that resonates with the recipient’s birth month‚ creating a lasting connection. It’s a thoughtful way to celebrate individuality and heritage. Whether set in necklaces‚ rings‚ or earrings‚ birthstones add a meaningful touch‚ making the jewelry a cherished keepsake. This tradition-rich option is perfect for birthdays‚ anniversaries‚ or milestone celebrations.

4.3. Custom-Designed Jewelry: Tailored to Taste

Custom-designed jewelry offers a unique way to create a piece that perfectly aligns with the recipient’s personal style and preferences. By working with a designer‚ you can select metals‚ gemstones‚ and designs that reflect their taste‚ ensuring a one-of-a-kind gift. This option allows for intricate details‚ such as engravings or specific symbols‚ adding emotional depth. Whether it’s a special occasion or a milestone‚ custom jewelry stands out as a thoughtful and personalized gesture. It’s a way to show you’ve put extra effort into crafting something just for them‚ making it a truly memorable and cherished possession.

Jewelry for Different Budgets

Jewelry can fit any budget‚ offering affordable‚ mid-range‚ and luxury options. Explore stylish choices that suit every wallet‚ ensuring quality and elegance at every price point.

5.1. Affordable Jewelry: Stylish and Budget-Friendly Options

Affordable jewelry offers a perfect blend of style and value without compromising on quality. From sterling silver to gold-plated pieces‚ there are countless options to suit every taste. Cubic zirconia and crystal jewelry provide luxurious looks at a fraction of the cost. Minimalist designs‚ delicate chains‚ and charm bracelets are popular choices for everyday wear. Birthstone jewelry and simple pendants are also great budget-friendly options. These pieces are ideal for birthdays‚ graduations‚ or as a thoughtful gesture. Online marketplaces and seasonal sales often offer discounts‚ making it easier to find stylish jewelry that fits your budget while still feeling special and meaningful;

5.2. Mid-Range Jewelry: Quality and Style Combined

Mid-range jewelry strikes the perfect balance between quality and affordability‚ offering stylish pieces that last. Made from durable materials like sterling silver‚ gold-plated metals‚ or semi-precious gemstones‚ these designs cater to a wide range of tastes; Popular options include minimalist necklaces‚ elegant pendants‚ and intricate bracelets. Birthstone jewelry and classic studs are also excellent choices for their timeless appeal. Ideal for occasions like anniversaries or weddings‚ mid-range jewelry combines craftsmanship with sophistication. Reputable brands and seasonal sales often provide excellent value‚ ensuring you find a piece that aligns with your budget while delivering exceptional style and durability for years to come.

5.3. Luxury Jewelry: High-End Pieces for Special Occasions

Luxury jewelry represents the pinnacle of craftsmanship and exclusivity‚ designed for milestones and extraordinary celebrations. Often crafted from precious metals like 18k gold‚ platinum‚ or adorned with high-quality gemstones‚ these pieces exude opulence and sophistication. Diamonds‚ sapphires‚ and rubies are popular choices for their rarity and brilliance. Luxury jewelry is frequently custom-designed or sourced from renowned designers‚ offering unique and timeless appeal. Ideal for significant events like high-profile weddings or anniversaries‚ these pieces are not just gifts but lasting family heirlooms. The attention to detail and premium materials ensure every item is a masterpiece‚ reflecting the recipient’s discerning taste and the giver’s thoughtfulness.

How to Select the Perfect Jewelry Gift

Selecting the perfect jewelry gift involves understanding the recipient’s style‚ lifestyle‚ and preferences. Consider metal types‚ gemstones‚ and sizing for a thoughtful‚ personalized choice that ensures comfort and style.

6.1. Understanding the Recipient’s Lifestyle and Preferences

Understanding the recipient’s lifestyle and preferences is crucial for selecting the perfect jewelry gift. Consider their daily activities‚ personal style‚ and jewelry they already wear. For instance‚ active individuals may prefer durable‚ low-maintenance pieces‚ while those who enjoy elegance might favor intricate designs. Examine their wardrobe colors to determine if they lean toward classic or trendy looks. Additionally‚ think about their preferences for metal types‚ gemstones‚ and jewelry types. Pay attention to their social media profiles or past gifts for inspiration. This thoughtful approach ensures the jewelry aligns with their taste and lifestyle‚ making the gift meaningful and personalized.

6.2. Considering Metal Types: Gold‚ Silver‚ Platinum

Choosing the right metal type is essential when selecting jewelry. Gold‚ silver‚ and platinum each offer unique qualities. Gold is timeless and available in various karats (14k‚ 18k‚ 22k)‚ suiting different budgets and preferences. Silver is modern‚ affordable‚ and versatile but may tarnish over time. Platinum is luxurious‚ durable‚ and hypoallergenic‚ making it ideal for sensitive skin. Consider the recipient’s lifestyle and existing jewelry collection to ensure compatibility. For example‚ someone with yellow gold pieces may prefer matching tones‚ while others might favor the sleek look of silver or platinum. Matching the metal to their style enhances the gift’s personal touch and longevity.

6.3. Gemstones: Choosing the Right Stone for the Occasion

Selecting the right gemstone enhances the meaning and beauty of a jewelry gift. Birthstones are ideal for birthdays‚ offering personal significance. Diamonds symbolize eternity‚ making them perfect for anniversaries or weddings. Sapphires and rubies are timeless choices for romantic occasions‚ while emeralds add a touch of elegance. Consider the recipient’s style and preferences when choosing between classic or vibrant stones. For example‚ a bold personality might love a bright sapphire‚ while someone understated may prefer a delicate pearl. The occasion‚ personal style‚ and symbolism of the stone ensure the gift is both thoughtful and memorable.

6.4. Jewelry Size and Fit: Ensuring Comfort and Style

Ensuring the right size and fit is crucial for both comfort and style. Measure wrists for bracelets‚ necks for necklaces‚ and fingers for rings to avoid ill-fitting pieces. Consider the recipient’s lifestyle—active individuals may prefer more secure closures or adjustable designs. For necklaces‚ choose lengths that complement their body type and preferred neckline. Rings should fit snugly without restricting movement. Proper fit enhances the wearer’s confidence and enjoyment of the piece. Always check sizing charts or opt for adjustable options to ensure a perfect fit‚ making the gift both practical and thoughtful.

Jewelry Gift Presentation and Packaging

Presentation is key to a memorable jewelry gift. Use elegant boxes‚ add a personal note‚ or create a scavenger hunt for a special touch;

7.1. Creative Ways to Present Jewelry Gifts

Presenting jewelry thoughtfully enhances its emotional impact. Consider a scavenger hunt leading to the gift or place it in a beautifully designed box with a personalized note. For a romantic touch‚ pair the jewelry with flowers or a heartfelt letter. Themed packaging‚ such as a vintage-inspired case‚ can add elegance. Another creative idea is to wrap the jewelry in a small‚ ornate box and hide it within a larger gift box for a surprising reveal. Custom engraving or a monogrammed pouch can also make the presentation unique. The extra effort in presentation turns a simple gift into an unforgettable experience.

7.2. Choosing the Right Jewelry Box or Case

Selecting the right jewelry box or case is essential for preserving the piece and enhancing its presentation. Opt for materials like leather‚ velvet‚ or satin for a luxurious feel. Ensure the box fits the jewelry perfectly‚ with adequate space to prevent damage. Consider the design—modern‚ sleek boxes for contemporary pieces‚ or ornate cases for vintage styles. Neutral colors like black‚ white‚ or navy are versatile and timeless. Custom engraving or branding can add a personal or professional touch. For extra protection‚ choose boxes with padded interiors or separate compartments. The right packaging not only safeguards the jewelry but also elevates the gifting experience‚ making it feel special and well-curated.

7.3. Adding a Personal Touch: Notes and Cards

A handwritten note or card can elevate your jewelry gift‚ making it deeply personal and meaningful. Consider adding a heartfelt message‚ a memory‚ or the story behind the piece. For birthdays or anniversaries‚ mention how the jewelry symbolizes your connection. Use elegant cards that match the jewelry’s style—simple for modern designs‚ or ornate for vintage pieces. Personalized stationery or monogrammed cards can add sophistication. Include care tips or a special wish to show thoughtfulness. This personal touch transforms the gift into a cherished keepsake‚ ensuring the recipient feels valued and remembered long after the occasion.

Jewelry Care and Maintenance Tips

Proper jewelry care ensures longevity. Clean pieces gently with soft cloths‚ store separately to prevent scratches‚ and avoid exposing to harsh chemicals or extreme temperatures.

8.1. Cleaning and Storing Jewelry Properly

Proper cleaning and storage are essential for maintaining jewelry’s beauty and longevity. Use a mild soap solution and a soft cloth to clean pieces‚ avoiding harsh chemicals. For delicate items‚ consider professional cleaning. Store jewelry in a cool‚ dry place‚ away from direct sunlight‚ to prevent fading or damage. Use a jewelry box with separate compartments to prevent tangling and scratches. Avoid stacking pieces‚ as this can cause wear. Regular maintenance ensures your jewelry remains pristine‚ preserving its value and appearance for years to come.

8.2. Avoiding Damage: Dos and Don’ts

To keep jewelry in pristine condition‚ handle it with care. Avoid exposure to harsh chemicals‚ such as chlorine or cleaning products‚ as they can damage metals and gemstones. Remove jewelry before swimming‚ exercising‚ or engaging in heavy tasks to prevent scratches or bending. Store pieces separately in a jewelry box to avoid tangling and scratching. Clean jewelry regularly with mild soap and water‚ using a soft cloth to polish. Avoid stacking bracelets or necklaces‚ as this can cause wear. By following these dos and don’ts‚ you can protect your jewelry from damage and ensure it remains dazzling for years to come.

8.3. Insuring Valuable Jewelry Pieces

Insuring valuable jewelry pieces is a wise investment to protect against loss‚ theft‚ or damage. Consider adding a rider to your homeowner’s insurance or purchasing a dedicated jewelry insurance policy. These policies often cover repair or replacement of damaged or stolen items. When insuring‚ obtain an appraisal from a certified gemologist to determine the piece’s value. Keep detailed records‚ including receipts and photos‚ for documentation. Review your policy annually to ensure coverage aligns with the item’s current value. This safeguard ensures your treasured jewelry remains protected‚ giving you peace of mind for years to come.

9.1. Final Tips for Choosing the Perfect Jewelry Gift

When selecting jewelry‚ prioritize personalization and thoughtfulness. Consider engravings‚ birthstones‚ or custom designs to add sentimental value. Ensure the piece aligns with the recipient’s style‚ whether classic‚ modern‚ or trendy. Pay attention to metal preferences and gemstone significances. Creative presentation‚ such as unique packaging or a heartfelt note‚ enhances the gift’s impact. Budget-friendly options exist across all price points‚ so focus on quality and meaning rather than cost alone. Finally‚ provide care tips to ensure the jewelry remains treasured for years. The perfect gift reflects love‚ effort‚ and a genuine understanding of the recipient’s tastes and emotions.

9.2. The Thought Behind the Gift: What Truly Matters

The true essence of gifting jewelry lies in the thought and emotion behind it. A well-chosen piece reflects care‚ understanding‚ and appreciation for the recipient. Personalized details‚ such as engravings or birthstones‚ add sentimental value‚ making the gift unforgettable. The act of giving jewelry is a gesture of love and connection‚ transcending monetary worth. Whether it’s a delicate anklet or a bold necklace‚ the effort to align the gift with the recipient’s style and preferences speaks volumes. Ultimately‚ it’s the thought‚ not the price tag‚ that creates lasting memories and strengthens bonds.

avatar frontiers of pandora trophy guide

Welcome to the comprehensive trophy guide for Avatar: Frontiers of Pandora. This guide will help you navigate the immersive world of Pandora, complete challenges, and unlock all achievements. Discover tips for exploration, combat, and collectibles to maximize your progress and earn the coveted Platinum Trophy.

Overview of the Game and Trophy System

Avatar: Frontiers of Pandora is an action-packed open-world game set on the vibrant planet of Pandora, offering a rich narrative and immersive exploration. The trophy system rewards players for completing main quests, side activities, and achieving specific milestones. Trophies are divided into categories, including story progression, collectible hunting, and combat mastery. To earn the Platinum Trophy, players must achieve 100% completion, which includes scanning wildlife, gathering audio logs, and unlocking all skills in the Navi Skill Tree. The game’s trophy list encourages thorough exploration and mastery of its mechanics, making it a challenging yet rewarding experience for dedicated players.

Importance of Exploration and Completion

Exploration and completion are vital in Avatar: Frontiers of Pandora to fully experience its vast, immersive world. The game rewards players for venturing off the beaten path, discovering hidden locations, and engaging with Pandora’s unique ecosystem. Completion involves not only finishing the main story but also tackling side quests, scanning wildlife, and collecting audio logs. These activities contribute to unlocking trophies and achieving 100% completion. Exploration is key to understanding the game’s lore and mechanics, while completion ensures access to all skills in the Navi Skill Tree. By thoroughly exploring and completing every aspect, players can immerse themselves in Pandora’s beauty and challenges, making the journey both rewarding and unforgettable.

Main Story Trophies

Main story trophies in Avatar: Frontiers of Pandora are earned by completing key quests and progressing through the narrative. These achievements mark significant milestones in the game’s storyline, rewarding players for their advancement. Completing main quests is essential to unlocking story-driven trophies, which are integral to the overall trophy set. These trophies highlight the journey through Pandora’s world and its lore, ensuring a memorable experience for players.

Trophies Related to Completing Main Quests

Trophies tied to completing main quests in Avatar: Frontiers of Pandora are awarded for progressing through the game’s narrative. These achievements are unlocked by finishing specific story missions, such as reaching key locations or defeating pivotal enemies. For example, the “Pathfinder” trophy is earned by completing the early quests that introduce the world of Pandora. Another notable trophy, “Champion of the Na’vi,” is awarded upon completing a series of quests that deepen your connection with the Na’vi people. These trophies are straightforward but require dedication to the story. They serve as milestones, celebrating your progress and immersion in the game’s world. Focus on following the main questline to unlock these achievements seamlessly.

Key Story-Driven Achievements

Key story-driven achievements in Avatar: Frontiers of Pandora are tied to pivotal moments in the narrative. The “Champion of the Na’vi” trophy is unlocked by completing a series of quests that strengthen your bond with the Na’vi people. Another significant achievement, “Pathfinder,” is awarded for reaching key locations that advance the story. These trophies highlight your progress through the game’s main storyline and are often accompanied by cinematic moments. Additionally, some achievements require specific actions, such as riding an Ikran for the first time or solving a critical puzzle. These story-driven trophies are essential for earning the Platinum Trophy and showcase your journey through Pandora’s immersive world. They blend seamlessly with the narrative, making your accomplishments feel meaningful and rewarding.

Side Quests and Additional Activities

Side quests and additional activities in Avatar: Frontiers of Pandora offer diverse challenges, enhancing exploration and trophy collection. Completing these enriches your journey and unlocks unique achievements.

Completion of Side Questlines

Completing side questlines in Avatar: Frontiers of Pandora is essential for earning the Platinum Trophy. Approximately four side questlines are required, all of which remain accessible after the main story. These quests provide valuable rewards, deepen the game’s lore, and offer unique challenges. Players must thoroughly explore Pandora to uncover these quests, as some are hidden in remote areas. Utilizing the Hunter’s Guide can help track progress and locate quest-related objectives. Ensure to complete these quests diligently, as they contribute significantly to overall game completion and trophy unlocks. Proper time management and thorough exploration are key to efficiently finishing these side questlines without missing crucial details.

Exploration Quests and Hidden Locations

Exploration quests in Avatar: Frontiers of Pandora are designed to encourage players to delve into the vast, breathtaking world of Pandora. These quests often involve discovering hidden locations, such as ancient ruins, waterfalls, and bioluminescent forests. Completing these quests not only rewards players with valuable items but also contributes to 100% game completion. Hidden locations are scattered throughout the map, requiring players to venture off the beaten path. Utilizing the Ikran for swift travel and the Hunter’s Guide for tracking objectives can significantly enhance exploration efficiency. Some locations are tied to specific trophies, making thorough exploration crucial for achieving the Platinum Trophy. Dedicate time to explore every nook and cranny, as Pandora’s secrets are as rewarding as they are elusive.

Collectibles and Scanning Requirements

Discover and collect Audio Logs, hidden as blue tablets in RDA and Resistance areas, and scan plants and wildlife to unlock specific trophies and enhance exploration.

Audio Logs and Their Locations

Audio Logs are a key collectible in Avatar: Frontiers of Pandora, with 30 scattered across Pandora. These logs are often found as blue tablets near RDA and Resistance camps, providing insights into the game’s lore. To unlock the related trophy, players must locate and collect all of them. Focus on exploring human settlements, military outposts, and resistance hideouts thoroughly. Use your mount to traverse the map efficiently and keep an eye out for glowing blue markers. Some logs are hidden in hard-to-reach areas, requiring precise navigation. Additionally, scanning these logs contributes to the Hunter’s Guide, offering additional context to Pandora’s world and its conflicts. Prioritize systematic exploration to ensure no logs are missed, as they are essential for 100% completion.

Scanning Plants and Wildlife

Scanning plants and wildlife is a crucial aspect of Avatar: Frontiers of Pandora, contributing to two trophies. Players must scan at least 100 unique plants and 100 unique wildlife specimens. These can be found across Pandora’s diverse biomes, from lush forests to open grasslands. Use the in-game Scanner tool to identify and record these elements. Scanning contributes to the Hunter’s Guide, which tracks your discoveries and provides lore about Pandora’s ecosystem. To unlock the trophies, ensure you scan a wide variety of flora and fauna, avoiding duplicates. Explore thoroughly, as some species are rare or hidden in specific locations. This task encourages immersion and rewards meticulous exploration, making it a cornerstone of the game’s completion challenges.

Combat and Skill Trees

Mastery of combat and skill trees is essential for progression. The game offers a variety of combat styles and abilities to unlock, enhancing your gameplay experience.

Trophies Related to Combat Mastery

Earning trophies related to combat mastery requires skill and strategy. Trophies like Precision Hunter and Rider’s Dominance reward accurate headshots and mounted combat prowess. Others, such as Untamed Fighter, unlock by defeating enemies using Pandora’s wildlife. These achievements highlight your ability to adapt and excel in various combat scenarios. Specific actions, like performing stealth takedowns or using unique Navi abilities, are also recognized. Completing challenging combat sequences without taking damage can grant trophies like Flawless Warrior. Additionally, mastering advanced combat techniques, such as dual-wielding weapons or utilizing the environment, will aid in unlocking these rewards. Focus on upgrading your skills and experimenting with different combat styles to efficiently achieve these trophies and enhance your gameplay experience.

Unlocking Skills in the Navi Skill Tree

Unlocking skills in the Navi Skill Tree is essential for enhancing your abilities in Avatar: Frontiers of Pandora. The skill tree is divided into categories like melee, ranged combat, and survival, each offering unique upgrades. To unlock skills, you’ll need to earn experience points by completing quests, defeating enemies, and exploring Pandora. Trophies like Becoming Navi require unlocking a set number of skills across all trees. Focus on upgrading abilities that complement your playstyle, such as improved weapon handling or enhanced stealth. Additionally, some skills are tied to specific achievements, rewarding mastery of certain combat or traversal techniques. Efficiently managing your skill points and prioritizing key upgrades will streamline your progression and help you achieve the coveted Platinum Trophy.

Exploration and Navigation

Mastering exploration and navigation in Avatar: Frontiers of Pandora is crucial for discovering hidden areas and unlocking trophies. Utilize the Ikran for swift travel across Pandora’s vast landscapes, and explore thoroughly to uncover secrets and complete challenges. Efficient navigation enhances progression and rewards, making it a cornerstone of your trophy journey.

Using the Ikran for Efficient Travel

The Ikran, a majestic flying mount, is essential for efficient travel in Avatar: Frontiers of Pandora. Unlocking the Ikran early in the game, specifically during Main Quest 11, allows you to soar across Pandora’s vast landscapes, saving time and enabling access to remote areas. To fly effectively, practice diving and soaring to maintain altitude and cover long distances. The Ikran’s agility and speed make it ideal for exploring hidden locations, completing exploration quests, and reaching hard-to-find collectibles. Regularly using the Ikran will also help you earn trophies like “Banshee Ride” for taming an Ikran and “Na’vi Aviator” for reaching high altitudes. Mastering the Ikran is a key part of your trophy journey, ensuring seamless navigation and enhancing your overall gameplay experience.

Discovering Hidden Areas

Discovering hidden areas in Avatar: Frontiers of Pandora is crucial for unlocking trophies and experiencing the game’s full potential. Use your Ikran to fly over uncharted territories, scanning for unusual landmarks or glowing plants. Pay attention to subtle environmental clues, such as faint sounds or light emissions, which often indicate secret locations. Exploring caves, waterfalls, and dense forests can reveal hidden caches or exclusive collectibles. Utilize the Hunter’s Guide to track rare wildlife or plants, as these often lead to undiscovered zones. Some areas require precise platforming or puzzle-solving to access. Thorough exploration not only aids in trophy completion but also enriches your understanding of Pandora’s lore. Remember, patience and curiosity are key to uncovering the game’s best-kept secrets;

Tips and Tricks for Trophy Hunters

Focus on completing main story quests first to unlock essential skills and abilities early. Regularly use the Ikran for efficient travel and exploration. Scan plants and wildlife thoroughly for hidden collectibles. Prioritize side quests and exploration to maximize progress. Utilize the Hunter’s Guide to track rare items and locations. Experiment with different combat strategies to master various enemies. Stay patient and persistent, as some trophies require thorough exploration and completion.

Optimizing Progression

To optimize your progression in Avatar: Frontiers of Pandora, focus on completing main story quests first to unlock essential skills and abilities early. Use the Ikran for efficient travel across Pandora, enabling quick access to remote areas. Regularly scan plants and wildlife to contribute to collectible-related trophies and gain insights into the environment. Utilize the Hunter’s Guide to track rare items and locations, ensuring you don’t miss hidden collectibles or side quests. Complete side quests and exploration missions to earn additional XP and unlock new skills in the Navi skill tree. Experiment with combat strategies to master various enemies and weapons. Stay persistent and thorough, as some achievements require extensive exploration and completion of specific tasks.

Using the Hunters Guide Effectively

The Hunter’s Guide is a vital tool for tracking collectibles and hidden items in Avatar: Frontiers of Pandora. Pin up to three items at a time to prioritize your search, ensuring efficient progression. Regularly update the guide as you explore to unlock new entries and locations. Focus on specific regions to avoid missing rare items, and use the guide to identify gaps in your collection. This system is particularly useful for locating Audio Logs and scanning targets for 100% completion. By leveraging the Hunter’s Guide effectively, you can streamline your trophy hunt and minimize post-game cleanup. Make it a habit to consult the guide frequently to stay on track and unlock achievements seamlessly.

Platinum Trophy Roadmap

Earn the Platinum Trophy by completing the story, all side quests, and collectibles. Focus on scanning wildlife, gathering Audio Logs, and mastering combat skills. Estimated completion time: 50-70 hours.

Step-by-Step Guide to Earning the Platinum

To earn the Platinum Trophy in Avatar: Frontiers of Pandora, follow this structured approach. Begin by completing the main story quests while scanning plants and wildlife to unlock early trophies. Next, focus on side quests and exploration missions to uncover hidden locations and collectibles. Use the Ikran for efficient travel and discover all Audio Logs scattered across Pandora. Complete specific activities, such as defeating a set number of enemies or reaching 100% synchronization in certain areas. After the story, dedicate time to cleanup by tracking remaining trophies using the Hunters Guide. Ensure all skill trees are fully unlocked and optimize your progression to avoid missing any achievements. With dedication and thorough exploration, the Platinum Trophy can be achieved in approximately 50-70 hours of gameplay.

Estimated Completion Time

Completing Avatar: Frontiers of Pandora and unlocking all trophies requires approximately 50-85 hours, depending on your skill level and dedication. The main story and essential side quests can be completed in around 30-40 hours, while 100% completion, including collectibles and hidden achievements, will take significantly longer. Players should allocate time for scanning plants and wildlife, completing exploration quests, and mastering combat skills. Cleanup activities, such as finalizing skill trees and gathering remaining collectibles, may add an additional 15-25 hours. Playing on any difficulty won’t affect trophy progress, so choose your preferred challenge level. With a well-planned approach and efficient use of the Hunters Guide, you can streamline your journey to the Platinum Trophy.

Post-Game Activities and Cleanup

Post-game cleanup involves exploring Pandora for any remaining collectibles, completing leftover side quests, and scanning uncollected plants and wildlife. Finalizing skill trees and completing any missed achievements is also essential during this phase. This step ensures all requirements for the Platinum Trophy are met, rounding off your journey in Pandora.

Completing Remaining Collectibles

After completing the main story, focus on tracking down any remaining collectibles, such as audio logs and scanned plants and wildlife. Audio logs, often found in RDA or Resistance camps, provide valuable lore and insights. Scanning plants and wildlife is crucial for unlocking certain trophies, so ensure you’ve documented at least 30 unique species. Use the Hunters Guide to mark and track missing items, pinning up to three at a time for efficient searching. Explore hidden areas and revisit familiar locations with a keen eye for detail. Thoroughly scanning every nook and cranny, especially in densely forested regions, will help uncover elusive collectibles. This step is essential for achieving 100% completion and securing the Platinum Trophy.

Finalizing Skill Trees

Completing the skill trees in Avatar: Frontiers of Pandora is a crucial step toward achieving the Platinum Trophy. Focus on unlocking key abilities that enhance exploration, combat, and stealth. The Navi Skill Tree is divided into five categories, and you’ll need to unlock at least 15 skills total, with at least three in each tree. Some skills, like those in the Rider Skill Tree, become available only after obtaining the Ikran. Use resources wisely, as materials for upgrades can be gathered from the environment or purchased from vendors. Prioritize abilities that complement your playstyle and aid in completing remaining trophies. While you don’t need to max out every tree, ensuring all trophy-related skills are unlocked is essential for 100% completion. This step ensures you’re fully prepared for any challenges during post-game cleanup.

Miscellaneous Trophies

Miscellaneous trophies include unique achievements for specific actions, such as discovering hidden patterns or completing unusual tasks. These add variety to your trophy collection and encourage creative play.

Trophies for Specific Actions

Certain trophies in Avatar: Frontiers of Pandora are awarded for performing specific actions or achieving unique milestones. These include flying a set distance on an Ikran or completing a mission without taking damage. Such trophies add a layer of challenge and encourage players to explore different playstyles.

For example, scanning a certain number of plants or wildlife is required for some achievements. These actions not only unlock trophies but also deepen your understanding of Pandora’s ecosystem. Keep an eye on your progress tracker to ensure you’re on the right path.

Additionally, some trophies are tied to completing specific side quests or interacting with the environment in unique ways. These achievements often require patience and attention to detail, making them rewarding to unlock.

Hidden or Unusual Achievements

Some trophies in Avatar: Frontiers of Pandora are hidden or require unconventional actions to unlock. For example, the “Becoming Navi” trophy involves unlocking 15 skills across the Navi skill tree, while others might involve finding rare locations like the “Weeping Steps.” These achievements often reward creativity and exploration.

Hidden achievements might require specific interactions with Pandora’s environment or completing unique challenges. For instance, certain trophies are tied to scanning rare wildlife or plants, encouraging players to thoroughly explore the world. These unusual milestones add depth to the game and provide a sense of accomplishment for dedicated players.

Keep an eye out for these hidden gems, as they often involve unexpected gameplay moments or discoveries that make the journey through Pandora even more rewarding.

Completing the trophy set for Avatar: Frontiers of Pandora is a rewarding journey that requires exploration, skill mastery, and dedication. Enjoy the adventure and the Platinum Trophy!

Final Thoughts on Completing the Trophy Set

Earning the Platinum Trophy in Avatar: Frontiers of Pandora is a testament to perseverance and dedication. The journey through Pandora’s vast world, filled with breathtaking landscapes and intricate challenges, offers a deeply rewarding experience. By meticulously exploring every corner, mastering combat skills, and uncovering hidden secrets, players can fully immerse themselves in the Na’vi culture and the game’s rich narrative. The trophy set encourages thorough completion, requiring players to engage with all aspects of the game, from main quests to side activities and collectible hunting. While the process can be time-consuming, the sense of accomplishment upon achieving 100% completion is unparalleled, making the effort truly worthwhile for dedicated trophy hunters.

self portrait size guide

Understanding the Importance of Size in Self-Portraits

The size of a self-portrait significantly influences its impact‚ with larger works commanding attention and smaller pieces inviting introspection‚ while medium sizes balance detail and accessibility;

Historical Context of Self-Portrait Sizes

Self-portrait sizes have evolved significantly over centuries‚ reflecting artistic trends and cultural values. During the Renaissance‚ artists like Rembrandt and Leonardo da Vinci often created smaller‚ intimate self-portraits‚ while larger works were typically reserved for wealthy patrons. In the 19th and 20th centuries‚ artists began experimenting with larger formats‚ influenced by movements like Realism and Expressionism. The size of self-portraits often conveyed the artist’s status or intent‚ with smaller pieces emphasizing humility and larger ones showcasing grandeur. Historical materials and techniques also dictated size‚ as smaller canvases were more practical for personal use. This historical context highlights how size has been a deliberate choice‚ shaped by both artistic vision and societal norms.

The Role of Size in Visual Impact

The size of a self-portrait plays a crucial role in its visual impact‚ as it determines how the viewer engages with the artwork. Larger self-portraits tend to command attention‚ emphasizing facial features and emotions‚ making them ideal for gallery settings. Smaller pieces‚ however‚ create a sense of intimacy‚ drawing the viewer into the artist’s personal space. The scale also influences composition and detail‚ with larger works allowing for intricate expressions and textures‚ while smaller ones focus on simplicity and subtlety. Ultimately‚ the size of a self-portrait is a deliberate choice that shapes its emotional resonance and aesthetic appeal‚ ensuring it communicates the artist’s intended message effectively.

Emotional Expression Through Size

Size in self-portraits is a powerful tool for emotional expression‚ as it conveys the artist’s inner state and connection with the viewer. Larger portraits often amplify emotions‚ making bold statements and drawing immediate attention to the subject’s feelings. Smaller pieces‚ however‚ can evoke vulnerability or modesty‚ creating a deeper‚ more personal connection. The scale also reflects the artist’s perspective‚ with life-sized works offering a sense of authenticity‚ while exaggerated sizes can distort reality‚ emphasizing specific emotions. By carefully choosing the size‚ artists can control the intensity and intimacy of their self-portraits‚ ensuring the emotional message resonates clearly with the audience. This deliberate use of size transforms the artwork into a compelling narrative of the artist’s inner world.

Standard Sizes for Self-Portraits

Common self-portrait sizes range from small‚ intimate 8×10 inches to larger‚ impactful 24×36 inches‚ offering flexibility for personal expression and display purposes‚ ensuring proper sizing for visual balance.

Common Dimensions for Printed Self-Portraits

When it comes to printing self-portraits‚ choosing the right dimensions is crucial for both visual appeal and practicality. Common sizes include 8×10 inches‚ 11×14 inches‚ and 16×20 inches‚ which are ideal for framing and displaying in standard spaces. Larger formats like 18×24 inches or 24×36 inches are popular for making a bold statement‚ while smaller sizes like 5×7 inches are great for intimate or wallet-sized prints. The choice often depends on the intended display location and the level of detail desired. Additionally‚ ensuring high-resolution images (at least 300 DPI) is essential for crisp‚ professional-looking prints. Standard aspect ratios‚ such as 3:2 or 4:3‚ are also commonly used to maintain balance and proportion in the composition.

Digital Display Sizes for Self-Portraits

Digital self-portraits require careful consideration of size and resolution to ensure optimal display across various platforms. Common digital sizes include 1080×1080 pixels for social media posts‚ 1200×1800 pixels for vertical formats‚ and 1920×1080 pixels for desktop wallpapers. Aspect ratios like 1:1 for square images or 3:2 for a classic portrait feel are popular choices. For websites or online galleries‚ sizes like 800×600 pixels or 1024×768 pixels are often used. High-resolution images (72-96 DPI) are essential for clarity on screens. When resizing‚ maintaining the original aspect ratio is crucial to avoid distortion. Additionally‚ optimizing for different platforms ensures your self-portrait looks professional and visually appealing‚ whether it’s shared online or showcased in a digital portfolio.

Resizing Best Practices

Resizing self-portraits requires careful attention to maintain image quality and integrity. Always start with high-resolution originals to ensure clarity when scaling down. Use image editing software like Photoshop or GIMP to resize‚ applying bicubic interpolation for smooth transitions. Avoid over-enlarging‚ as this can lead to pixelation. When reducing size‚ consider the platform’s requirements to prevent unnecessary compression. Sharpen images after resizing to counteract softening. Batch processing can save time for multiple images. Preserve the aspect ratio to avoid distortion and test resized images on different devices. Backup originals before resizing to maintain a master copy. These practices ensure your self-portraits remain professional and visually appealing across various formats and displays.

Materials and Surfaces

Choosing the right materials and surfaces for self-portraits enhances size perception and artistic expression‚ with canvas‚ paper‚ and digital screens offering unique textures and visual impacts.

Choosing the Right Material Based on Size

Selecting the appropriate material for your self-portrait is crucial‚ as it directly impacts the final piece’s durability and visual appeal. For larger self-portraits‚ sturdy materials like canvas or wood panels are ideal‚ as they provide a solid base for detailed work. Smaller pieces‚ such as miniature self-portraits‚ often thrive on paper or smaller‚ lightweight surfaces. The texture of the material also plays a role; smooth surfaces are better for fine details‚ while rough textures can add depth and emotion. Additionally‚ digital self-portraits require high-resolution screens or printers to maintain clarity; Ultimately‚ the material choice should align with the size and intended display of the artwork to ensure optimal results.

Impact of Surface Texture on Size Perception

The surface texture of a self-portrait can significantly influence how its size is perceived. Smooth textures often create a sense of cleanliness and minimalism‚ making smaller works appear more delicate and focused. Rough or heavily textured surfaces‚ on the other hand‚ can add depth and visual weight‚ making even smaller pieces feel more dynamic and larger-than-life. For larger self-portraits‚ a textured surface can enhance the sense of grandeur and emotion‚ while a smooth surface might emphasize detail and precision. The interplay between texture and size can also affect how the viewer’s eye moves across the artwork‚ with rough textures drawing attention to specific areas. Ultimately‚ the surface texture should complement the size of the piece to create the desired emotional and visual impact.

Digital Considerations

Digital self-portraits require careful attention to resolution‚ aspect ratio‚ and file size for optimal display across devices‚ ensuring clarity and consistency in online platforms and social media.

Resolution and Aspect Ratio for Digital Self-Portraits

For digital self-portraits‚ maintaining the right resolution and aspect ratio is crucial for visual clarity and professional presentation. A minimum resolution of 300 DPI is recommended for prints‚ while 72 DPI is standard for web use. The aspect ratio‚ which determines the proportional relationship between width and height‚ should be carefully chosen to complement the composition. Common ratios include 3:2‚ 4:3‚ 1:1‚ and 16:9‚ each suited for different platforms and displays. Ensuring consistency across platforms prevents distortion or cropping issues. When resizing‚ preserve the aspect ratio to maintain the integrity of the image. Tools like Adobe Photoshop or online editors can help optimize these settings for various mediums‚ ensuring your self-portrait looks its best whether printed or shared digitally.

Optimizing for Social Media Platforms

When sharing self-portraits on social media‚ optimizing for platform-specific guidelines ensures maximum visibility and engagement. Common aspect ratios for platforms include 1:1 for Instagram feeds‚ 9:16 for TikTok or Instagram Stories‚ and 16:9 for YouTube thumbnails. Maintaining a high-resolution image (72 DPI for web) ensures clarity‚ while compressing files to appropriate sizes prevents slow loading times. Platforms like Instagram and Facebook automatically crop images‚ so using tools like Canva or Adobe Spark to resize and format your work can help maintain composition integrity. Experimenting with platform-specific filters and presets can also enhance visual appeal. Consistency across platforms ensures a professional and cohesive online presence‚ making your self-portraits stand out in crowded feeds.

Printing and Framing

Printing and framing are crucial for showcasing self-portraits. Standard sizes like 8×10″ or 11×14″ ensure compatibility with frames‚ while matte or glossy paper enhances visual depth and texture.

Printing Considerations for Different Sizes

When printing self-portraits‚ size plays a critical role in achieving the desired visual impact. Smaller sizes‚ like 4×6″ or 5×7″‚ are ideal for detailed work and intimate settings‚ while larger formats‚ such as 16×20″ or 24×36″‚ create bold statements. Medium sizes‚ such as 8×10″ or 11×14″‚ strike a balance between detail and accessibility; High-resolution images (300 DPI or higher) are essential for larger prints to avoid pixelation. Canvas or high-quality paper is recommended for larger sizes to maintain texture and vibrancy. Custom sizes offer flexibility but may require special framing. Always consider color profiles and test prints to ensure accuracy. Proper sizing enhances the emotional and artistic impact of the self-portrait.

Bleed and Margins in Printing

Bleed and margins are crucial for professional printing of self-portraits. A bleed ensures the image extends beyond the trim line‚ preventing white edges. Standard bleed is 0.125″ on all sides. Margins define the unprinted area‚ typically 0.25″ for safety. Proper setup avoids cropped details. Use graphic design tools like Adobe Photoshop or Illustrator to set bleed and margins accurately. Check printer guidelines for specific requirements. Neglecting bleed and margins risks uneven or crooked prints. Always preview and adjust before final printing. This ensures your self-portrait is framed perfectly‚ enhancing its presentation and preserving artistic intent.

Composition and Placement

Composition and placement guide the viewer’s eye‚ creating balance and harmony. Elements like balance‚ focus‚ and negative space define the visual flow‚ enhancing the portrait’s emotional impact.

Rule of Thirds in Self-Portraits

The rule of thirds is a fundamental composition technique that divides the frame into nine equal parts using two vertical and two horizontal lines. Placing key elements along these lines or at their intersections creates balance and visual interest. In self-portraits‚ this method ensures the subject isn’t centered‚ which can make the image less dynamic. Instead‚ positioning the face or eyes at one of the intersection points draws the viewer’s eye naturally. This approach also helps avoid a static composition‚ making the portrait more engaging. Experimenting with this rule allows artists to guide the viewer’s focus effectively‚ enhancing the overall emotional impact of the piece. Proper use of the rule of thirds can elevate a self-portrait from ordinary to extraordinary.

Use of Negative Space

Negative space in self-portraits refers to the areas around and between subjects‚ which can create a sense of simplicity and focus. By minimizing distractions‚ negative space directs the viewer’s attention to the subject’s expression and details. This technique is particularly effective in smaller formats‚ where clutter can easily overwhelm the composition. It also allows for a more intimate and contemplative feel‚ making the portrait feel more personal. Artists often use negative space to evoke emotions or tell a subtle story‚ as the empty areas can imply context or mood. When balanced correctly‚ negative space enhances the overall impact of the self-portrait‚ making it visually striking and thought-provoking. Proper use of negative space is a powerful tool in creating compelling and memorable self-portraits.

Subject Placement Within the Frame

Subject placement is crucial in self-portraits‚ as it dictates the visual flow and focus. The rule of thirds is a popular technique‚ where the subject is positioned off-center‚ creating balance and dynamism. Symmetry can also be effective‚ especially for formal or introspective pieces. Placing the subject slightly off-center often results in a more engaging composition. The use of negative space around the subject can enhance the emotional depth of the portrait. For larger formats‚ the subject can be smaller within the frame to emphasize surroundings‚ while in smaller sizes‚ a tighter crop focuses attention on facial details. Experimenting with placement based on the desired mood and size ensures a visually compelling self-portrait. Proper placement enhances storytelling and viewer engagement‚ making it a key element in composition.

Cropping and Editing

Cropping refines focus‚ emphasizing key features‚ while editing tools adjust proportions and balance‚ ensuring the self-portrait maintains its integrity across various sizes and formats effectively.

Cropping Techniques for Size Adjustment

Cropping is a powerful tool for refining a self-portrait’s composition and adapting it to different sizes. Start by identifying the focal point‚ ensuring it remains central. Use the rule of thirds to maintain balance. Experiment with aspect ratios like 4:5 or 3:4 for a cohesive look. Avoid over-cropping‚ as it can distort proportions. For smaller sizes‚ focus on the face‚ while larger formats allow for full-body inclusion. Tools like the crop tool in software can help achieve precise adjustments. Consider the platform’s requirements‚ such as square formats for social media or panoramic for exhibitions. Always save a high-resolution original before cropping. This ensures quality remains intact across various sizes and formats.

Editing for Proportion and Balance

Editing plays a crucial role in maintaining proportion and balance in self-portraits. Adjustments like scaling‚ rotating‚ and flipping ensure the image fits the desired size without distortion. Use software tools to fine-tune proportions‚ ensuring facial features and body ratios remain natural. Balance is achieved by aligning elements symmetrically or asymmetrically‚ depending on the artistic intent. Pay attention to resolution; high DPI ensures clarity when resizing. Avoid over-editing‚ as it can disrupt the original composition. Always work on a duplicate layer to preserve the original. These steps ensure the self-portrait looks polished and visually appealing across various formats and platforms‚ maintaining artistic integrity and technical quality.

Practical Tips and Tricks

Experimenting with various sizes and formats enhances creativity. Starting small allows for detail mastery‚ while larger works showcase expression. Reference images ensure accuracy and proportion‚ helping achieve balance and composition. Explore different materials and surfaces to find what suits your style best. Lighting and presentation significantly impact the final display. Regularly resizing and cropping keeps your portfolio fresh and dynamic. Seeking feedback from artist communities refines your technique. Continuous practice and adaptability are key to mastering self-portrait size and composition‚ ensuring each piece is unique and impactful.

Starting Small: Benefits of Miniature Self-Portraits

Creating miniature self-portraits offers numerous advantages for artists. Small sizes allow for refined detail work and technique mastery without overwhelming complexity. They foster intimacy and focus‚ enabling precise control over features and expressions. Miniature portraits are cost-effective‚ requiring fewer materials and space. This approach encourages experimentation with styles and mediums‚ helping artists build confidence and skill. It also allows for quick completion‚ providing a sense of accomplishment and motivation. Additionally‚ small-scale works are ideal for practice‚ enabling artists to refine their craft before scaling up. The portability of miniature self-portraits makes them easy to share or display‚ offering flexibility for exhibitions or personal portfolios. Starting small is a practical way to hone artistic abilities while exploring creative possibilities.

Using Reference Images for Accuracy

Using reference images is a crucial step in creating accurate and detailed self-portraits. These images provide a clear guide for capturing precise features‚ expressions‚ and proportions. By studying references‚ artists can achieve a more realistic representation of themselves‚ ensuring consistency in their work. Reference images also help in maintaining proper scale and perspective‚ which is especially important when working with specific sizes. They allow artists to focus on subtle details‚ such as the shape of the eyes or the texture of the skin‚ enhancing the overall realism of the portrait. Additionally‚ references can inspire creativity and help artists experiment with different styles while maintaining accuracy. This practice is particularly beneficial for those refining their technique or exploring new artistic approaches.

Experimenting with Different Formats

Experimenting with different formats allows artists to explore various creative possibilities in self-portraits. From square to panoramic‚ each format offers unique compositional opportunities. Square formats are ideal for social media‚ while rectangular ones provide a cinematic feel. Circular or oval frames can add a timeless‚ vintage aesthetic. Digital formats‚ such as vertical or horizontal orientations‚ cater to specific platforms or displays; Artists can also resize their work to suit different purposes‚ ensuring their art remains versatile. This experimentation encourages innovation and helps artists discover the format that best complements their style and vision. By exploring these options‚ creators can enhance their artistic expression and reach a broader audience.

Framing and Mounting

Framing and mounting enhance the presentation and protection of self-portraits‚ ensuring they are displayed securely while complementing their size and material‚ adding a professional finish.

Framing Options for Various Sizes

Choosing the right frame for your self-portrait depends on its size and style. For small pieces‚ slim frames in neutral tones like black‚ white‚ or gray enhance detail without overwhelming the artwork. Medium-sized portraits can benefit from slightly wider frames with subtle textures or finishes‚ adding depth without distracting from the subject. Large self-portraits often look best in bold‚ statement frames that complement the scale and energy of the piece. Consider materials like wood‚ metal‚ or acrylic‚ and ensure the frame’s proportions align with the artwork to create a balanced‚ cohesive display. This approach ensures the frame enhances rather than overpowers the portrait.

Mounting Techniques for Stability and Display

Mounting your self-portrait correctly is essential for both stability and visual appeal. Acid-free mats and foam core are popular choices for ensuring the artwork remains flat and protected from moisture. For added durability‚ consider using adhesive-backed mounting boards or spray adhesives designed for artwork. If displaying digitally‚ ensure the file is properly optimized for its intended platform. For physical pieces‚ acrylic or glass can be used to protect the surface while maintaining clarity. Proper alignment and secure framing are crucial to prevent movement or warping over time. These techniques ensure your self-portrait remains stable‚ preserving its quality and enhancing its display longevity.

Lighting and Presentation

Proper lighting enhances the visibility of details in self-portraits‚ while presentation techniques like consistent framing and spacing create a cohesive visual experience for viewers.

Lighting Considerations for Display

Lighting plays a crucial role in showcasing self-portraits effectively. Natural light is ideal for consistency‚ but artificial lighting‚ such as LED or softbox lights‚ offers better control over intensity and direction. Avoid harsh or direct lighting‚ as it can create unflattering glare or shadows. Instead‚ use diffused lighting to evenly illuminate the artwork‚ ensuring all details are visible. The color temperature of the light should align with the ambient environment to maintain the artwork’s intended hues. Experiment with lighting angles to highlight the subject’s features without overexposing the background. For digital displays‚ adjust screen brightness and calibration to ensure the self-portrait appears vibrant and true to its original form. Proper lighting enhances both the visual appeal and emotional impact of the piece.

Creating a Cohesive Display Environment

Creating a cohesive display environment for self-portraits involves careful consideration of spatial arrangement‚ wall color‚ and thematic consistency. Ensure the artwork is centered and well-spaced to draw attention without overwhelming the viewer. Neutral or complementary wall colors enhance the piece’s visibility and maintain visual harmony. Grouping self-portraits by size‚ style‚ or theme fosters a unified aesthetic. Avoid cluttering the surrounding area to prevent distractions; The display space should reflect the artist’s intent‚ whether formal or casual. Proper alignment and leveling of the artwork ensure a professional presentation. A well-curated environment not only enhances the artwork’s appeal but also creates a meaningful connection between the piece and its audience. Balance is key to achieving a visually pleasing and thoughtfully designed display.

Resources and Further Reading

Explore books on self-portrait techniques‚ enroll in online courses for composition mastery‚ and join artist communities for inspiration and constructive feedback on your work.

Recommended Books on Self-Portrait Techniques

For in-depth guidance on self-portrait techniques‚ explore books like “The Artist’s Guide to Self-Portraits” and “Mastering Portrait Painting.” These resources offer insights into proportion‚ expression‚ and composition. “The Art of Self-Portraiture” provides historical context and modern approaches‚ while “Drawing and Painting the Human Face” focuses on realistic techniques. “Creative Self-Portraits” encourages experimentation with style and medium. Each book provides practical tips and visual examples‚ helping artists refine their skills. Whether you’re a beginner or advanced‚ these texts are invaluable for mastering self-portrait techniques and understanding the role of size in your work.

Online Courses for Mastering Size and Composition

Enhance your self-portrait skills with online courses that focus on size and composition. Platforms like Coursera and Udemy offer classes that explore resizing techniques‚ aspect ratios‚ and visual balance. Skillshare provides workshops on digital tools for adjusting proportions‚ while Artists Network features tutorials on framing and negative space. These courses cater to all skill levels‚ offering practical lessons and hands-on projects. They emphasize how size impacts emotional expression and visual hierarchy‚ helping you create compelling‚ well-proportioned self-portraits. Whether you’re refining digital or traditional methods‚ these resources provide expert guidance to elevate your artistry.

Artist Communities for Feedback and Inspiration

Engaging with artist communities can significantly enhance your self-portrait work. Platforms like Behance and Instagram allow artists to share their pieces‚ receive constructive feedback‚ and gain inspiration from others. Communities such as ArtStation and DeviantArt offer dedicated spaces for networking and growth. These groups often feature critiques‚ challenges‚ and discussions on techniques like resizing‚ composition‚ and emotional expression. By participating in these forums‚ you can refine your approach to size and proportion while staying updated on trends. Additionally‚ many communities host virtual exhibitions‚ providing opportunities to showcase your work and connect with like-minded creators. Joining these networks can foster creativity and help you master the nuances of self-portrait art.

tv guide for flagstaff az

The Flagstaff, AZ TV Guide provides essential information for local viewers, helping them stay updated on channel lineups, listings, and schedules for both broadcast and cable services.

1.1 Overview of TV Viewing Options in Flagstaff, AZ

Flagstaff, AZ offers a variety of TV viewing options, including over-the-air channels, cable, satellite, and streaming services. Residents can access major broadcast networks like ABC, Univision, and PBS, as well as Spanish-language channels such as UniMás and Telemundo. Cable providers like Spectrum and Suddenlink provide extensive channel lineups, while satellite options include DirecTV and Dish. Additionally, streaming platforms like Hulu and YouTube TV offer flexible viewing choices. With numerous options available, viewers in Flagstaff can enjoy a diverse range of entertainment, news, and educational content tailored to their preferences.

1.2 Importance of a TV Guide for Local Viewers

A TV guide is crucial for Flagstaff viewers, offering a comprehensive schedule of programs across various channels. It helps viewers plan their watching experience, ensuring they don’t miss favorite shows or live events. With detailed listings, users can navigate through over-the-air, cable, and satellite options efficiently. The guide also highlights local news and community programming, fostering connection to regional events. This resource is indispensable for staying informed and entertained, making it a vital tool for the community.

Local TV Channels in Flagstaff, AZ

Flagstaff offers a diverse range of local TV channels, including major networks, Spanish-language stations, and educational programming, ensuring a wide variety of content for all viewers.

2.1 Major Broadcast Networks Available

Flagstaff, AZ offers access to major broadcast networks like ABC, CBS, NBC, and FOX. Channels include KNXV-ABC Phoenix, AZ HD, KPHO-CBS, KSAZ-NBC, and KSAZ-FOX. These networks provide local news, sports, and entertainment, including popular shows like American Idol and The Partridge Family. With digital TV, viewers enjoy crisp HD signals, ensuring high-quality programming. Flagstaff residents can also watch major events like the NBA Finals and U.S. Open Golf Championship through these networks, making them essential for diverse viewing preferences.

2.2 Spanish-Language Channels in Flagstaff

Flagstaff, AZ offers several Spanish-language channels, including KFPH-UniMás and KTAZ-Telemundo. These channels provide a variety of programming, such as news, sports, and entertainment, catering to the Hispanic community. Univision (channel 17) and UniMás (channel 13) are also available, offering popular shows like telenovelas and soccer matches. These channels ensure Spanish-speaking residents can stay connected to their culture and access diverse content, making them a vital part of Flagstaff’s TV offerings.

2.3 Local PBS and Educational Channels

Flagstaff, AZ is served by Arizona PBS, offering educational and cultural programming. Channels like 8.1 HD, 8.2 Life, 8.3 World, and 8.4 KIDS provide diverse content, including documentaries, educational series, and children’s shows. These channels cater to lifelong learning and community engagement, making them invaluable for residents seeking informative and enriching content. Additionally, KNAZ-TV contributes to local news and entertainment, ensuring a well-rounded viewing experience for the community.

Channel Lineups for Flagstaff, AZ

Flagstaff offers diverse channel lineups, including broadcast, cable, and satellite options. Residents enjoy access to sports, movies, and local news, with providers like Spectrum and DirecTV.

3.1 Broadcast TV Channels

Flagstaff residents can access a variety of broadcast TV channels, including major networks like ABC, Univision, and Telemundo. Local channels such as KFPH-UniMás and KTAZ-Telemundo provide diverse programming. Digital TV enhances signal quality, offering channels like KNXV-ABC and KTVW-Univision in HD. Additional options include specialty channels like American Heroes Channel, Vice TV HD, and Smithsonian Channel HD. These channels cater to a wide range of interests, from sports to educational content. With a TV antenna, viewers can enjoy free access to these channels, ensuring a rich entertainment experience without subscription fees.

3.2 Cable TV Channels

Flagstaff’s cable TV channels offer a wide range of options for viewers, including popular networks like Spectrum and Suddenlink. These providers deliver channels such as American Heroes Channel, UP HD, and Lifetime Real Women. Cable TV also features specialty channels, including Crime and Investigation, Military History Channel, and Smithsonian Channel HD. With cable, residents can access a diverse lineup of sports, movies, and family-friendly content. While cable requires a subscription, it provides reliable access to a broad spectrum of programming tailored to various interests and preferences.

3.3 Satellite TV Channels

Satellite TV channels in Flagstaff, AZ, are provided by services like DirecTV and Dish Network. These platforms offer access to a variety of channels, including HD options such as KNXV-ABC and KTVW-Univision. Satellite TV also features specialty channels like Vice TV HD, Smithsonian Channel HD, and Military History Channel. With satellite TV, viewers can enjoy a wide range of sports, movies, and entertainment programming. Satellite services are particularly beneficial for areas where cable access is limited, ensuring residents stay connected to their favorite shows and live events.

TV Listings for Flagstaff, AZ

TV listings for Flagstaff, AZ, provide detailed schedules for local channels, including over-the-air, cable, and satellite options. Viewers can plan their TV schedule with accurate airing times.

4;1 Over-the-Air TV Listings

Over-the-air TV listings in Flagstaff, AZ, offer free access to local channels like KFPH-UniMás, KTAZ-Telemundo, and KNXV-ABC. These channels provide news, sports, and entertainment. Viewers can use a TV antenna to receive these signals. Listings include popular shows, live sports, and community programs, ensuring diverse content for all audiences. Schedules are updated daily, making it easy to plan viewing. This service is a cost-effective way to enjoy local programming without subscription fees, catering to a wide range of viewer preferences.

4.2 Cable TV Listings

Cable TV listings in Flagstaff, AZ, provide a wide range of channels, including popular networks like Spectrum, Suddenlink, and DirecTV. Viewers can access entertainment, sports, and news through channels such as American Heroes Channel, Vice TV HD, and Crime & Investigation. Listings are updated regularly, offering detailed schedules for prime-time shows, movies, and live events. Cable TV listings ensure viewers can plan their watching experience with ease, catering to diverse interests and preferences. This service is ideal for those seeking a broader selection of programming options.

4.3 Satellite TV Listings

Satellite TV listings in Flagstaff, AZ, offer diverse programming through providers like DirecTV and Dish Network. Channels include Smithsonian Channel HD, Lifetime Real Women, and sports events. Viewers can access national networks and regional content, ensuring a wide range of entertainment options. Listings are updated frequently, providing schedules for movies, live sports, and popular shows. Satellite TV listings cater to various interests, offering high-definition quality and reliability for Flagstaff residents seeking expansive channel options and consistent service.

How to Watch TV in Flagstaff, AZ

Residents can watch TV using antennas for over-the-air channels, subscribe to cable providers like Spectrum, or opt for satellite services such as DirecTV or Dish Network.

5.1 Using a TV Antenna for Over-the-Air Channels

Using a TV antenna in Flagstaff allows viewers to access over-the-air channels for free. Popular channels include KFPH-UniMás (13), KTAZ-Telemundo (14), and KNXV-ABC (15). These antennas provide reliable access to local news, sports, and entertainment without subscription fees. With digital TV advancements, signals are clearer, offering high-definition options like KNXV-DT Antenna (16) and KTVW-Univision (17). This cost-effective method ensures viewers stay connected to their favorite shows and community programs, making it a practical choice for budget-conscious households in Flagstaff.

5.2 Popular Cable TV Providers in Flagstaff

Flagstaff residents have access to reliable cable TV providers like Suddenlink, offering a diverse range of channels. These providers deliver local favorites, including KFPH-UniMás (13), KTAZ-Telemundo (14), and KNXV-ABC (15), along with popular networks such as American Heroes Channel (313), Vice TV HD (314), and Smithsonian Channel HD (317). With options for digital channels and HD programming, cable TV in Flagstaff ensures a robust entertainment experience, catering to various viewer preferences and enhancing the local TV guide’s value for the community.

5.3 Satellite TV Providers Serving Flagstaff

Satellite TV providers like DirecTV and Dish Network serve Flagstaff, offering a wide range of channels, including sports, movies, and premium content. DirecTV provides national and Phoenix-specific lineups, while Dish Network offers customizable packages. These services ensure access to popular networks like American Heroes Channel, Vice TV HD, and Smithsonian Channel HD. With features like HD programming and DVR capabilities, satellite TV enhances the viewing experience for Flagstaff residents, complementing local broadcast options and expanding entertainment choices.

Streaming Services in Flagstaff, AZ

Popular streaming platforms like Hulu Live TV and YouTube TV offer Flagstaff residents access to live and on-demand content, including local channels and premium options.

6.1 Popular Streaming Platforms Available

Flagstaff residents can access a variety of streaming services, including Hulu Live TV, YouTube TV, Netflix, Amazon Prime Video, Disney+, and HBO Max. These platforms offer a wide range of live and on-demand content, catering to diverse preferences. Many services provide local channel access, ensuring viewers stay connected to Flagstaff-specific news and events. With flexible subscription plans and no need for traditional cable, streaming services have become a convenient and popular choice for entertainment in Flagstaff, enhancing the overall TV viewing experience.

6.2 Streaming Services with Local Channel Access

Streaming platforms like Hulu Live TV and YouTube TV offer access to local Flagstaff channels, including Arizona PBS and KNAZ-TV. These services provide live streaming of local news, sports, and community programs, ensuring residents stay connected to regional content. With features like cloud DVR and on-demand viewing, streaming services enhance convenience for viewers. This integration of local channels into popular streaming platforms has become a key part of Flagstaff’s modern TV experience, blending traditional broadcasting with digital accessibility.

TV Schedule for Flagstaff, AZ

Flagstaff’s TV schedule offers daily and weekly listings, ensuring viewers stay updated on live sports, local news, and popular entertainment shows across various channels like FOX and CBS.

7.1 Daily TV Listings

Daily TV listings for Flagstaff, AZ provide a detailed schedule of programs airing on local channels. Viewers can check what’s on FOX (K48GI-D) or CBS (K50HU) throughout the day. From live sports like the FIFA Club World Cup to entertainment shows such as American Idol, the listings cover a wide range of genres. Local news broadcasts on KNAZ-TV and Arizona PBS offer updates on community events. The listings are available online, making it easy for residents to plan their viewing schedule in advance and never miss their favorite programs.

7.2 Weekly TV Listings

Weekly TV listings for Flagstaff, AZ offer a comprehensive view of upcoming programs on local channels. Viewers can plan their week with detailed schedules for popular networks like FOX (K48GI-D) and CBS (K50HU). Listings include prime-time shows, sports events, and local news broadcasts. From live sports such as the FIFA Club World Cup to entertainment shows like American Idol, the weekly guide ensures residents never miss their favorite programs. Additionally, Arizona PBS provides educational content, while KNAZ-TV covers community updates, making the weekly listings an essential resource for diverse viewing preferences.

Sports and Entertainment on Flagstaff TV

Flagstaff TV offers diverse sports and entertainment options, including live events like FIFA Club World Cup and NBA Finals, alongside popular shows and movies for all audiences.

8.1 Live Sports Events on Local Channels

Flagstaff TV channels offer a variety of live sports events, including the FIFA Club World Cup 2025, U.S. Open Golf Championship, and NBA Finals. Local stations like FOX (K48GI-D) and CBS (K50HU) broadcast these events, providing real-time access to major sporting events. Viewers can enjoy live coverage of basketball, football, and golf tournaments, ensuring they never miss their favorite teams in action. This makes Flagstaff’s TV guide a valuable resource for sports enthusiasts, blending local and national events seamlessly.

8.2 Popular Entertainment Shows and Movies

Flagstaff’s TV guide features a diverse lineup of entertainment, including popular shows like American Idol on FOX (K48GI-D) and The Partridge Family on channel 16.2. Movies and series span various genres, catering to all audiences. Streaming platforms like Hulu Live TV further enhance options, offering on-demand access to trending content. With a mix of classic and contemporary programming, Flagstaff’s entertainment options ensure there’s always something engaging to watch, making it a hub for both live TV and digital streaming enthusiasts.

Community Impact of Local TV Guide

The Flagstaff TV guide plays a vital role in uniting the community by providing access to local news, cultural events, and educational programming, fostering informed and engaged residents.

9.1 Role of Local News in Flagstaff

Local news in Flagstaff plays a crucial role in keeping residents informed about community events, local issues, and emergencies. Flagstaff’s TV guide highlights channels like KNAZ-TV, which provided vital updates until its closure. The loss of such stations underscores the challenges of maintaining local news sources, emphasizing the importance of alternative platforms for community engagement and information dissemination.

9.2 Importance of Community Programming

Community programming in Flagstaff plays a vital role in fostering local culture and education. Channels like Arizona PBS and KNAZ-TV offer shows that highlight regional history, arts, and educational content. These programs strengthen community bonds by addressing local interests and providing platforms for public discourse. Additionally, they support lifelong learning through documentaries and children’s shows. The availability of such content ensures that residents stay connected to their community’s heritage and values, making it an essential part of Flagstaff’s TV guide offerings.

survival guides

A survival guide is a comprehensive resource designed to help individuals navigate emergencies, wilderness situations, and unexpected challenges. It provides practical advice, essential skills, and strategies to stay safe and resilient in critical moments.

1.1 What is a Survival Guide?

A survival guide is a practical resource designed to equip individuals with the knowledge and skills needed to navigate emergencies, wilderness situations, and unforeseen challenges. It typically includes strategies for finding food and water, building shelter, starting fires, and signaling for help. These guides often cater to various environments, such as forests, deserts, or urban settings, and are tailored for different audiences, from outdoor enthusiasts to disaster preparedness. By focusing on essential techniques and tools, a survival guide aims to enhance resilience and increase the chances of staying safe until help arrives or conditions improve.

1.2 Importance of Having a Survival Guide

A survival guide is crucial for preparedness in emergencies, offering life-saving information and strategies. It equips individuals with the knowledge to stay safe during natural disasters, wilderness adventures, or urban crises. By providing clear instructions on essential skills, such as finding water, starting a fire, and signaling for help, a survival guide boosts confidence and resilience. It also serves as a mental toolkit, helping users remain calm and focused in high-stress situations. Whether for hiking, disaster preparedness, or everyday safety, a well-structured survival guide is an indispensable resource for anyone seeking to navigate challenges effectively and emerge unharmed.

The Rule of Threes in Survival

The Rule of Threes is a survival principle emphasizing that humans can survive three minutes without air, three days without water, and three weeks without food.

2.1 Understanding the Rule of Threes

The Rule of Threes is a fundamental survival principle that outlines the maximum time a person can survive without basic necessities. It states that humans can survive three minutes without air, three days without water, and three weeks without food. This rule helps prioritize survival efforts by focusing on the most critical needs first. Air is the most immediate requirement, as brain damage or death occurs within minutes without oxygen. Water follows, with severe dehydration setting in within days. Food, while essential, is the least urgent, as the human body can survive several weeks without it under the right conditions.

2.2 Applying the Rule of Threes in Different Scenarios

The Rule of Threes guides survival decisions in various situations. In a desert, water becomes critical, so locating shade and conserving sweat is essential. At sea, rationing water and signaling for help are priorities. In cold environments, shelter and fire-building take precedence to prevent hypothermia. Urban scenarios may focus on securing safe shelter and avoiding hazards. The rule adapts to context, emphasizing immediate needs. For example, in high-altitude conditions, air quality becomes the primary concern. By applying this framework, individuals can allocate resources effectively, ensuring they address the most urgent threats first. This adaptability makes the Rule of Threes a universal survival tool.

The 7 Survival Priorities

The 7 Survival Priorities provide a clear framework for addressing immediate needs in emergencies. They ensure safety, efficiency, and focus, helping individuals stay organized under stress.

3.1 The Priority List for Survival

The priority list for survival outlines essential steps to ensure safety and sustainability in emergencies. It typically starts with assessing immediate threats, followed by securing water, food, shelter, and signaling tools. Each item on the list addresses a critical need, aiming to prevent further risks and improve chances of rescue. Understanding this hierarchy helps individuals allocate resources effectively and maintain focus during crises; The list emphasizes mental clarity and practical actions, ensuring survivors can manage their environment and stay resilient until help arrives. This structured approach is universal, applicable to both wilderness and urban scenarios, making it a cornerstone of survival strategies.

3.2 Maintaining a Positive Mindset

Maintaining a positive mindset is crucial for survival, as it fosters resilience and clarity in dire situations. A calm and focused mind enables better decision-making, helping individuals stay proactive rather than reactive. Techniques such as deep breathing, visualization, and setting small achievable goals can help manage stress and anxiety. Staying optimistic boosts morale, preventing despair and hopelessness. Mental resilience is as vital as physical preparedness, ensuring individuals remain resourceful and determined to overcome challenges. A positive mindset also enhances the ability to adapt, think creatively, and persevere, ultimately increasing chances of survival and recovery.

Essential Survival Skills

Mastering essential survival skills like finding water, starting a fire, and building shelter is vital for staying alive in challenging environments. These skills ensure basic needs are met.

4.1 Finding and Purifying Water

Finding and purifying water is crucial for survival, as dehydration can set in quickly. Locate water sources like streams, rivers, or ponds, or collect rainwater or dew. Always purify water to remove contaminants. Boiling is the most reliable method, but sand filtration or solar disinfection can also work. Carry a portable filter or water purification tablets for convenience. Avoid stagnant water to prevent waterborne illnesses. Conservation is key—ration water and reduce waste. Learning these techniques ensures access to safe drinking water, essential for sustaining life in any survival situation.

4.2 Starting a Fire Without Modern Tools

Starting a fire without modern tools is a vital survival skill, providing warmth, light, and a way to cook food. Methods include friction techniques, such as using sticks or bows, solar fire starting with magnifying glasses, and flint-and-steel tools. Prepare tinder like dry leaves, grass, or bark, and add kindling gradually. Maintain airflow by arranging materials in a teepee or log cabin structure. Practice these techniques to master them, as fire can be a lifesaver in cold or wet conditions, boosting morale and ensuring survival. Always follow safety guidelines to avoid uncontrolled fires.

4.3 Building a Shelter

Building a shelter is a critical survival skill to protect against harsh weather and wildlife. Use natural materials like branches, leaves, and pine needles to construct lean-tos, debris huts, or snow shelters. Choose a dry, elevated spot away from standing water and windy areas. For a lean-to, create a frame with sturdy branches and cover it with leaves or grasses. Debris huts require a central pole and layers of sticks and foliage. Always ensure good ventilation and insulation to stay warm and dry. Maintaining a shelter requires regular repairs and reinforcement, especially in wet or snowy conditions, to ensure it remains safe and durable.

Survival Tools and Gear

Survival tools and gear are essential for staying safe in emergencies. A multi-tool, knife, rope, flashlight, emergency blanket, and compass are must-have items for any survival situation.

5.1 Must-Have Items in a Survival Kit

A well-prepared survival kit should include essential items to ensure safety and sustainability. Key components include a water filter or purification tablets, a multi-tool or knife, a first aid kit, an emergency blanket, a flashlight with extra batteries, a rope or paracord, fire-starting tools like matches or a ferro rod, a whistle for signaling, and a multi-use knife. These items are lightweight, versatile, and crucial for addressing immediate needs such as shelter, water, and signaling for help. Having these must-have items in a survival kit significantly increases your chances of staying safe and resilient during emergencies or wilderness situations.

5.2 Choosing the Right Multi-Tool

Selecting the right multi-tool is crucial for survival situations, as it provides versatility and convenience. Look for tools made from durable materials like stainless steel, ensuring longevity and reliability. A good multi-tool should include essential functions such as a knife, pliers, screwdriver, and can opener. Consider the size and weight, as portability is key in survival kits. Ergonomic design enhances usability, while additional features like wire cutters or saws can be beneficial. Popular brands like Leatherman and Victorinox offer high-quality options. Choose a multi-tool that balances functionality with ease of use, ensuring it meets your specific survival needs without unnecessary bulk.

5.3 Maintaining Your Survival Gear

Maintaining your survival gear is essential to ensure its effectiveness in critical situations. Regularly clean and inspect tools, such as knives, multi-tools, and fire starters, to prevent rust and damage. Lubricate moving parts to keep them functional, and sharpen blades to maintain their cutting efficiency. Store gear in a dry, protected environment to avoid deterioration. Additionally, check expiration dates on items like water purification tablets and replace them as needed. Routine maintenance ensures your survival gear remains reliable when you need it most. By staying proactive, you can extend the lifespan of your equipment and rely on it during emergencies.

Emergency First Aid in the Wild

Emergency first aid in the wild is crucial for treating injuries and preventing infections. It involves basic wound care, bleeding control, and splinting fractures to stabilize conditions until professional help arrives.

6.1 Basic First Aid Techniques

Basic first aid techniques are essential for managing injuries in the wild. Control bleeding by applying direct pressure with a clean cloth or bandage. Clean wounds with purified water or antiseptic wipes to prevent infection. Use topical antibiotics if available and cover wounds with sterile dressings. For fractures, immobilize the affected area with a splint. Treat burns by cooling them with clean water and covering loosely. Monitor vital signs and provide reassurance to the injured person. Knowing these techniques can significantly improve outcomes until professional medical help is available. Always prioritize cleanliness and stability to prevent further harm. Preparedness and practice are key to effective first aid in survival situations.

6.2 Managing Wounds and Injuries

Managing wounds and injuries in survival situations requires immediate attention to prevent infection and promote healing. Clean the wound with purified water or antiseptic wipes to remove dirt and bacteria. Apply a topical antibiotic ointment if available and cover the wound with a sterile dressing or clean cloth. Monitor for signs of infection, such as redness, swelling, or pus, and change dressings daily. For deep wounds, use sutures or butterfly bandages to close them. Elevate injured limbs to reduce swelling. Apply a tourniquet only in extreme cases of severe bleeding. Use cold compresses or ice packs to reduce swelling and pain. Natural remedies like honey can also act as antiseptics. Always prioritize cleanliness to avoid complications.

6.3 Mental Health and Stress Management

Mental health and stress management are critical components of survival. A positive mindset helps individuals stay focused and resilient during crises. Techniques like deep breathing, meditation, and visualization can reduce stress and anxiety. Establishing a routine and setting small, achievable goals can provide a sense of purpose. It’s important to acknowledge emotions but not let fear or panic overwhelm decision-making. Maintaining hope and fostering a growth mindset are essential for long-term survival. Building trust within a group and sharing responsibilities can alleviate mental strain. Remember, survival is as much about mental fortitude as it is about physical preparedness.

Navigation Techniques

Navigation is crucial for survival, helping individuals find food, water, and safety. It relies on reading natural signs, using tools, and staying adaptable to surroundings and conditions.

7.1 Reading Natural Signs for Navigation

Reading natural signs is a vital skill for navigation, allowing individuals to determine direction and location without modern tools. The sun’s position, stars like the North Star, and natural landmarks provide reliable guidance. Moss often grows on the north side of trees, while animal tracks may indicate water sources. Understanding these signs helps survivors move purposefully, conserving energy and resources. Additionally, recognizing patterns in terrain, such as ridges or valleys, aids in mapping surroundings. This timeless skill enhances navigation accuracy and boosts confidence in wilderness environments, making it an essential component of any survival strategy.

7.2 Using a Compass Effectively

A compass is an essential navigation tool that helps determine direction accurately. To use it effectively, hold it level and steady, ensuring the magnetic needle aligns with the magnetic north indicator. Rotate the bezel ring to set your desired direction, then follow the bearing. Landmarks can help verify your route. Always account for magnetic declination, the difference between magnetic and true north, for precise navigation. Practice using a compass in various terrains to build proficiency. This skill is crucial for staying on course in wilderness environments, especially when natural signs are unclear or GPS devices are unavailable.

7.3 GPS Navigation Basics

GPS navigation is a modern tool that relies on satellite signals to determine precise locations. To use it effectively, turn on the device, wait for satellite acquisition, and input your destination as waypoints. Save routes and tracks to retrace your path later. Digital maps can enhance navigation by displaying terrain features. Always carry extra batteries, as GPS devices consume power quickly. While GPS is reliable, it’s essential to combine it with map-reading skills for situations where technology fails. Understanding GPS basics improves navigation accuracy and confidence in wilderness survival scenarios.

Wilderness Survival Tips

Stay calm, find or purify water, build a shelter using natural materials, and use fire for warmth and signaling. Conserve energy and stay visible to rescuers.

8.1 Staying Warm in Cold Environments

Staying warm in cold environments is crucial for survival. Dress in layers to trap body heat, using breathable base layers and insulating materials like wool or fleece. Avoid cotton as it retains moisture. Use a waterproof outer layer to protect against wind and rain. Find or create a shelter, such as a snow trench or lean-to, to shield from harsh conditions. Insulate your bed with leaves, grass, or pine needles. Keep your head and hands covered, as significant heat loss occurs there. Stay dry by removing wet clothing and avoid overexertion, which can lead to sweating. Build a fire if possible, but ensure it’s safe and controlled.

8.2 Signaling for Help

Signaling for help is a critical survival skill, especially in remote areas. Use visible signals like bright clothing, smoke, or reflective objects during the day. At night, build a fire or use a flashlight to create a beacon. Whistles are effective; three short blasts signal distress. Create large, visible markers such as “HELP” or “SOS” using natural materials like rocks or branches. Stay near your shelter to conserve energy and increase visibility to rescuers. Avoid overexertion and ensure your signals are consistent and easy to spot. Preparation and visibility are key to being noticed and rescued swiftly in emergency situations.

Urban Survival Strategies

Urban survival requires understanding your environment, securing resources, and staying informed. Utilize city infrastructure wisely, stay aware of threats like crowds, and maintain cautious use of technology for safety.

9.1 Finding Food and Water in the City

In urban survival, securing food and water is crucial. Churches, community centers, and food banks often provide aid. Public water fountains and hydrants can be reliable sources. Scavenge safely, avoiding expired or spoiled items. Use apps or maps to locate nearby resources. Be cautious when approaching strangers for help, as trust must be earned. Always prioritize water safety, using purification methods if unsure. Familiarize yourself with urban landmarks and potential supply hubs. Urban environments offer unique opportunities for resource gathering, but require vigilance and strategic planning to navigate safely and effectively.

9.2 Avoiding Dangers in Urban Areas

Urban survival requires staying vigilant and aware of potential threats. Avoid poorly lit or deserted areas, especially at night. Stay informed about local crime hotspots and civil unrest. Trust your instincts and keep a low profile to avoid attracting unwanted attention. Learn to navigate using landmarks and mental maps to stay oriented. Be cautious when approaching strangers, as not everyone may have good intentions. Keep emergency contacts handy and have a backup plan for safe shelter. Stay quiet and observant in crowded spaces to avoid drawing suspicion. Always plan escape routes and know the nearest safe zones. Urban dangers are diverse, so adaptability and awareness are key to staying safe.

Legal Considerations in Survival

Understanding legal restrictions is crucial for survival. Know local laws to avoid illegal actions, ensure legal weapon carry, and respect property rights to stay compliant and safe.

10.1 Understanding Legal Restrictions

Understanding legal restrictions is vital for survival. Laws vary by location, and ignorance can lead to severe consequences. Familiarize yourself with local regulations regarding firearm use, trespassing, and foraging. Knowing what is legally permissible ensures you avoid unintended legal issues. For instance, collecting firewood in protected areas may be illegal. Legal mistakes can escalate survival situations, making it harder to stay safe. Always research and understand the legal framework of your environment to avoid violations. This knowledge is a critical component of responsible survival practices, helping you navigate challenges while remaining within the bounds of the law.

10.2 Carrying Weapons Legally

Carrying weapons legally is crucial for survival while adhering to the law. Always obtain necessary permits for firearms, knives, or other defensive tools. Research local, state, and federal regulations to ensure compliance. Concealed carry laws vary widely, so understand the rules in your area. Open carry may be restricted in certain zones, such as schools or government buildings. Legal weapon transport methods, like locking firearms in a case, are often required. Violating these laws can result in fines, arrests, or confiscation of gear. Stay informed to avoid legal complications and ensure your safety measures remain lawful. Proper legal compliance is key to responsible weapon use in survival situations.

Community and Support Networks

Community and support networks are vital in survival, offering shared resources and mutual aid. Building strong, reliable connections ensures collective strength during crises.

11.1 Building a Support Network

Building a support network is crucial for survival, as it fosters collaboration and resource sharing. Trust and communication are key to creating a reliable group. Each member brings unique skills, such as medical expertise or navigation knowledge, enhancing collective resilience. Regular meetings and shared responsibilities strengthen bonds. A well-coordinated network ensures everyone is prepared for emergencies, with clear communication plans and designated meeting points. This collective effort not only aids in immediate crises but also provides long-term support, ensuring the community thrives. A strong support network is a vital asset for overcoming challenges and maintaining stability in uncertain situations.

11.2 The Role of Community in Survival

A strong community plays a vital role in survival by fostering cooperation and shared resources. Collective knowledge and skills within a group enhance problem-solving and adaptability. Communities provide emotional support, reducing stress and maintaining morale during crises. Shared responsibilities, such as resource gathering and security, lighten individual burdens. A united front also deters potential threats, ensuring safer environments. Additionally, communities encourage knowledge sharing, preserving essential survival techniques. This collective strength not only aids in immediate survival but also lays the groundwork for long-term recovery and rebuilding. A cohesive community is often the backbone of resilience in challenging situations.