gevi espresso machine manual

Gevi Espresso Machine Manual: A Comprehensive Guide

Navigating this manual unlocks the full potential of your Gevi machine! Discover detailed instructions, troubleshooting, and advanced features for consistently exceptional espresso,
leveraging Adobe’s intelligent technology for a unique experience.

Understanding Your Gevi Espresso Machine

Welcome to the world of home espresso! Your Gevi machine is designed for ease of use and consistently delicious results. This section provides a foundational understanding of its capabilities. Like Photoshop’s tailored editing, your Gevi adapts to your preferences. It’s part of a crowded coffee gadget market, but aims for simplicity.

The machine utilizes pressure to extract rich, flavorful espresso from finely-ground coffee beans. Understanding the interplay between grind size, tamping pressure, and water temperature is key to achieving optimal extraction. While not a free download like some older software versions, the investment delivers quality. Familiarize yourself with the machine’s components and control panel – detailed in subsequent sections – to unlock its full potential. Consistent cleaning, as outlined later, ensures longevity and performance.

Unboxing and Initial Setup

Carefully unpack your Gevi espresso machine and verify all components are present. Refer to the component identification section for a complete list. Before first use, remove all packaging materials and protective films. Wipe down the exterior with a damp cloth.

Thoroughly rinse the water reservoir, portafilter, and filters with clean water. Avoid using abrasive cleaners. Place the machine on a stable, level surface near a grounded electrical outlet. Fill the water reservoir with fresh, filtered water. Like installing Creative Suite 6 apps, ensure proper connections. Perform an initial flush by running water through the machine without coffee grounds – this cleans the internal system. This initial setup, though simple, is crucial for optimal performance and longevity, mirroring the importance of updates for software like Photoshop.

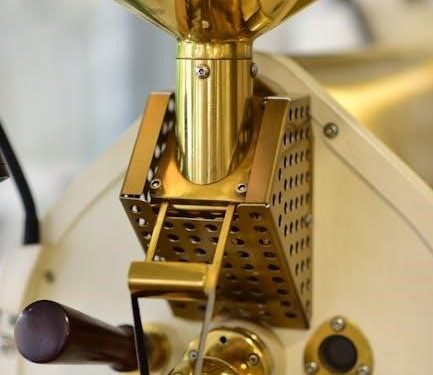
Component Identification

Familiarize yourself with the key parts of your Gevi espresso machine. This section details each component for easy reference during operation and maintenance. The Power Cord and Base provide stable operation and electrical connection; The Water Reservoir holds the water supply for brewing and steaming, requiring regular filling with filtered water.

The Portafilter securely holds the coffee grounds during extraction, while the included Filters (single and double shot) determine the amount of coffee brewed. Understanding these components, much like knowing Photoshop’s tools, is essential. Additional accessories may be included, though some user reviews note potential usability issues with certain attachments. Proper identification ensures correct usage and contributes to the machine’s overall performance and lifespan.

Power Cord and Base

The Power Cord and Base are fundamental to your Gevi espresso machine’s operation. Ensure the base is placed on a stable, level surface before connecting the power cord to a grounded electrical outlet. The cord’s length is designed for convenient placement without requiring extension cords – avoid using adapters.

Inspect the cord regularly for any signs of damage, such as fraying or exposed wires; discontinue use if damage is detected. The base houses the machine’s internal components and provides a secure connection point. Similar to ensuring a stable foundation in Photoshop projects, a secure power connection is crucial. Proper handling of the power cord and base guarantees safe and reliable performance, preventing potential hazards and ensuring longevity.

Water Reservoir

The Water Reservoir is a critical component for brewing delicious espresso with your Gevi machine. This removable tank holds the water used in the brewing process and for steam generation. Always fill the reservoir with fresh, filtered water to optimize flavor and prevent scale buildup – much like using high-resolution images in Photoshop.

Ensure the reservoir is securely seated in its designated slot before operation. The reservoir features a maximum fill line; do not exceed this level to avoid overflow. Regular cleaning of the reservoir is essential to maintain hygiene and prevent mineral deposits. Similar to maintaining a clean workspace in creative software, a clean reservoir ensures optimal performance and extends the life of your Gevi espresso machine.

Portafilter and Filters

The Portafilter is the handle with a basket that holds the ground coffee for brewing. Your Gevi espresso machine includes a portafilter and a selection of filter baskets – single and double shot. These filters determine the amount of coffee used per brew, impacting the espresso’s strength and volume.

Ensure the filter basket is correctly seated within the portafilter before adding coffee grounds. Different grind sizes require different filter baskets for optimal extraction, akin to selecting the right brush in Photoshop for detailed edits. Regularly clean the portafilter and filter baskets to remove coffee residue, ensuring a clean and flavorful brew. Proper maintenance extends the lifespan of these components and guarantees consistently high-quality espresso.

Operating Instructions: First Use

Before your inaugural brew, a preparatory sequence is crucial. Begin by thoroughly rinsing the water reservoir and portafilter with clean, potable water. Run a full brewing cycle without coffee grounds to flush the system and eliminate any residual manufacturing dust or odors – similar to calibrating tools in Photoshop for accurate results.

Fill the water reservoir with fresh, filtered water to the maximum fill line. Ensure the machine is securely placed on a stable, level surface. Power on the machine and allow it to fully heat up; the indicator light will signal readiness. This initial flush primes the internal components, guaranteeing optimal performance and a pristine first cup of espresso.

Brewing Espresso: Step-by-Step

Achieving café-quality espresso requires precision. First, select your preferred coffee beans and grind them to a fine consistency – crucial for optimal extraction, much like fine-tuning edits in Photoshop. Next, carefully dose the portafilter with the ground coffee, typically around 18-21 grams.

Employ a tamper to firmly and evenly compress the coffee grounds, creating a level puck. Lock the portafilter securely into the brew head. Initiate the brewing process, monitoring the extraction. A perfect shot should yield a rich, crema-topped espresso within 25-30 seconds. Adjust grind size and tamping pressure for desired results, mirroring iterative design processes.

Grinding the Coffee Beans

Freshly ground beans are paramount for exceptional espresso. Utilize a burr grinder, as it provides a consistent particle size, unlike blade grinders which produce uneven grounds. For Gevi espresso machines, a fine grind is generally recommended – similar in texture to table salt.

Experiment with grind settings to fine-tune extraction. A grind that’s too coarse results in under-extraction (sour taste), while a grind that’s too fine leads to over-extraction (bitter taste). Adjust incrementally, making small changes between shots. Remember, achieving the perfect grind is an iterative process, much like refining images in Photoshop, requiring patience and precision for optimal results.

Tamping the Coffee Grounds

Consistent tamping is crucial for even extraction. After distributing the grounds evenly in the portafilter, use a tamper to compress them firmly. Apply approximately 30 pounds of pressure – a firm, level press is more important than sheer force.

Ensure the tamp is perfectly level to avoid channeling, where water finds the path of least resistance through the grounds. Channeling leads to uneven extraction and a subpar espresso. Like precise edits in Photoshop, consistency is key. Polish the tamped grounds with a gentle twist to create a smooth surface. A well-tamped puck will resist water flow for the ideal 25-30 second extraction time.

Locking the Portafilter

Securely locking the portafilter is essential for safe and effective brewing. Once the coffee grounds are tamped, align the portafilter with the group head of your Gevi espresso machine; Gently insert the portafilter and rotate the handle to the right until it’s firmly locked into place.

You should feel resistance when it’s properly secured. Avoid forcing it, as this could damage the machine. A secure lock prevents leaks and maintains the necessary pressure during extraction, much like a precise edit in Photoshop. If the portafilter isn’t locked correctly, water may spray out, or the espresso will brew unevenly. Always double-check the lock before initiating the brewing process.

Steaming Milk: A Detailed Guide

Achieving perfectly steamed milk elevates your espresso drinks. Begin by filling the milk pitcher approximately one-third full with cold milk – whole milk is recommended for optimal texture. Purge the steam wand by briefly opening the valve to release any condensation. Submerge the wand tip just below the surface of the milk and open the steam valve fully;

Introduce air into the milk by slowly lowering the pitcher, creating a swirling vortex. This stretches the milk, creating microfoam. Once the milk volume increases by about 50%, submerge the wand deeper to heat the milk without adding more air. Aim for a temperature of 140-155°F (60-68°C). Like precise Photoshop edits, practice makes perfect!

Cleaning and Maintenance

Regular cleaning ensures longevity and optimal performance of your Gevi espresso machine. After each use, wipe down the exterior with a damp cloth. Remove the portafilter and rinse thoroughly, discarding used coffee grounds. The drip tray should be emptied and cleaned daily to prevent buildup, much like clearing cache in Photoshop for smoother operation.

Weekly, backflush the machine with water to remove coffee oils. Monthly, descale the machine using a descaling solution, following the manufacturer’s instructions. This removes mineral deposits that can affect brewing quality. Neglecting maintenance can lead to issues, mirroring the problems of outdated software. Consistent care guarantees years of delicious espresso!

Daily Cleaning Procedures

Consistent daily cleaning is crucial for maintaining your Gevi espresso machine’s performance and hygiene. Immediately after each use, empty the drip tray and wipe it clean – preventing residue buildup is key. Rinse the portafilter thoroughly under warm water, removing all traces of coffee grounds. Wipe down the steam wand with a damp cloth after each milk frothing session, purging it briefly to eliminate milk residue.

The exterior of the machine should also be wiped down with a soft, damp cloth. This prevents staining and keeps your Gevi looking its best. These simple steps, like regular file saving in Photoshop, ensure a smooth and enjoyable experience every time you brew!

Descaling the Machine

Regular descaling is vital to remove mineral buildup that can affect your Gevi espresso machine’s performance and the taste of your coffee. Frequency depends on water hardness – typically every 1-3 months. Use a descaling solution specifically designed for espresso machines, following the product’s instructions carefully.

Generally, this involves running the solution through the machine’s brewing cycle, followed by several cycles with fresh water to rinse thoroughly. Like updating Photoshop CS6, descaling keeps your machine running optimally. Ignoring this step can lead to reduced water flow, increased brewing time, and ultimately, machine failure. A clean machine equals a perfect espresso!

Troubleshooting Common Issues

Encountering problems with your Gevi espresso machine? This section addresses frequent concerns. If the machine won’t turn on, check the power cord and outlet. Low water pressure often indicates mineral buildup – descaling is recommended. For espresso brewing issues, ensure proper grind size, tamping pressure, and portafilter locking.

Similar to troubleshooting Photoshop CS6 updates, a systematic approach is key. Erratic steam wands may require cleaning. If problems persist, consult the FAQ or contact support. Remember, consistent maintenance, like regular cleaning, prevents many issues. Don’t hesitate to seek assistance – a perfectly brewed espresso is within reach!

Machine Not Turning On

Is your Gevi espresso machine failing to power up? First, verify the power cord is securely connected to both the machine and a functioning electrical outlet. Test the outlet with another device to confirm it’s providing power. Inspect the power cord itself for any visible damage, such as cuts or fraying.

If the outlet and cord are fine, the issue might be internal. Similar to troubleshooting software like Adobe Photoshop CS6, a reset can sometimes help. Unplug the machine, wait a few minutes, and then plug it back in. If it still doesn’t turn on, contact Gevi support for further assistance – do not attempt to disassemble the machine yourself.

Low Water Pressure

Experiencing weak water flow during brewing? Several factors can contribute to low water pressure in your Gevi espresso machine. Ensure the water reservoir is filled to the appropriate level and properly seated. Check for any kinks or obstructions in the water line connecting the reservoir to the machine.

Mineral buildup, similar to issues requiring updates in programs like Adobe Photoshop CS6, can restrict water flow. Descale your machine regularly, following the instructions in the ‘Descaling the Machine’ section. If the problem persists, verify the portafilter is securely locked into the group head. Contact Gevi support if these steps don’t resolve the issue.

Espresso Not Brewing Properly

Is your espresso weak, watery, or not extracting at all? Several issues could be at play. First, confirm your coffee grind is appropriate – too coarse, and water rushes through; too fine, and it can cause blockage, much like editing complexities in Photoshop. Ensure proper tamping pressure is applied, creating a consistent puck.

Verify the portafilter is securely locked into the group head. Check for clogs in the portafilter basket or shower screen. Regularly clean these components. If the machine has been idle, prime the pump by running a blank shot (water only) through the portafilter. Like troubleshooting CS6 downloads, systematic checks are key. If problems continue, consult the troubleshooting section or contact Gevi support.

Advanced Features and Settings

Unlock the full potential of your Gevi espresso machine with its advanced capabilities! Explore customizable settings to fine-tune your brewing experience. Adjust the brewing temperature to optimize extraction for different coffee bean varieties, similar to tailoring edits in Photoshop. Experiment with pre-infusion times to enhance flavor development.

Many Gevi models offer programmable shot volumes, allowing you to consistently brew single or double espressos. Delve into the machine’s memory functions to save your preferred settings for quick recall. Understanding these features, like mastering CS6 direct downloads, requires exploration. Refer to the control panel section for detailed instructions on accessing and modifying these advanced settings for truly personalized espresso.

Understanding the Control Panel

The Gevi espresso machine’s control panel is your command center for crafting the perfect cup. Familiarize yourself with the power button, indicator lights, and programmable function buttons; The panel displays crucial information, such as brewing temperature and shot timer, enabling precise control, much like Photoshop’s interface.

Explore the steam wand control, allowing you to activate and regulate steam pressure for milk frothing. Understand the function of any dedicated buttons for pre-infusion or adjustable brewing strength. Refer to the manual for specific button layouts and functionalities, as they may vary between Gevi models. Mastering the control panel, similar to CS6 direct downloads, unlocks the machine’s full potential for consistent, high-quality espresso.

Adjusting Grind Size for Optimal Extraction

Achieving optimal espresso extraction hinges on precise grind size adjustment. A grind that’s too coarse results in under-extraction – a weak, sour shot. Conversely, a grind too fine leads to over-extraction, producing a bitter, burnt taste. Like tailoring edits in Photoshop, finding the sweet spot is crucial.

Start with a medium grind and adjust incrementally. Finer adjustments are needed for darker roasts, while lighter roasts benefit from a coarser setting. Observe the espresso flow; it should resemble warm honey. If it flows too quickly, grind finer. If it drips slowly or not at all, grind coarser. Experimentation, similar to exploring CS6 features, is key to unlocking your Gevi’s full potential and consistently brewing exceptional espresso.

Milk Frothing Techniques

Mastering milk frothing transforms your espresso into café-quality beverages. Begin with cold milk – whole milk generally produces the richest foam, but alternatives work too. Purge the steam wand briefly to remove condensation. Submerge the wand tip just below the milk surface and introduce air, creating a swirling vortex. This stretches the milk, increasing its volume.

Once the desired volume is reached, lower the wand deeper to create a smooth, velvety texture, akin to the precise edits possible in Photoshop. Avoid overheating; aim for a temperature around 140-155°F (60-68°C). Tap the pitcher to eliminate large bubbles and swirl to integrate the foam. Practice, like learning CS6 shortcuts, will refine your technique and enable beautiful latte art!

Creating Latte Art

Elevate your beverages with stunning latte art! Begin with well-frothed milk – microfoam is key, resembling the detailed adjustments within Adobe Photoshop. Gently swirl the pitcher to ensure a homogenous texture. Hold the pitcher close to the espresso, and start pouring from a height to combine milk and coffee.

As the cup fills, lower the pitcher and begin creating your design. For a heart, pour steadily then wiggle the pitcher as you finish, pulling through the center. Rosettes require a more complex pouring motion, similar to mastering CS6’s layers. Practice is crucial; don’t be discouraged by initial attempts! Experiment with different techniques and milk textures to unlock your artistic potential, mirroring the creative freedom Photoshop offers.

Safety Precautions

Prioritize safety during operation! Always ensure the machine is placed on a stable, level surface; Never operate with a damaged cord or plug – similar to avoiding corrupted files in Photoshop. Keep the machine away from water sources and flammable materials. The steam wand and espresso outlet become extremely hot during use; avoid direct contact to prevent burns.

Never disassemble the machine while it’s plugged in. Allow all components to cool completely before cleaning, mirroring safe software shutdown procedures. Do not immerse the machine in water. Supervise children when the machine is in use. Regularly inspect the machine for any signs of damage. Following these precautions ensures a safe and enjoyable espresso experience, just as careful editing ensures a polished final project.

Warranty Information

Your Gevi espresso machine is covered by a one-year limited warranty against defects in materials and workmanship from the date of original purchase. This warranty doesn’t cover damage resulting from misuse, accidents, unauthorized repairs, or normal wear and tear – akin to software issues caused by improper use; To initiate a warranty claim, please retain your proof of purchase and contact Gevi customer support.

The warranty covers repair or replacement of defective parts, at Gevi’s discretion. Shipping costs for warranty service are the responsibility of the customer. This warranty is non-transferable. Gevi does not warrant performance issues resulting from improper cleaning or descaling. Refer to the full warranty details included with your machine or available on our website for complete terms and conditions, ensuring a seamless experience.

Frequently Asked Questions (FAQ)

Q: My machine isn’t turning on. What should I do? Ensure the power cord is securely connected and the outlet is functioning. Check the machine’s internal fuse if applicable. Q: Why is my espresso brewing slowly? This could indicate insufficient coffee grounds, too coarse a grind, or inadequate tamping pressure. Adjust these factors for optimal extraction. Q: Can I use pre-ground coffee? Yes, but freshly ground beans are recommended for the best flavor.

Q: How often should I descale the machine? Descale every 1-3 months, depending on water hardness. Q: Is the portafilter compatible with other brands? Generally, no. Gevi portafilters are designed specifically for our machines. Q: Where can I find replacement parts? Visit our website or contact customer support for available parts and accessories, ensuring continued enjoyment.

Gevi Espresso Machine Accessories

Enhance your Gevi experience with our range of dedicated accessories! We offer a variety of portafilter baskets – single and double – to suit your brewing preferences. Consider a distribution tool for even coffee puck preparation, leading to more consistent extractions. A dedicated tamping mat protects your countertop and provides a stable surface.

For milk-based drinks, explore our stainless steel milk frothing pitchers in various sizes. Cleaning brushes are essential for maintaining hygiene, alongside our specialized descaling solution. While some users find included accessories basic, Gevi continually strives to improve quality. Explore our website for bundled accessory kits offering excellent value and convenience, maximizing your machine’s potential.

Comparing Gevi Models

Gevi offers a diverse lineup of espresso machines to cater to varying needs and budgets. The Café Affetto, for example, is an automatic model prioritizing convenience, while others require more manual control. Consider the pump pressure – higher pressure generally equates to better extraction. Water reservoir capacity is another key differentiator, impacting brewing frequency before refills.

Features like built-in grinders and milk frothing capabilities also distinguish models. Some Gevi machines boast advanced control panels with customizable settings. Researching specific model specifications is crucial. The proliferation of coffee gadgets means careful comparison is vital. Ultimately, the best Gevi machine depends on your experience level, desired features, and preferred brewing style.

Where to Find Additional Support

Beyond this manual, Gevi provides multiple avenues for support. The official Gevi website hosts a comprehensive FAQ section addressing common issues and troubleshooting steps. You can also access downloadable resources, including updated manuals and software drivers, if applicable. For direct assistance, Gevi offers customer service via email and potentially phone support – check their website for current contact details.

Online communities and forums dedicated to espresso machines can be invaluable resources. These platforms allow you to connect with other Gevi users, share experiences, and seek advice. Remember to utilize Softonic for software updates. While Adobe Photoshop CS6 isn’t directly related, the principle of seeking reliable downloads applies. Prioritize official channels for accurate information and assistance;

guide pin

Guide pins‚ essential components in various industries‚ offer precise alignment and positioning. Recent discussions highlight their role‚ mirroring the precision found in automotive reliability—like Toyota’s enduring value.

What are Guide Pins?

Guide pins are cylindrical or specialized fasteners meticulously engineered to constrain or direct movement within a system. They function as locating devices‚ ensuring accurate alignment during assembly‚ operation‚ or maintenance procedures. Unlike typical fasteners‚ their primary role isn’t clamping force‚ but rather precise guidance.

Consider the meticulous construction of automobiles‚ like those highlighted for their durability – a Toyota Corolla‚ for instance‚ maintains value well. Similarly‚ guide pins provide consistent‚ reliable positioning. They are crucial in molds‚ dies‚ and fixtures where repeatable accuracy is paramount. Their design can vary‚ influencing load capacity and wear resistance‚ mirroring the diverse range of rolling pins each suited for a specific task.

Historical Development of Guide Pins

The evolution of guide pins parallels the broader advancements in precision manufacturing. Initially‚ simple dowel pins served as rudimentary guides‚ evolving alongside the need for increasingly accurate tooling. As industries like automotive manufacturing – exemplified by Toyota’s consistent reliability – demanded tighter tolerances‚ so too did guide pin technology.

Early iterations likely utilized readily available materials like brass. The mid-20th century saw the rise of hardened steel pins‚ offering superior wear resistance. Limited-edition vehicles‚ like the Le Collection Numéro 271‚ demonstrate a focus on detail; similarly‚ guide pin development prioritized precision. Today‚ materials like stainless steel and specialized plastics cater to diverse applications‚ reflecting ongoing innovation and refinement.

Types of Guide Pins

Diverse guide pin types – straight‚ tapered‚ stepped‚ and ball nose – cater to specific application needs‚ mirroring the variety in automotive choices and cabin configurations.

Straight Guide Pins

Straight guide pins represent the most fundamental and widely utilized type‚ characterized by their consistent diameter along their entire length. These pins excel in applications demanding simple‚ direct alignment‚ offering reliable performance in scenarios where angular guidance isn’t a primary concern. Their straightforward design contributes to cost-effectiveness and ease of manufacturing‚ making them a staple in numerous industries.

Similar to the consistent reliability of brands like Toyota‚ straight guide pins provide a dependable solution for basic positioning needs. They are frequently employed in mold and die work‚ assembly fixtures‚ and various machine tooling applications where precise linear movement is crucial. The simplicity of their form doesn’t diminish their importance; they are foundational elements in many precision engineering processes.

Tapered Guide Pins

Tapered guide pins introduce a unique advantage through their conical shape‚ facilitating easier insertion and removal‚ particularly in tight-fitting applications. This design minimizes the risk of damage to mating components during assembly and disassembly‚ a crucial benefit in sensitive tooling environments. The taper also allows for self-alignment‚ compensating for minor misalignments during the joining process.

Much like the careful engineering found in automotive design – ensuring components fit seamlessly – tapered pins offer a refined solution for precision alignment. They are often preferred in mold applications where frequent changes are required‚ and in fixtures demanding quick and reliable component exchange. Their design promotes smooth operation and reduces potential for binding‚ enhancing overall efficiency.

Stepped Guide Pins

Stepped guide pins‚ characterized by multiple diameters along their length‚ provide versatile functionality in applications requiring varying degrees of clearance or interference fits. This design allows for a secure hold in one section while permitting free movement in another‚ ideal for complex assembly sequences. The stepped configuration can also accommodate different material thicknesses or component geometries.

Similar to the tiered seating arrangements in aircraft cabins (V‚ H‚ W‚ P‚ L)‚ stepped pins offer a structured approach to alignment. They excel in situations where a single pin needs to fulfill multiple roles‚ offering a cost-effective and space-saving solution. Their adaptability mirrors the diverse needs of modern manufacturing‚ ensuring precise positioning across a range of applications and tolerances.

Ball Nose Guide Pins

Ball nose guide pins feature a hemispherical end‚ offering a self-aligning capability crucial for applications where precise centering is paramount‚ even with slight misalignments. This design minimizes stress concentration and reduces the risk of damage to mating components during assembly. The rounded tip allows for smooth entry and exit‚ enhancing the overall efficiency of the process.

Much like the diverse collection of rolling pins – each shape and material serving a specific purpose – ball nose pins are specialized tools. They excel in scenarios demanding gentle guidance‚ akin to carefully navigating a limited-edition vehicle like the Le Collection Numéro 271. Their forgiving nature makes them ideal for delicate assemblies and high-precision tooling.

Materials Used in Guide Pin Manufacturing

Guide pins utilize diverse materials—steel‚ stainless steel‚ brass‚ and plastics—selected for strength‚ durability‚ and resistance to wear‚ mirroring automotive material choices.

Steel Guide Pins (Various Grades)

Steel guide pins represent the most common type‚ prized for their exceptional strength and cost-effectiveness. Numerous steel grades are employed‚ each tailored to specific application demands. High-carbon steel offers superior hardness and wear resistance‚ ideal for high-volume production molds. Alloy steels‚ incorporating elements like chromium or molybdenum‚ enhance toughness and resistance to deformation under load.

The selection hinges on factors like anticipated loads‚ operating temperatures‚ and the corrosive environment. Heat treatment processes—hardening‚ tempering‚ and case hardening—further refine steel properties. Proper heat treatment is crucial for achieving optimal performance and longevity. Considering the automotive industry’s focus on durability‚ similar principles apply to steel guide pin selection‚ ensuring reliable performance over extended periods.

Stainless Steel Guide Pins

Stainless steel guide pins are favored when corrosion resistance is paramount‚ offering superior performance in harsh environments. Various grades‚ such as 303‚ 304‚ and 420 stainless steel‚ cater to diverse needs. 303 provides excellent machinability‚ while 304 excels in general corrosion resistance. 420 stainless steel offers increased hardness and wear resistance‚ approaching that of some carbon steels.

These pins are frequently chosen in applications involving exposure to moisture‚ chemicals‚ or extreme temperatures. Like the long-term reliability valued in automobiles—such as a Toyota Corolla retaining its value—stainless steel guide pins ensure consistent performance and minimize maintenance. While generally more expensive than carbon steel‚ their longevity often justifies the initial investment.

Brass Guide Pins

Brass guide pins‚ known for their excellent machinability and inherent corrosion resistance‚ are a popular choice in specific applications. Their softer nature compared to steel makes them ideal where minimizing damage to mating components is crucial – preventing wear on delicate molds or fixtures. Different brass alloys offer varying properties; some prioritize machinability‚ while others enhance strength.

Similar to appreciating the craftsmanship in automotive manufacturing‚ brass guide pins represent a balance of functionality and material properties. While not as strong as steel‚ their resistance to corrosion and ease of fabrication make them suitable for less demanding‚ yet precise‚ alignment tasks. They are often found in applications where spark resistance is also a requirement.

Plastic Guide Pins

Plastic guide pins represent a cost-effective and lightweight solution for non-critical alignment applications. Offering excellent damping properties‚ they reduce noise and vibration during operation‚ a benefit akin to the smooth ride quality sought in modern vehicles. Various polymers‚ like nylon and acetal‚ are employed‚ each providing a unique balance of strength‚ wear resistance‚ and chemical compatibility.

While lacking the strength of metal counterparts‚ plastic guide pins excel in environments where corrosion is a major concern or where electrical insulation is required. They are frequently used in assembly fixtures and low-load applications‚ mirroring the focus on durability and value seen in models like the Toyota Corolla. Their lower cost allows for frequent replacement if needed.

Applications of Guide Pins

Guide pins are vital in mold and die work‚ assembly fixtures‚ machine tooling‚ and robotics—ensuring precision‚ much like the reliability of automotive manufacturing.

Mold and Die Applications

Guide pins are absolutely critical within mold and die sets‚ functioning to precisely align die halves during the molding or stamping process. This alignment is paramount for maintaining dimensional accuracy and preventing flash or other defects in the finished parts. They withstand substantial forces and repeated cycles‚ demanding robust materials like high-grade steel or stainless steel.

Their consistent performance directly impacts production efficiency and part quality. The selection of appropriate guide pin dimensions and materials is crucial‚ considering factors like mold size‚ clamping force‚ and the type of material being processed. Proper lubrication and maintenance are also essential to extend their lifespan and ensure continued precision‚ mirroring the care needed for reliable automotive components.

Assembly Fixtures

Guide pins play a vital role in assembly fixtures‚ ensuring accurate and repeatable positioning of components during manufacturing processes. They facilitate quick and precise alignment‚ reducing assembly time and minimizing errors. These pins act as locating elements‚ guiding parts into their correct orientation before fastening or joining.

The use of guide pins in fixtures is particularly important for complex assemblies requiring tight tolerances. Similar to the precision needed in automotive manufacturing – exemplified by Toyota’s reliability – accurate alignment is key. Materials are selected based on load requirements and wear resistance‚ often utilizing hardened steel for durability and longevity‚ ensuring consistent performance throughout the assembly process.

Machine Tooling

Guide pins are integral to machine tooling‚ providing crucial support and alignment for various machining operations. They function as locating devices within jigs and fixtures‚ ensuring consistent workpiece positioning relative to the cutting tool. This precision is paramount for achieving accurate dimensions and surface finishes‚ mirroring the exacting standards found in automotive production‚ like those upheld by Toyota.

In applications like drilling‚ milling‚ and tapping‚ guide pins maintain stability and prevent unwanted movement during the machining process. Materials chosen for these pins often include hardened steel or stainless steel‚ offering resistance to wear and deformation. Proper selection and maintenance of guide pins are essential for maximizing tooling lifespan and maintaining machining accuracy.

Robotics and Automation

Guide pins play a vital role in robotics and automation systems‚ enabling precise and repeatable movements of robotic arms and end-effectors. They act as alignment features within automated assembly lines‚ ensuring accurate component placement and fastening‚ much like the precise fit and finish expected in modern automobiles‚ such as those produced by Toyota.

In robotic cells‚ guide pins facilitate quick tool changes and fixture positioning‚ minimizing downtime and maximizing production efficiency. Their robust construction and dimensional stability are crucial for withstanding the high-speed‚ repetitive cycles inherent in automated processes. Selecting appropriate materials‚ like hardened steel‚ ensures longevity and reliability within these demanding environments.

Guide Pin Standards and Tolerances

Guide pin manufacturing adheres to ANSI/ASME‚ DIN‚ and ISO standards‚ ensuring interchangeability and quality—similar to cabin class codes (Y‚ F‚ C) for aircraft seating.

ANSI/ASME Standards

ANSI (American National Standards Institute) and ASME (American Society of Mechanical Engineers) collaboratively establish crucial guidelines for guide pin dimensions‚ materials‚ and performance characteristics. These standards prioritize precision and reliability‚ mirroring the meticulous attention to detail seen in automotive manufacturing‚ like Toyota’s commitment to durability.

Specifically‚ these standards define acceptable tolerances for diameter‚ straightness‚ and surface finish‚ ensuring consistent functionality across different applications. They also cover material specifications‚ often referencing steel grades and hardness requirements. Adherence to ANSI/ASME standards facilitates seamless integration within assembly fixtures‚ mold designs‚ and machine tooling‚ promoting interoperability and reducing potential errors—much like standardized cabin codes (Y‚ F‚ C) simplify air travel logistics.

DIN Standards

DIN (Deutsches Institut für Normung – German Institute for Standardization) provides a comprehensive set of standards governing guide pin manufacturing and application‚ particularly prevalent in European engineering. These standards‚ like the meticulous detail in limited-edition car collections (Le Collection Numéro 271)‚ emphasize precision and interchangeability.

DIN standards specify dimensional accuracy‚ material composition‚ and hardness levels for various guide pin types. They often detail surface finish requirements and geometric tolerances‚ ensuring consistent performance in demanding applications like mold and die work. Compliance with DIN standards guarantees compatibility within European machinery and tooling‚ fostering efficient production processes. Similar to how Kelley Blue Book assesses vehicle value‚ DIN standards provide a benchmark for quality and reliability.

ISO Standards

ISO (International Organization for Standardization) develops globally recognized standards for guide pins‚ promoting international compatibility and quality control. Much like the diverse range of rolling pins available‚ ISO standards cover a broad spectrum of guide pin specifications‚ ensuring consistent performance across different manufacturing environments.

ISO standards define dimensional tolerances‚ material properties‚ and testing procedures for guide pins. These standards facilitate seamless integration of components sourced from various global suppliers‚ mirroring the international appeal of brands like Toyota. Adherence to ISO guidelines ensures that guide pins meet stringent quality requirements‚ enhancing reliability and reducing the risk of failures in critical applications. They are vital for maintaining precision‚ similar to aircraft cabin classifications (V‚ H‚ W‚ etc.).

Selecting the Right Guide Pin

Choosing guide pins demands careful consideration of load‚ wear‚ and precision needs—much like selecting a reliable car‚ such as a Toyota Corolla‚ for long-term value.

Load Capacity Considerations

Determining the appropriate load capacity for guide pins is paramount to ensuring reliable performance and preventing premature failure. This involves a thorough understanding of the forces acting upon the pin during operation‚ including static loads‚ dynamic loads‚ and potential shock loads.

Factors such as pin diameter‚ material strength‚ and pin length all contribute to its overall load-bearing capability. Larger diameter pins generally exhibit higher load capacities‚ while stronger materials‚ like high-grade steel‚ can withstand greater stresses.

Furthermore‚ the pin’s length influences its susceptibility to bending and buckling under load. Careful calculation and consideration of these variables are crucial for selecting a guide pin that can safely and effectively handle the anticipated loads‚ mirroring the importance of vehicle durability‚ like that of a Toyota.

Wear Resistance Requirements

Assessing wear resistance is critical when selecting guide pins‚ particularly in applications involving frequent movement or abrasive environments. The longevity of a guide pin directly impacts the precision and reliability of the overall system. Materials like stainless steel and hardened tool steels offer superior wear resistance compared to softer materials like brass or plastic.

Surface treatments‚ such as coatings or nitriding‚ can further enhance wear resistance‚ extending the pin’s service life. The operating conditions‚ including lubrication‚ temperature‚ and the presence of contaminants‚ also play a significant role in determining the required level of wear resistance‚ much like maintaining a vehicle’s value over time.

Choosing a pin with adequate wear resistance minimizes downtime and reduces the need for frequent replacements.

Precision and Accuracy Needs

Defining precision and accuracy is paramount when specifying guide pins. Applications demanding tight tolerances‚ such as mold and die work or robotics‚ necessitate pins manufactured to exacting standards. Dimensional accuracy‚ including diameter and length‚ must be closely controlled to ensure proper alignment and functionality.

The required level of precision often dictates the manufacturing process and material selection. Ground pins offer superior accuracy compared to machined pins. Furthermore‚ factors like runout and straightness are crucial considerations. Similar to the meticulous construction of reliable automobiles‚ precision in guide pins translates to consistent performance.

Careful consideration of these needs minimizes errors and maximizes system efficiency.

invisible man pdf ralph ellison

Article Plan: Invisible Man PDF Ralph Ellison

This article details accessing Invisible Man in PDF format, covering download locations, file specifics (like the 2.32 MB ralph-ellison-invisible-man-v3_0.pdf), and edition details.

We’ll explore the novel’s length (around 300 pages) and provide resources for study, referencing its availability as a free ebook.

Invisible Man, published in 1952, stands as a monumental achievement in American literature, penned by Ralph Ellison. This groundbreaking novel transcends simple categorization, functioning as a powerful exploration of identity, race, and the African American experience in the 20th century.

The story, often sought in PDF format for convenient study, is narrated by an unnamed Black man who feels socially invisible. He journeys through a series of encounters, navigating the complexities of prejudice and societal expectations. The novel’s enduring relevance stems from its unflinching portrayal of systemic racism and the psychological toll it takes on individuals.

Its availability as a downloadable PDF has broadened access to this crucial work, allowing students and readers worldwide to engage with Ellison’s profound insights. The text’s impact continues to resonate, prompting critical discussions about visibility, power, and the search for self.

The Availability of the Invisible Man PDF

Invisible Man in PDF format is widely accessible online, catering to students, researchers, and avid readers. Numerous websites offer the novel as a free download, often listed as a “Literature Ebook”. The ralph-ellison-invisible-man-v3_0.pdf version, approximately 2.32 MB in size, is a commonly circulated file.

However, users should exercise caution when downloading from unofficial sources, ensuring the file is legitimate and free from malware. Reputable online libraries and educational platforms frequently host the PDF for legal access. The ease of obtaining the PDF contributes to the novel’s continued study and appreciation.

Furthermore, digital formats like PDF enhance portability, allowing readers to engage with Ellison’s work on various devices. This widespread availability underscores the novel’s enduring cultural significance and its importance in contemporary discourse.

Where to Download the Invisible Man PDF for Free

Finding a free Invisible Man PDF requires navigating various online resources. Several websites explicitly offer the novel as a free download, categorized as a “PDF File” alongside Text File (.txt) options. Online repositories and digital libraries frequently host the ebook, making it readily available to the public.

Searching directly for “Invisible Man PDF free download” yields numerous results, but prioritizing established platforms ensures a safe and reliable access point to Ralph Ellison’s seminal work. Remember to respect copyright considerations when utilizing freely available digital content.

File Size and Format of the PDF

The Invisible Man PDF commonly circulates as a standard application/pdf document, ensuring broad compatibility across devices and operating systems. A frequently encountered version, specifically ralph-ellison-invisible-man-v3_0.pdf, boasts a manageable file size of 2.32 MB. This relatively small size facilitates quick downloads and efficient storage, even on devices with limited capacity.

However, file sizes can vary slightly depending on the source and the edition’s formatting. Some versions may include additional supplementary materials, potentially increasing the overall file size. The PDF format preserves the original text layout, including fonts and images, offering a reading experience closely mirroring the printed book.

Users can expect a clear, digitally formatted text, suitable for both on-screen reading and printing. The PDF’s portability makes it an ideal format for students and researchers accessing the novel remotely.

A Brief Overview of the Novel’s Plot

Invisible Man follows an unnamed African American narrator’s journey through the racially divided America of the mid-20th century. Initially, he seeks to advance through societal expectations, believing in the promise of education and hard work. He’s expelled from a Southern college for inadvertently exposing the hypocrisy of its white benefactors.

The narrator then moves to Harlem, seeking opportunity, but encounters further disillusionment with various political and social organizations. He grapples with issues of identity, prejudice, and the struggle to find his place in a society that refuses to truly see him.

His experiences lead to a profound sense of alienation and ultimately, a self-imposed exile. The novel culminates in his realization of his “invisibility” – a metaphor for the systemic disregard of Black individuals. He reflects on his past, attempting to understand his experiences and forge a path forward, emerging from the underground.

The Significance of the Opening Lines: “I am an invisible man.”

The iconic opening line, “I am an invisible man,” is not a statement of literal disappearance, but a powerful metaphor for the narrator’s social and psychological state. He feels unseen, unheard, and unacknowledged by a society defined by racial prejudice. People perceive him only as a reflection of their own biases and expectations, rather than recognizing his individuality.

This invisibility isn’t a unique condition to the narrator; it represents the broader experience of African Americans in a racially stratified society. Ellison uses this concept to explore themes of identity, perception, and the dehumanizing effects of racism.

The line immediately establishes a sense of alienation and invites the reader to question the nature of visibility and how societal structures can render individuals effectively nonexistent in the eyes of others. It’s a provocative statement that sets the stage for the novel’s exploration of these complex issues.

Key Themes Explored in Invisible Man

Invisible Man delves into profoundly complex themes, most notably racial identity and the pervasive impact of prejudice. The novel portrays a society where the narrator’s identity is constantly shaped – and distorted – by the expectations of others, highlighting the struggle for self-definition in a racially charged environment.

Closely linked is the overarching search for identity. The protagonist’s journey is a quest to understand who he is, independent of societal labels and expectations. This search is complicated by his experiences with various ideologies and institutions, each attempting to define him.

Furthermore, the power of storytelling emerges as a crucial theme. The narrator’s act of recounting his experiences is itself a form of resistance and a means of reclaiming his voice and asserting his existence. Through narrative, he attempts to make himself visible and understandable.

Racial Identity and Prejudice

Invisible Man relentlessly examines the construction of racial identity within a prejudiced society. The narrator’s experiences demonstrate how Black identity is often defined by the white gaze, leading to a sense of alienation and invisibility. He is repeatedly subjected to stereotypes and expectations, hindering his ability to authentically express himself.

The novel portrays systemic racism not as overt hostility alone, but as a subtle, insidious force that permeates all aspects of American life. Institutions, from universities to political organizations, perpetuate prejudice through their actions and policies, often unintentionally reinforcing harmful stereotypes.

Ellison illustrates how the pursuit of acceptance within a prejudiced system can lead to self-betrayal and a loss of identity. The narrator’s attempts to navigate this complex landscape ultimately force him to confront the limitations imposed by racial prejudice and seek a more authentic sense of self.

The Search for Identity

Invisible Man is fundamentally a novel about the narrator’s arduous journey to discover his own identity. Initially, he seeks validation and purpose through external forces – the expectations of the white community, the promises of institutions, and the ideologies of various organizations.

However, each attempt to define himself through these external sources proves ultimately disillusioning, leaving him feeling fragmented and “invisible.” He grapples with the conflicting messages he receives about who he should be, struggling to reconcile his own desires with the limitations imposed upon him.

The narrator’s descent into the underground symbolizes his withdrawal from a society that refuses to acknowledge his individuality. It is in this isolation that he begins the difficult process of self-reflection, ultimately realizing that true identity cannot be found in external validation, but must be forged from within.

The Power of Storytelling

Invisible Man powerfully demonstrates the transformative and often subversive power of storytelling. The narrator’s very act of recounting his experiences is a defiant assertion of his existence and a reclamation of his voice in a society that seeks to silence him.

Through his narrative, he challenges dominant narratives and exposes the hypocrisy and prejudice that underpin the social order. The novel itself becomes a testament to the importance of bearing witness and sharing one’s truth, even – and especially – when that truth is uncomfortable or unwelcome.

Ellison utilizes a rich and evocative prose style, employing symbolism and metaphor to convey the complexities of the narrator’s inner life and the broader social landscape. The story isn’t just what happened, but how it’s told, highlighting the subjective nature of reality and the power of language to shape perception.

Character Analysis: The Narrator

The narrator of Invisible Man is a complex and dynamic figure, initially presented as naive and eager to please, seeking validation within a society that consistently denies his individuality. He embodies the struggle for identity in a racially divided America, constantly shifting his persona to conform to others’ expectations.

His journey is marked by disillusionment as he encounters betrayal and manipulation at every turn. He moves from a position of hopeful ambition to one of profound alienation, ultimately retreating into a self-imposed exile. The narrator’s “invisibility” isn’t a literal state, but a metaphorical one – a consequence of others’ refusal to truly see him.

Throughout the novel, he grapples with questions of self-worth, purpose, and the meaning of freedom. His eventual decision to emerge from his underground existence suggests a tentative embrace of agency and a commitment to speaking his truth, despite the risks.

Historical Context of Invisible Man

Invisible Man is deeply rooted in the socio-political landscape of mid-20th century America, specifically the era of Jim Crow laws and the burgeoning Civil Rights Movement. Ralph Ellison drew heavily from his own experiences navigating racial prejudice and segregation during the 1930s and 40s.

The novel reflects the complexities of African American life during this period, including the pervasive discrimination in education, employment, and housing. The depiction of the narrator’s experiences with the Southern college and the Brotherhood mirrors the historical realities faced by Black Americans seeking opportunities and equality.

Furthermore, the novel engages with the intellectual and political currents of the time, such as the influence of Marxism and the debates surrounding racial uplift. Ellison’s work serves as a powerful commentary on the limitations of assimilation and the enduring struggle for genuine recognition and social justice.

Critical Reception and Literary Significance

Upon its 1952 publication, Invisible Man was met with widespread critical acclaim, immediately establishing Ralph Ellison as a major voice in American literature. The novel won the National Book Award in 1953, solidifying its place in the canon.

Critics lauded Ellison’s innovative narrative techniques, his exploration of complex themes like racial identity and alienation, and his masterful prose style. The novel’s enduring power lies in its ability to resonate with readers across generations, prompting ongoing discussions about race, power, and the search for self.

Invisible Man is frequently studied in academic settings and remains a cornerstone of African American literature. Its influence can be seen in the works of numerous contemporary writers, and it continues to be celebrated for its artistic merit and its profound social commentary. The PDF accessibility further expands its reach.

Page Count and Edition Information

Determining the exact page count of Invisible Man can vary depending on the edition and publisher. However, most editions fall within the 300 to 350-page range. Some sources indicate approximately 300 pages, while academic papers referencing the text cite figures between 278-293 pages for specific excerpts.

The readily available PDF versions, such as ralph-ellison-invisible-man-v3_0.pdf, maintain this general length. Different digital formats may slightly alter pagination due to font sizes and margins.

First editions and subsequent printings have undergone minor revisions, but the core text remains consistent. When studying the novel, referencing the edition’s publication details is crucial for accurate citations and understanding any textual variations. The widespread availability of the PDF ensures access to this significant work.

The Novel’s Style and Narrative Techniques

Ralph Ellison’s Invisible Man employs a highly distinctive and complex narrative style. The novel is famously told through the first-person perspective of an unnamed narrator, creating a deeply subjective and introspective experience for the reader.

Ellison masterfully utilizes stream of consciousness, blending realistic and surreal elements. Passages describe the narrator “floating free of his body,” showcasing a fragmented and dreamlike quality. This technique mirrors the narrator’s feelings of alienation and invisibility.

The prose is rich with symbolism and metaphor, demanding close reading and interpretation. The PDF format allows for easy annotation and revisiting of key passages. Ellison’s rhythmic and poetic language contributes to the novel’s enduring literary power, making it a cornerstone of American literature.

Exploring Symbolism within the Text

Invisible Man is saturated with potent symbolism, enriching its exploration of identity and societal forces. The very concept of “invisibility” transcends a literal state, representing the narrator’s lack of recognition and agency within a racially prejudiced society.

Light and darkness frequently appear, symbolizing knowledge versus ignorance, and visibility versus invisibility. The narrator’s experiences with light – from the battle royal to the basement – highlight his fluctuating sense of self.

The PDF format facilitates detailed analysis of recurring motifs. Objects like the briefcase and the Sambo doll carry significant weight, representing the narrator’s attempts to define himself and the manipulative power of societal expectations. Studying these symbols within the complete text, readily available in PDF form, unlocks deeper layers of meaning.

Further Resources for Studying Invisible Man

Beyond accessing the Invisible Man PDF, numerous resources enhance understanding of Ralph Ellison’s masterpiece. Academic databases offer critical essays analyzing the novel’s themes and literary techniques. Websites dedicated to American literature often feature study guides and character analyses.

Online forums and discussion boards foster engaging conversations about the novel. Utilizing the searchable PDF format allows for quick reference to specific passages while engaging with these supplementary materials, deepening comprehension and critical thinking.

manual abu garcia reel parts diagram

Welcome! Your journey with the Abu Garcia Spinning Reel Parts Diagram begins now, offering a comprehensive guide for effective understanding and operation.

This manual unlocks a new world, outlining correct operating instructions for your Abu Garcia reel, ensuring optimal performance and longevity.

Understanding the Importance of Diagrams

Diagrams are crucial for successfully navigating the complexities of Abu Garcia reel maintenance and repair. A detailed parts diagram serves as a visual roadmap, enabling users to identify each component accurately, understand its function within the reel’s mechanism, and facilitate efficient troubleshooting. Without a clear diagram, disassembly and reassembly can become incredibly challenging, potentially leading to incorrect installation of parts or even permanent damage.

These diagrams are especially vital when ordering replacement parts, ensuring compatibility and preventing costly errors. They empower both seasoned anglers and beginners to confidently undertake reel servicing, extending the lifespan of their valuable equipment. The manual emphasizes that proper operation relies on understanding these visual guides, unlocking a new world of possibilities for reel maintenance.

Brief History of Abu Garcia Reels

Abu Garcia’s legacy began in Sweden in 1921, initially as ABUMannen, producing precision steel bearings. The company transitioned to manufacturing fishing reels in the 1940s, quickly gaining renown for innovation and quality. Early models revolutionized fishing with features like the foot-operated level-wind system, setting new standards for casting distance and control.

Throughout the decades, Abu Garcia continued to pioneer advancements in reel technology, including the introduction of durable materials and refined drag systems. This commitment to excellence established Abu Garcia as a trusted brand among anglers worldwide. Understanding this history provides context for the intricate designs reflected in modern Abu Garcia Spinning Reel Parts Diagrams, showcasing a century of engineering expertise and a dedication to performance.

Identifying Reel Models

Accurate identification is crucial for locating the correct Abu Garcia Spinning Reel Parts Diagram. Decoding model numbers and recognizing common series simplifies the process significantly.

Decoding Model Numbers

Understanding Abu Garcia model numbers is fundamental to pinpointing the precise parts diagram for your reel. These numbers aren’t random; they contain valuable information about the reel’s series, size, and features. Typically, an Abu Garcia model number consists of letters and numbers, each segment revealing specific details.

For instance, the prefix often indicates the reel type – whether it’s a spinning reel, baitcasting reel, or a specific series within those categories. Subsequent numbers usually denote the reel’s size, with larger numbers generally corresponding to larger reels designed for heavier line and bigger fish. Further digits or letters might specify features like gear ratios, bearing counts, or special editions.

Locating this information is usually found stamped or printed on the reel’s frame, often near the foot or handle side plate. Carefully noting the complete model number is the first step towards successfully navigating the parts diagram system and ensuring you order the correct replacement components.

Common Abu Garcia Reel Series

Abu Garcia boasts a diverse range of reel series, each tailored to specific angling applications. Familiarizing yourself with these series simplifies the parts identification process. Popular series include the Ambassadeur, renowned for its robust baitcasting reels favored by seasoned anglers. The Cardinal series offers reliable spinning reels, often preferred for lighter applications and finesse techniques.

The Veritas line represents high-performance baitcasters designed for competitive bass fishing, while the Vengeance series provides excellent value and versatility for a wide range of species. More recent additions like the Ike series, developed with professional angler Mike Iaconelli, cater to specific bass fishing styles.

Knowing the series helps narrow down your search within the parts diagrams. Each series has unique components and construction, so identifying the correct series is crucial for accurate repairs and maintenance.

Locating Your Reel’s Specific Diagram

Finding the correct parts diagram is paramount for successful reel maintenance and repair. Begin by visiting the Abu Garcia official website – a primary resource for downloadable diagrams. Navigate to the “Support” or “Parts” section, and utilize the reel model number search function. Accurate model identification is key; diagrams are specific to each variation.

Alternatively, online forums and communities dedicated to Abu Garcia reels often host extensive diagram libraries compiled by enthusiasts. These forums can be invaluable if the official website lacks your specific model. When searching, be precise with keywords including the reel series and year of manufacture.

Always verify the diagram matches your reel’s exact specifications before ordering parts. Discrepancies can lead to incorrect replacements and further complications.

Essential Reel Components

Key components include the spool, drag system, handle, gear assembly, frame, and side plates – understanding these is vital for effective repair and maintenance.

Spool and Drag System

The spool is central to line storage and casting performance, requiring careful attention during maintenance. Abu Garcia diagrams meticulously detail spool types and their corresponding parts, aiding in correct reassembly. Understanding the drag system is paramount; it controls the force needed to release line when a fish strikes.

Drag systems utilize washers – carbon fiber, felt, or stainless steel – which create friction. Parts diagrams illustrate the precise arrangement of these drag washers, springs, and adjustment knobs. Proper lubrication of the drag is crucial for smooth operation and preventing corrosion. Incorrectly assembled or poorly maintained drag systems can lead to lost fish and reel damage. Always refer to your reel’s specific diagram for the correct parts and configuration, ensuring optimal drag performance and longevity.

Handle and Gear Assembly

The handle and gear assembly are vital for power transmission and retrieval. Abu Garcia parts diagrams clearly showcase the intricate relationship between the handle, stem, pinion gear, and main gears. Correct alignment and lubrication are essential for smooth, efficient operation.

Diagrams pinpoint specific gear ratios, allowing for accurate parts identification and replacement. Disassembly requires careful attention to detail, noting the position of shims and bearings. Proper lubrication minimizes friction and wear, extending the lifespan of these critical components. Incorrect reassembly can result in grinding noises, reduced power, or complete gear failure. Always consult your reel’s diagram to ensure correct parts placement and torque specifications during maintenance and repair.

Frame and Side Plates

The reel’s frame and side plates provide structural integrity and house the internal components. Abu Garcia parts diagrams meticulously illustrate the frame’s design, highlighting screw locations, mounting points, and any integrated features like foot designs. Side plates secure the gears and bearings, ensuring proper alignment and preventing unwanted movement.

Diagrams detail the specific screw types and washer configurations used in assembly. Damage to the frame or side plates, such as cracks or stripped threads, can compromise the reel’s performance. Accurate parts identification is crucial when replacing these components. Maintaining proper tightness of all fasteners prevents flexing and ensures optimal power transfer. Always refer to the diagram for correct torque specifications to avoid over-tightening and potential damage.

Detailed Parts Breakdown

Explore comprehensive Abu Garcia reel schematics, dissecting each component – from the bail assembly to internal gears – for precise repair and maintenance insights.

Bail Assembly Components

The bail assembly is crucial for smooth line retrieval and casting on your Abu Garcia reel. Key components include the bail arm, bail wire, bail springs, and the bail roller. Diagrams clearly illustrate the positioning of each part, aiding in disassembly and reassembly.

Understanding how these components interact is vital for troubleshooting issues like line twist or bail malfunctions. Inspect the bail wire for bends or damage, and ensure the bail springs provide adequate tension. The bail roller, often a wear item, should rotate freely. Refer to the parts diagram to identify specific part numbers for replacements, ensuring compatibility with your reel model. Proper maintenance of the bail assembly contributes significantly to overall reel performance and longevity.

Rotor and Rotor Nut

The rotor is the rotating portion of the reel that carries the line, and the rotor nut secures it to the main shaft. Detailed diagrams showcase the rotor’s construction, including its connection points and internal mechanisms. Proper rotor function is essential for smooth reeling and preventing line tangles.

Inspect the rotor for cracks or warping, and ensure the rotor nut is tightened securely but not over-tightened. The nut often features a specific torque specification; consult your reel’s manual. Disassembly requires careful attention to the order of components. Referencing the parts diagram is crucial for correct reassembly. Maintaining these parts ensures efficient operation and extends the life of your Abu Garcia reel, preventing costly repairs;

Line Roller and Line Guide

The line roller, positioned on the bail arm, and the line guide work together to distribute line evenly across the spool during retrieval. Diagrams clearly illustrate their placement and interaction with other reel components. Regular inspection of the line roller is vital, as wear can cause line friction and reduced casting distance.

Check for smooth rotation and any signs of damage, replacing it if necessary. The line guide ensures proper line lay, preventing tangles and maximizing spool capacity. Lubrication of both components minimizes friction and enhances performance. Refer to the parts diagram for correct identification and replacement procedures, ensuring optimal line management and extending the lifespan of your Abu Garcia reel.

Handle Knob and Stem

The handle knob and stem are crucial for reel operation, translating your power into spool rotation. Parts diagrams detail the assembly, including the knob itself, the stem connecting it to the gear assembly, and any associated bearings or washers. Inspect the knob for secure attachment and comfortable grip; replacements are available in various materials and styles.

Check the stem for any bends or damage, as this can affect retrieval smoothness. Lubrication of the stem and bearings ensures effortless operation. Refer to the exploded view in the manual for proper disassembly and reassembly procedures. Correct installation is vital to maintain optimal performance and prevent handle slippage during intense fishing sessions, ensuring a secure and comfortable experience.

Gear Ratio and Internal Gears

Understanding the gear ratio is fundamental to reel performance. Parts diagrams meticulously illustrate the arrangement of internal gears – the pinion gear, main gear, and any intermediate gears – showcasing their precise positioning. Higher ratios retrieve line faster, ideal for techniques like crankbaiting, while lower ratios offer more power for battling larger fish.

Inspect gears for wear, chipped teeth, or corrosion. Lubrication is paramount; apply grease specifically designed for fishing reels to minimize friction and extend gear life. The diagram aids in identifying each gear’s specific location and orientation during reassembly. Proper gear maintenance ensures smooth, efficient operation and prevents premature failure, maximizing your reel’s longevity and fishing success.

Drag Washer System

The drag system is crucial for fighting fish, and parts diagrams clearly depict its components: drag washers, pressure plates, and the star drag mechanism. Washers are typically made of carbon fiber, felt, or stainless steel, each offering different drag characteristics. Diagrams show the correct stacking order and orientation of these washers for optimal performance.

Regular inspection is vital; check for wear, cracks, or contamination. Lubricating drag washers with drag grease reduces friction and ensures smooth, consistent drag pressure. Adjusting the star drag controls the amount of force needed to release line. Proper maintenance prevents drag failure during a crucial fight, safeguarding your catch and reel’s integrity.

Bearing Locations and Types

Abu Garcia reel parts diagrams meticulously illustrate bearing placements throughout the reel – spool, handle, and level wind mechanisms. Bearings reduce friction, enhancing casting distance and retrieve smoothness. Common types include shielded, sealed, and ceramic bearings, each offering varying levels of corrosion resistance and performance.

Diagrams specify bearing sizes and types for each location, crucial for accurate replacement. Shielded bearings offer basic protection, while sealed bearings provide superior resistance to water and debris. Ceramic bearings are lightweight and corrosion-proof, ideal for saltwater use. Proper lubrication with bearing oil is essential for longevity and smooth operation, preventing corrosion and wear.

Screw and Washer Identification

Abu Garcia reel parts diagrams detail various screws and washers, vital for assembly and disassembly. Diagrams clearly illustrate screw lengths, diameters, and head types (flat, round, etc.). Washers – flat, lock, or wave – are shown accompanying specific screws, ensuring proper clamping force and preventing loosening.

Correct identification is crucial; using the wrong screw can damage threads or compromise structural integrity. Parts lists often include screw and washer part numbers for easy ordering. Pay attention to diagrams showing washer placement; incorrect positioning can lead to malfunction. Stainless steel screws resist corrosion, ideal for saltwater reels. Maintaining a well-organized parts layout during disassembly aids reassembly and prevents lost components.

Using the Parts Diagram for Repair

Effectively troubleshoot common issues and streamline repairs with the Abu Garcia reel parts diagram, facilitating accurate part identification and successful reel maintenance.

Troubleshooting Common Issues

Identifying the root cause of reel malfunctions is simplified using the Abu Garcia parts diagram. Common problems like rough cranking often stem from worn gears or insufficient lubrication, easily pinpointed within the diagram’s detailed gear assembly section.

Loss of casting distance can be traced to issues with the spool, bail assembly, or line roller – components clearly illustrated for inspection. Drag malfunctions are frequently caused by worn drag washers, readily identifiable and replaceable using the diagram as a guide.

Handle play often indicates loose or damaged handle and gear assembly parts. The diagram allows for precise identification of screws, washers, and bearings requiring attention. Regularly referencing the diagram during disassembly and reassembly minimizes errors and ensures correct component placement, leading to efficient and successful repairs.

Ordering Replacement Parts

Accurate part identification is crucial when ordering replacements, and the Abu Garcia parts diagram is your key resource. Note the exact part number corresponding to the component needing replacement, as listed alongside each item in the diagram.

Utilize the diagram in conjunction with authorized Abu Garcia retailers or online parts suppliers. Providing the reel model number and the specific part number guarantees you receive the correct component. Beware of generic parts; authentic Abu Garcia replacements ensure optimal performance.

Cross-reference the part number with supplier catalogs or websites. Many suppliers offer exploded views mirroring the official diagram for easy navigation. Confirm compatibility before finalizing your order, and consider ordering a small quantity of frequently worn items like drag washers for future maintenance.

Tools Required for Reel Maintenance

Successful reel maintenance demands the right tools. A basic toolkit should include a selection of precision screwdrivers – both Phillips and flathead – in various sizes, to handle the diverse screws within the reel. Needle-nose pliers are invaluable for manipulating small parts and springs.

Bearing presses (or a suitable substitute with soft jaws) are essential for safely removing and installing bearings without damage. A parts tray keeps components organized, preventing loss. Lubricants, specific to fishing reels, are vital – avoid general-purpose oils.

Cleaning brushes, including small detailing brushes, remove old grease and debris. A magnifying glass aids in inspecting tiny parts. Consider a torque wrench for precise tightening of screws, preventing over-tightening and damage. Always prioritize quality tools for longevity and safety.

Maintenance and Lubrication

Regular maintenance extends your reel’s life! Utilize recommended lubricants and follow cleaning procedures diligently. A preventative maintenance schedule ensures peak performance.

Recommended Lubricants

Selecting the right lubricant is crucial for Abu Garcia reel longevity and smooth operation. Avoid using general-purpose oils, as they can attract dirt and grime, hindering performance. Instead, opt for high-quality reel-specific lubricants designed for fishing applications.

For gears, a thicker grease is recommended to withstand the high pressures and friction. Abu Garcia often suggests their own branded reel grease, or equivalent products from reputable brands like Shimano or Penn. Bearings benefit from lighter oils, such as mineral oil or synthetic oil, to reduce friction without creating excessive drag.

Drag systems require specialized drag grease to ensure smooth, consistent drag pressure. Regularly applying these lubricants, as part of a maintenance schedule, will significantly improve your reel’s performance and lifespan. Always clean the area before applying fresh lubricant.

Cleaning Procedures

Regular cleaning is paramount for maintaining your Abu Garcia reel. Begin by rinsing the reel with fresh water after each use, especially after saltwater exposure, to remove corrosive elements. Disassemble the reel partially, focusing on areas prone to salt and grime buildup – the spool, rotor, and handle.

Use a soft brush and mild soap to gently scrub these components. Avoid harsh chemicals or solvents that could damage the reel’s finish or internal parts. Pay close attention to the line roller and bail assembly, as these areas accumulate debris easily.

Thoroughly dry all parts with a clean cloth before reassembly. Inspect for any signs of corrosion or damage during the cleaning process. Proper cleaning not only extends the reel’s life but also ensures optimal casting distance and retrieval performance.

Preventative Maintenance Schedule

Establish a routine for preventative maintenance to maximize your Abu Garcia reel’s lifespan. After each fishing trip, rinse with fresh water and wipe down the exterior. Monthly, perform a more detailed cleaning, disassembling key components as described previously.

Every three months, apply recommended lubricants to gears, bearings, and the spool shaft. Annually, consider a complete overhaul, replacing worn drag washers and inspecting for any internal damage. Regularly check the line roller for wear and tear, replacing it as needed.

Keep a log of maintenance performed to track intervals and identify potential issues early. Consistent preventative care will significantly reduce the risk of breakdowns and ensure years of reliable performance from your Abu Garcia reel.

Resources and Support

Explore the Abu Garcia official website for diagrams and support. Join online forums and communities for shared knowledge. Find parts suppliers and retailers easily online.

Abu Garcia Official Website

The Abu Garcia official website serves as the primary hub for accessing detailed reel parts diagrams and comprehensive support resources. Navigating their site allows users to locate specific diagrams based on reel model numbers, ensuring accuracy for repairs and maintenance.

Beyond diagrams, the website provides access to frequently asked questions, troubleshooting guides, and warranty information. Users can also find contact details for customer service representatives who can offer personalized assistance. Furthermore, the official website often features updated information regarding new reel releases and discontinued models, aiding in accurate parts identification.

For business inquiries, the website lists the email address bussiness4abugmail.com. Direct access to these resources streamlines the repair process and empowers owners to maintain their Abu Garcia reels effectively. Remember to utilize the search function for quick access to specific information.

Online Forums and Communities

Engaging with online forums and communities dedicated to fishing reels, particularly Abu Garcia, provides a valuable platform for sharing knowledge and seeking assistance with parts diagrams. These communities often host experienced anglers and reel enthusiasts who can offer insights into specific models and common repair issues.

Users frequently share their own experiences, troubleshooting tips, and even custom modifications, supplementing the official documentation. Platforms like TikTok, with accounts such as abu_kavkaz.official (boasting over 282.9K likes), showcase reel maintenance and modifications. YouTube channels, like Stand_abu with 637 videos, offer visual guides and tutorials.

These resources can be invaluable when deciphering complex diagrams or identifying obscure parts. Remember to verify information from multiple sources and exercise caution when attempting repairs based on community advice.

Parts Suppliers and Retailers

Sourcing replacement parts for your Abu Garcia reel is crucial for successful repairs, and several suppliers specialize in providing genuine and aftermarket components. Identifying the correct part relies heavily on accurate interpretation of the parts diagram, ensuring compatibility with your specific reel model.

While the official Abu Garcia website is a primary source, numerous retailers offer a wider selection and potentially competitive pricing. Online marketplaces and dedicated fishing tackle shops often stock a comprehensive range of parts. Consider exploring specialized retailers known for their expertise in reel repair.

Be mindful of part numbers and specifications when ordering, cross-referencing them with the diagram to avoid errors. ABU for business (bussiness4abugmail.com) may offer business solutions, but direct parts purchasing is typically through retailers.

waiver of subrogation form pdf

Waiver of Subrogation Form PDF: A Comprehensive Guide (Updated 12/03/2025)

Understanding waiver of subrogation forms (PDF) is crucial for businesses and insureds navigating contracts, as boilerplate legal terms significantly impact risk allocation and insurance claims․

These forms, often found within broader agreements, dictate the right of an insurer to pursue a third party after paying a claim, a concept explored in cases like Ace American Insurance Co․ v․ American Medical Plumbing․

Downloading PDF templates and comprehending standard language, as highlighted by Investopedia and AIA contract provisions, is essential for effective negotiation and dispute prevention, especially considering potential multi-million dollar claims․

What is a Waiver of Subrogation?

A waiver of subrogation is a contractual provision where an insurer agrees to relinquish its right to pursue a third party for recovery of payments made on a claim, a concept frequently encountered when reviewing waiver of subrogation form PDF documents․

Essentially, it prevents the insurance company from “stepping into the shoes” of its insured to sue someone else responsible for the loss, as discussed in relation to broker/customer arrangements and additional insureds․

This agreement is commonly embedded within contracts – construction agreements, lease agreements, and various business arrangements – and is often presented as boilerplate legal language․

Caroline Banton of Investopedia clarifies that these waivers are integral to risk allocation, impacting insurance premiums and potential litigation․ Understanding this concept is vital when examining a waiver of subrogation form PDF, particularly concerning enforcement as seen in New Jersey and Maryland court cases․

The core function is to shift the risk of loss, preventing insurers from seeking reimbursement from responsible third parties, a practice with significant financial implications, as demonstrated by the $80 million claim example․

The Core Concept: Preventing Insurance Claim Recourse

The fundamental principle behind a waiver of subrogation, often detailed within a waiver of subrogation form PDF, is to eliminate an insurer’s right to seek reimbursement from a responsible third party after settling a claim with its insured․

This prevents the “recourse” action typically available to insurers, effectively transferring the risk of loss to the parties agreeing to the waiver, a point highlighted in discussions surrounding AIA contracts and Maryland court rulings․

Instead of pursuing a claim against the at-fault party, the insurer absorbs the loss, impacting potential premium adjustments and influencing negotiation strategies․

The Ace American Insurance Co․ v․ American Medical Plumbing case exemplifies this, demonstrating the legal complexities surrounding waiver enforcement․

Essentially, the waiver acts as a pre-negotiated agreement, defining who bears the financial burden of a loss, a critical consideration when reviewing any waiver of subrogation form PDF, especially in construction and lease contexts․

Why are Waivers of Subrogation Required?

Waivers of subrogation, often formalized in a waiver of subrogation form PDF, are frequently demanded in contracts to allocate risk and streamline dispute resolution, particularly in scenarios involving multiple parties and potential liabilities․

Brokers and customers often require them as a condition of doing business, as noted by Todd Dills, shifting the responsibility for certain losses away from the insurer and onto the contracting parties․

This is common in construction, lease agreements, and arrangements where additional insured status is granted, preventing potential conflicts and costly litigation, as illustrated by the $80 million claim example․

Essentially, they provide certainty and predictability, avoiding protracted legal battles over fault and coverage, a key consideration when analyzing a waiver of subrogation form PDF․

By precluding the insurer’s right to pursue recovery, these waivers foster smoother business relationships and minimize disruptions, aligning with the principles outlined in AIA contract provisions․

Common Scenarios Requiring a Waiver

A waiver of subrogation form PDF is commonly encountered in three primary contexts: construction contracts, lease agreements, and broker/customer arrangements involving additional insureds․ Construction projects frequently necessitate these waivers to delineate liability among owners, contractors, and subcontractors, preventing insurers from pursuing claims against each other․

Lease agreements often include them to protect landlords from claims arising from tenant activities, shifting the risk back to the tenant’s insurance․

Furthermore, brokers and customers frequently demand them, as discussed by Todd Dills, to be added as additional insureds, safeguarding them from potential lawsuits․

These scenarios highlight the practical need for a clear understanding of a waiver of subrogation form PDF, ensuring all parties are aware of their rights and obligations, especially considering potential disputes and litigation․

The prevalence of these waivers underscores their importance in modern commercial transactions․

Construction Contracts and Waivers

Within construction, a waiver of subrogation form PDF is almost ubiquitous, embedded within contracts to manage risk between project owners, general contractors, and subcontractors․ These waivers prevent insurers from pursuing cost recovery from parties involved in a construction-related incident after a claim is paid․

The Ace American Insurance Co․ v․ American Medical Plumbing case exemplifies the enforcement of these provisions, particularly concerning widely used AIA (American Institute of Architects) contract forms․

This is crucial because construction inherently carries significant risk of damage or injury, and waivers streamline the claims process by precluding inter-party lawsuits․

Careful review of the waiver language is paramount, as ambiguities can lead to disputes, potentially involving substantial sums like the $80 million claim example cited․

Properly executed waivers offer clarity and predictability in construction project risk management․

Lease Agreements and Subrogation

Waiver of subrogation form PDFs are frequently incorporated into lease agreements, particularly commercial leases, to define liability between landlords and tenants regarding property damage or injury․

These waivers typically prevent a landlord’s insurer, after paying a claim for tenant-caused damage, from pursuing the tenant directly for reimbursement, and vice versa․

Recent federal court decisions in New Jersey and Pennsylvania have addressed the enforceability of these waivers, often hinging on the specific language used and the intent of the parties․

The inclusion of a waiver shifts the risk primarily to the insurance carriers, avoiding potentially costly and disruptive litigation between landlord and tenant․

Understanding the implications of these waivers is vital for both parties, as they significantly impact insurance coverage and potential legal recourse․

Broker/Customer Arrangements & Additional Insureds

The demand for waiver of subrogation forms (PDF) is common in broker/customer arrangements, often coupled with requests to be named as an “additional insured” on the customer’s insurance policy, as discussed by Todd Dills․

Customers frequently require brokers to waive their right to recover from them, shifting the risk to the broker’s insurer, particularly concerning transportation or service-related incidents․

Careful negotiation is crucial, as accepting these terms can significantly impact a broker’s insurance premiums and coverage, potentially leading to disputes if claims arise․

The enforceability of these waivers, like those in lease agreements, is subject to legal scrutiny, with courts examining the clarity and intent of the contractual language․

Understanding the interplay between waivers of subrogation and additional insured status is essential for brokers to protect their interests and manage risk effectively․

Understanding the Legal Framework

Legal precedents, like Ace American Insurance Co․ v․ American Medical Plumbing, and recent federal court rulings, define waiver of subrogation enforceability, impacting PDF form interpretation․

Ace American Insurance Co․ v․ American Medical Plumbing (New Jersey Case)

The Ace American Insurance Co․ v․ American Medical Plumbing case (458 N․J․ Super․ 535, App․ Div․ 2019) represents a significant development in New Jersey law regarding waiver of subrogation enforcement․

This Appellate Division decision addressed an issue of first impression: whether a waiver of subrogation provision within a construction contract was enforceable, despite not explicitly mentioning insurance carriers․

The court ultimately ruled in favor of enforcing the waiver, establishing that clear and unambiguous waiver language, even without direct reference to insurers, can preclude an insurer’s subrogation rights․

This case underscores the importance of carefully drafted waiver of subrogation clauses in PDF forms, particularly within construction contracts, and highlights the potential for broad application of these provisions․

It serves as a cautionary tale for insurers and insureds alike, emphasizing the need to thoroughly review contract language and understand the implications of waiver provisions․

Recent Federal Court Decisions (New Jersey & Pennsylvania)

Recent federal court rulings in New Jersey and Pennsylvania demonstrate a trend of upholding waiver of subrogation provisions, even when insurers attempt to pursue claims against responsible third parties․

These decisions involved insurers seeking to recover damages paid to homeowners and lessees, highlighting the broad applicability of waivers across various insurance contexts․

The courts refused to dismiss the subrogation claims filed by the insurers, reinforcing the principle that a valid waiver, as documented in a PDF form, can effectively extinguish an insurer’s right to pursue recovery․

These cases emphasize the critical importance of precise language within waiver of subrogation agreements, and the courts’ willingness to enforce those agreements based on their clear terms․

They serve as a reminder that a properly executed waiver in a PDF document can significantly impact an insurer’s ability to recoup losses, even in situations involving substantial damages․

Maryland Court of Appeals & AIA Contracts

The Maryland Court of Appeals addressed the enforceability of mutual waiver of subrogation provisions within American Institute of Architects (AIA) contracts, a common framework in construction projects․

The court held that when a party to an AIA contract sues or settles with a third party, the mutual waiver clause is triggered, preventing either party from pursuing subrogation claims against the other․

This ruling clarifies the scope of these waivers within the context of AIA contracts, emphasizing the importance of understanding the interplay between contract language and subrogation rights․

The decision underscores that a waiver of subrogation, often documented in a PDF form accompanying the AIA contract, is binding and enforceable when the specified conditions are met․

This case highlights the need for careful review of AIA contract provisions, particularly regarding waivers, to ensure a clear understanding of risk allocation and potential limitations on insurance recovery․

Enforcement of Waiver Provisions: Key Considerations

Successfully enforcing waiver of subrogation provisions, often detailed in a PDF form, hinges on several critical factors, as demonstrated in cases like Ace American Insurance Co․ v․ American Medical Plumbing․

Clear and unambiguous language is paramount; vague or poorly drafted waivers are susceptible to challenge․ Courts scrutinize the specific wording to determine the intent of the parties․

The scope of the waiver must be clearly defined, specifying the types of claims and losses covered․ Broad language is generally favored, but must be reasonable․

Consideration is essential; the waiver must be supported by valid contractual consideration․ This is typically the exchange of promises within the underlying agreement․

Understanding applicable state law is crucial, as enforcement principles vary by jurisdiction․ Recent federal court decisions in New Jersey and Pennsylvania illustrate this point․

The Anatomy of a Waiver of Subrogation Form (PDF)

A valid waiver (PDF) contains essential elements, standard language, and specific clauses defining the scope of subrogation rights relinquished, impacting insurance claims and risk․

Essential Elements of a Valid Waiver

Establishing a legally sound waiver of subrogation requires meticulous attention to detail․ As demonstrated in Ace American Insurance Co․ v․ American Medical Plumbing, New Jersey courts emphasize clear and unambiguous language․ The form must explicitly identify the parties involved – the insured, the insurer, and the third party potentially responsible for damages․

A clear description of the underlying contract or agreement is vital, specifying the scope of work or services covered by the waiver․ The waiver must demonstrate intentional relinquishment of subrogation rights, meaning the insurer knowingly and voluntarily gives up its right to pursue recovery from the third party․

Consideration is another key element; the waiver must be supported by something of value exchanged between the parties․ Finally, proper execution – signatures and dates – are essential for enforceability, ensuring a documented agreement as highlighted by practical implications and potential litigation scenarios․

Standard Language & Boilerplate Terms

Waiver of subrogation forms frequently employ standardized language and boilerplate terms, often appearing as pre-printed clauses within broader contracts․ These commonly include phrases like “waives all rights of recovery” or “releases any and all claims” against specified parties․ However, as noted in discussions surrounding broker/customer arrangements, relying solely on boilerplate can be risky․

Typical terms address the scope of the waiver – whether it applies to all claims or is limited to specific types of losses․ Indemnification clauses often accompany waivers, requiring one party to protect another from financial harm․ “Additional insured” provisions, frequently demanded by brokers, can intersect with waiver language, creating complex legal implications․

Careful review is crucial; seemingly innocuous boilerplate can significantly alter risk allocation․ Understanding these standard terms, as Investopedia explains, is vital for effective negotiation and preventing unintended consequences, particularly in construction and lease agreements․

Specific Clauses to Look For

When reviewing a waiver of subrogation form (PDF), several specific clauses demand close attention․ Look for precise definitions of “insured,” “claim,” and “covered losses” to understand the waiver’s scope․ Pay attention to any exclusions – circumstances where the waiver doesn’t apply, potentially negating its intended effect․

Clauses addressing “intentional acts” are critical; waivers often exclude claims arising from willful misconduct․ Examine language regarding “related claims” – does the waiver extend to issues connected to the primary claim? The AIA contract provisions often contain specific wording regarding these scenarios․

Furthermore, scrutinize clauses concerning notice requirements – are there deadlines for notifying parties of a waiver? As highlighted by the Ace American Insurance Co․ v․ American Medical Plumbing case, ambiguous language can lead to disputes, emphasizing the need for clarity and precision in these clauses․

Sample Waiver of Subrogation Forms

Accessing sample waiver of subrogation forms (PDF) is invaluable for understanding practical application․ Forms vary depending on the context – owner/lessor arrangements differ significantly from those for organizations like a Kiwanis Club․ These samples demonstrate standard language and formatting, providing a baseline for comparison․

The provided samples illustrate key elements: identification of parties, a clear statement waiving subrogation rights, and specific details regarding covered claims․ Reviewing these examples helps identify potential gaps or ambiguities in custom-drafted waivers․

Remember that these are templates; legal counsel should always review and adapt them to specific circumstances․ Understanding the nuances of these forms, as discussed in relation to AIA contracts, is crucial for mitigating risk and ensuring enforceability, particularly given the potential for substantial claims, as seen in the $80 million case study․

Sample for Owner/Lessor

A waiver of subrogation form (PDF) for owners/lessors typically addresses potential liability arising from tenant activities․ This sample clarifies that the landlord’s insurance will not seek recovery from the tenant’s insurance for damages caused by the tenant, or their guests, even if the landlord pays a claim․

The form explicitly waives the owner’s right to subrogation against the tenant, covering property damage and potentially bodily injury․ It’s crucial this waiver is mutual, protecting both parties․ The language should be clear and unambiguous, referencing the specific lease agreement it applies to․

Reviewing case law, like Ace American Insurance Co․ v․ American Medical Plumbing, highlights the importance of precise wording․ This sample serves as a starting point, but legal counsel should tailor it to the specific lease terms and jurisdictional requirements, ensuring enforceability and minimizing potential disputes․

Sample for Kiwanis Club

A waiver of subrogation form (PDF) for a Kiwanis Club, often a non-profit organization renting space, focuses on limiting liability for events held on their premises․ This sample clarifies that if a participant is injured or property is damaged during a Kiwanis event, the club’s insurer won’t pursue claims against event attendees or their insurance․

The form typically covers incidents arising from the use of the facility, explicitly waiving the club’s right to subrogation․ It’s vital to specify the scope of activities covered, ensuring clarity for all parties involved․ Clear language is paramount, avoiding ambiguity that could lead to legal challenges․

Considering recent federal court decisions, precise wording is essential for enforceability․ This sample provides a foundation, but legal review is crucial to align with local regulations and protect the Kiwanis Club from potential financial repercussions, especially regarding large-scale events․

Practical Implications & Considerations

Waivers impact insurance premiums and necessitate careful negotiation of terms, potentially leading to disputes and litigation, as seen in the $80 million claim example․

Impact on Insurance Premiums

The inclusion of a waiver of subrogation within a contract can demonstrably affect insurance premiums, though the extent of this impact varies based on several factors․ Insurers view waivers as increasing their risk exposure, as they relinquish the right to recover claim payments from responsible third parties․

Consequently, insurers may adjust premiums upwards to compensate for this heightened risk, particularly in industries prone to substantial claims, like construction or property leasing․ However, the premium increase isn’t always direct or proportional․

Factors such as the overall risk profile of the insured, the specific terms of the waiver, and the competitive insurance market all play a role․ Some insurers may offer discounts for risk management practices that mitigate the impact of the waiver, while others may simply decline to underwrite the risk altogether․

Careful consideration of these premium implications is vital during contract negotiation, balancing the cost of the waiver against the potential benefits of securing a favorable contractual arrangement․

Negotiating Waiver Terms

Successfully negotiating waiver of subrogation terms requires a strategic approach, understanding the potential implications for all parties involved․ As highlighted by discussions surrounding broker/customer arrangements, demands for waivers are common, but not always non-negotiable․

Insureds should carefully review the scope of the waiver, seeking to limit its application to specific occurrences or types of losses․ For example, carving out exceptions for intentional acts or gross negligence can protect the insurer’s right to pursue recovery in certain situations․

Reciprocal waivers, where both parties agree to waive subrogation rights against each other, are often a fair compromise․

Legal counsel is invaluable during this process, ensuring the waiver language is clear, unambiguous, and enforceable, referencing precedents like those established in Ace American Insurance Co․ v․ American Medical Plumbing to strengthen negotiating positions․

Potential Disputes & Litigation

Despite careful drafting, disputes surrounding waiver of subrogation provisions frequently arise, often leading to litigation․ Recent federal court decisions in New Jersey and Pennsylvania demonstrate insurers’ willingness to challenge waivers when subrogation rights are perceived as unjustly relinquished․

Common areas of contention include ambiguity in the waiver language, the scope of the waiver, and whether the underlying claim falls within the waiver’s coverage․ The $80 million claim example illustrates the high stakes involved, where insurers aggressively pursued recovery despite a waiver․

Enforcement hinges on demonstrating clear and unequivocal intent to waive subrogation rights, as affirmed in cases like Ace American Insurance Co․ v․ American Medical Plumbing․

Litigation can be costly and time-consuming, emphasizing the importance of proactive risk management and seeking legal counsel to clarify potential ambiguities before disputes escalate․

The $80 Million Claim Example: A Case Study

This case vividly demonstrates the significant financial implications tied to waiver of subrogation clauses within contracts․ After an explosion and fire caused extensive damage – totaling approximately $80 million – to a glass manufacturing plant’s furnace and equipment, the insurer attempted to recover costs․

Despite having paid out the substantial claim, the insurer’s subrogation efforts were unsuccessful, highlighting the binding nature of a properly executed waiver․ This scenario underscores the critical importance of thoroughly reviewing waiver provisions before signing agreements․

The case serves as a cautionary tale, illustrating how a seemingly standard clause can prevent the recovery of a massive sum․ It emphasizes the need for careful consideration of risk allocation and potential exposure when negotiating contract terms․

Ultimately, this example reinforces the value of proactive legal review and a clear understanding of the implications of waiving subrogation rights․

Resources & Further Information

Explore Investopedia’s detailed coverage and the American Institute of Architects (AIA) contract provisions for deeper insights․ Downloadable PDF templates are readily available online․

Investopedia’s Coverage of Waivers of Subrogation

Investopedia provides a comprehensive overview of waivers of subrogation, explaining their function as contractual provisions altering the standard rights of insurers․ Caroline Banton, a business and finance writer, clarifies that these waivers impact an insurer’s ability to recover claim payments from responsible third parties․

The platform details how these agreements are commonly embedded within broader business contracts, covering aspects like price, payment terms, and delivery schedules․ Investopedia emphasizes the importance of understanding boilerplate legal terms, as they significantly influence risk allocation․

Ebony Howard, a certified public accountant and Investopedia contributor, further elucidates the concept, making it accessible to a wider audience․ Their coverage highlights the practical implications for insureds and their customers, stressing the need for careful review and negotiation of waiver clauses within contracts․ Investopedia’s resources serve as a valuable starting point for anyone seeking to understand the nuances of these agreements․

American Institute of Architects (AIA) Contract Provisions

The American Institute of Architects (AIA) contracts frequently include mutual waiver of subrogation provisions, a topic recently addressed by the Maryland Court of Appeals․ These provisions, standard in many construction agreements, dictate how insurance claims are handled when third parties are involved․

Specifically, the court ruled that if one party to an AIA contract sues or settles with a third party, the waiver applies to both parties involved․ This means neither can pursue a subrogation claim against the other’s insurer․

An appellate court in New Jersey affirmed a trial court’s decision regarding the enforcement of waiver-of-subrogation provisions within a widely used AIA form construction contract․ Understanding these provisions is critical for owners, contractors, and insurers involved in construction projects․ Careful review of AIA contract language is essential to avoid disputes and ensure clear understanding of risk allocation․

Finding and Downloading PDF Templates

Locating reliable waiver of subrogation form PDF templates is a crucial step for businesses and individuals needing to implement these agreements․ While numerous sources offer templates online, verifying their legal validity and suitability for your specific situation is paramount․

Resources like legal document providers and insurance industry websites often host downloadable forms․ However, it’s essential to ensure the template complies with the laws of your jurisdiction, as requirements vary by state, as demonstrated in cases from New Jersey and Pennsylvania;

Sample forms for specific scenarios, such as owner/lessor or Kiwanis Club agreements, are available, but customization may be necessary․ Consulting with legal counsel before using any downloaded template is highly recommended to guarantee it adequately protects your interests and avoids potential disputes․